Next: Introduction, Previous: (dir), Up: (dir) [Contents][Index]
Copyright © 1989-2017 Free Software Foundation, Inc.
GNU Hyperbole is available for use, modification, and distribution under the terms of the GNU General Public License (GPL) Version 3 or later, as published by the Free Software Foundation, with all rights and responsibilities thereof.
GNU Hyperbole is distributed in the hope that it will be useful, but WITHOUT ANY WARRANTY, without even the implied warranty of MERCHANTABILITY or FITNESS FOR A PARTICULAR PURPOSE.
Edition 6.0.2g
Printed November 6, 2017.

  Published by the Free Software Foundation, Inc.
  Author:    Bob Weiner
  E-mail:    <hyperbole-users@gnu.org> (This is a mail list).
  Web:       www.gnu.org/software/hyperbole
GNU Hyperbole was designed and written by Bob Weiner. See Setup, for information on how to obtain and to install Hyperbole.
This manual explains user operation and summarizes basic developer facilities of GNU Hyperbole. Hyperbole provides convenient access to information, control over its display and easy linking of items across documents and across the web. The Hyperbole Koutliner offers flexible views and structure manipulation within bodies of information.
We hope you enjoy using Hyperbole and that it improves your productivity. If it does, consider sending us a quote or short note discussing how it helps you. We may use your submission to help promote further use of Hyperbole; all submissions will be considered freely reusable and will fall under the same license as Hyperbole. E-mail your quote to <hyperbole-users@gnu.org>. We volunteer our time on Hyperbole and love to hear user stories in addition to any problem reports.
Before we delve into Hyperbole, a number of acknowledgments are in order. Peter Wegner and Morris Moore encouraged the growth of this work. Douglas Engelbart showed us the bigger picture and will forever be an inspiration. His life-long quest at augmenting individual and team capabilities represents a model from which we continue to draw. Chris Nuzum has used Hyperbole since its inception, often demonstrating its power in creative ways. Many thanks to Mats Lidell, a long-time Hyperbole user, who has helped maintain it throughout the years. The Koutliner is dedicated to my lovely wife, Kathy.
Next: Smart Keys, Previous: Top, Up: Top [Contents][Index]
This edition of the GNU Hyperbole Manual is for use with any version 6.0.2g or greater of GNU Hyperbole. Hyperbole runs atop GNU Emacs 24.3 or higher. It will trigger an error if your Emacs is older.
This chapter summarizes the structure of the rest of the manual, describes Hyperbole, lists some of its potential applications, and explains how to subscribe to its mail lists.
Throughout this manual, sequences of keystrokes are delimited by curly
braces { }, function and variable names use this typeface.
| • Manual Overview: | ||
| • Motivation: | ||
| • Hyperbole Overview: | ||
| • Mail Lists: |
Next: Motivation, Previous: Introduction, Up: Introduction [Contents][Index]
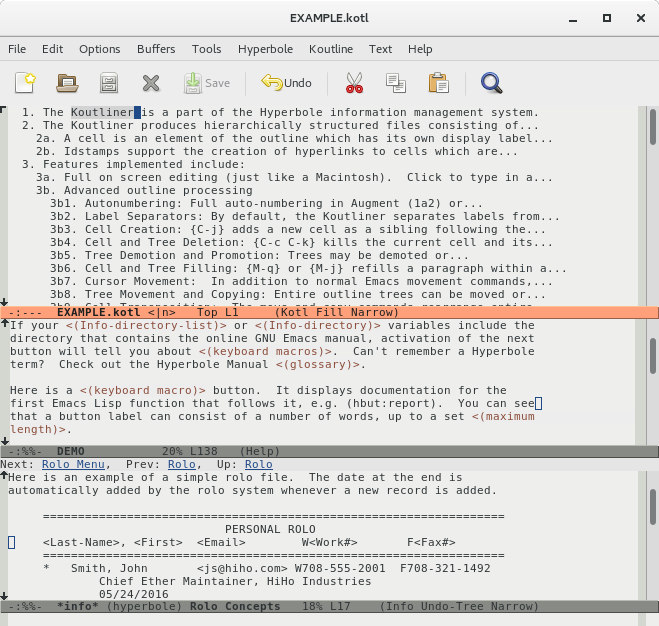
This is a reference manual with extensive details about Hyperbole use. If you prefer a simpler, more interactive introduction to Hyperbole, the DEMO file included in the Hyperbole distribution demonstrates many of Hyperbole’s standard facilities without the need to read through this reference manual. It is a good way to rapidly understand some of what Hyperbole can do for you. Once Hyperbole is installed, (see Setup), you can access the DEMO with the key sequence {C-h h d d}.
See Glossary, for definitions of Hyperbole terms. In some cases, terms are not precisely defined within the body of this manual since they are defined within the glossary. Be sure to reference the glossary if a term is unclear to you. Although you need not have a keen understanding of all of these terms, a quick scan of the glossary should help throughout Hyperbole use.
See Setup, for explanations of how to obtain, install, configure and load Hyperbole for use. This appendix includes information on user-level settings that you may want to modify after you understand Hyperbole’s basic operation.
See Suggestion or Bug Reporting, for instructions on how to ask a question, suggest a feature or report a bug in Hyperbole. A few commonly asked questions are answered in this manual, see Questions and Answers. If you are interested in classic articles on hypertext, see References.
See Smart Keys, for an explanation of the innovative, context-sensitive mouse and keyboard Action and Assist Keys offered by Hyperbole. See Smart Key Reference, for a complete reference on what the Action and Assist Keys do in each particular context that they recognize. See Smart Key Argument Selection, for how Hyperbole speeds selection of prompted for arguments.
Keep in mind as you read about using Hyperbole that in many cases, it provides a number of overlapping interaction methods that support differing work styles and hardware limitations. In such instances, you need learn only one technique that suits you.
See Buttons, for an overview of Hyperbole buttons and how to use them.
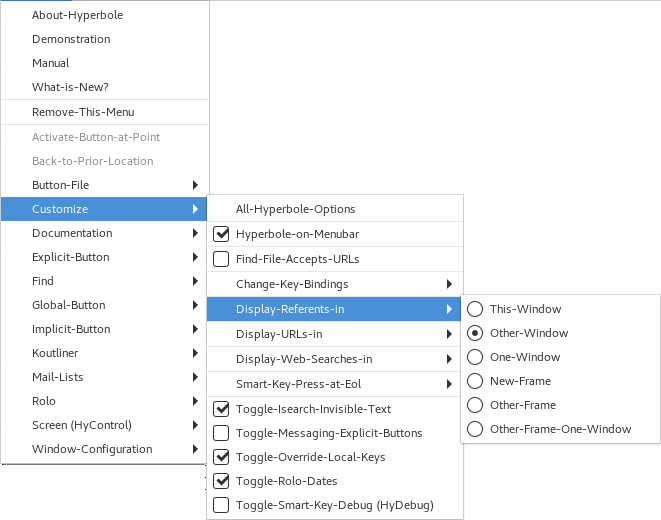
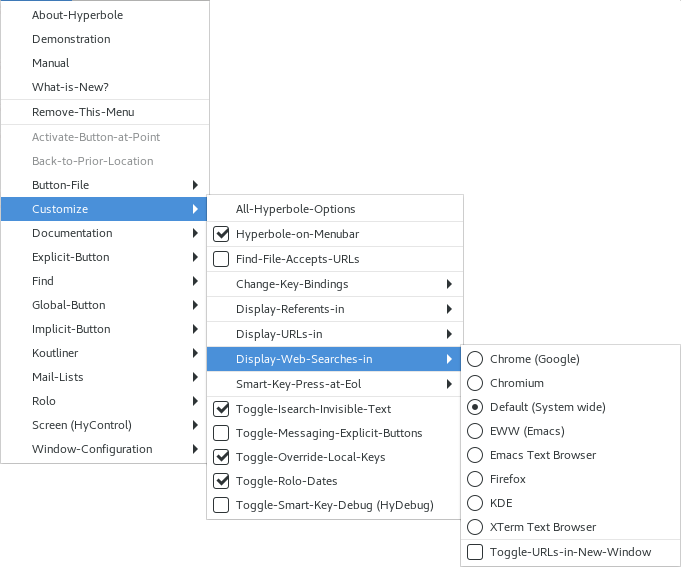
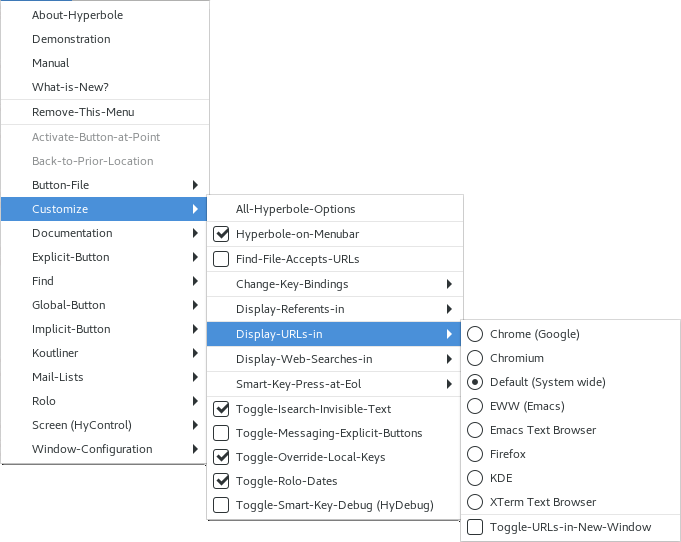
See Menus, for summaries of Hyperbole menu commands and how to use the minibuffer-based menus that work on dumb terminals, PCs or workstations.
See HyControl, for how to quickly and interactively control your Emacs windows and frames and what they display.
See Koutliner, for concept and usage information on the autonumbered, hypertextual outliner. See Koutliner Keys, for a full summary of the outliner commands that are bound to keys.
See HyRolo, for concept and usage information on the rapid lookup, hierarchical, free text record management system included with Hyperbole.
See Window Configurations, for instructions on how to save and restore the set of buffers and windows that appear within a frame. This feature lets you switch among working contexts easily, even on a dumb terminal. Such configurations last only throughout a single session of editor usage.
See Developing with Hyperbole, if you are a developer who is comfortable with Lisp.
See Future Work, for future directions in Hyperbole’s evolution.
Next: Hyperbole Overview, Previous: Manual Overview, Up: Introduction [Contents][Index]
Database vendors apply tremendous resources to help solve corporate information management problems. But the information that people deal with in their everyday worklife is seldom stored away in neatly defined database schemas. Instead it is scattered among local and remote files, e-mail messages, faxes, voice mail and web pages.
The rise of the web has demonstrated how hypertext technologies can be used to build massive organized repositories of scattered information. But assembling information for the web still remains a great challenge and the data formats of the web are too structured to deal with the great variety of information that people process. Modern web development requires the use of many languages: HTML, JavaScript, and CSS. This in itself prevents its use as the prime means of organizing and interlinking the constant flows of daily information.
GNU Hyperbole takes a distinctly different approach. It has its own hypertext technology that can interface perfectly with web links but which are much easier to create (simply drag from the source to the destination of a link to create a new hyperlink). Hyperbole hyperbuttons can link not only to static information but can perform arbitrary actions through the use of button types written in a single, highly interactive language, Emacs Lisp. Hyperbole adds all of this power to your written documents, e-mail, news articles, contact management, outlines, directory listings, and much more. Hyperbole works well with the very latest versions of GNU Emacs.
Unlock the power of GNU Hyperbole to make your information work for you. One system. One language. One manual. One solution. Learn GNU Hyperbole and start moving further, faster.
Next: Mail Lists, Previous: Motivation, Up: Introduction [Contents][Index]
GNU Hyperbole (pronounced Ga-new Hi-per-bo-lee), or just Hyperbole, is an efficient and programmable hypertextual information management system. It is intended for everyday work on any GNU Emacs platform. Hyperbole allows hypertext buttons to be embedded within unstructured and structured files, mail messages and news articles. It offers intuitive mouse-based control of information display within multiple windows. It also provides point-and-click access to Info manuals, ftp archives, and the World-Wide Web (WWW).
Hyperbole consists of five parts:
Hyperbole hyperlink and other kinds of buttons (explicit buttons) may be added to documents with a simple drag between windows, no markup language needed. Implicit buttons are patterns automatically recognized within text that perform actions, e.g. bug#24568 displays the bug status information for that bug number. See Buttons.
Buttons are accessed by clicking on them or referenced by name (global buttons), so they can be activated regardless of what is on screen. Users create and activate Hyperbole buttons; Emacs Lisp programmers easily can develop new button types and actions.
Hyperbole includes two special Smart Keys, the Action Key and the Assist Key, that perform an extensive array of context-sensitive operations across emacs usage, including activating and showing help for Hyperbole buttons. In many popular Emacs modes, they allow you to perform common, sometimes complex operations without having to use a different key for each operation. Just press a Smart Key and the right thing happens. See Smart Keys;
an interactive, textual information management interface, including fast, flexible file and text finding commands. A powerful, hierarchical contact manager, see HyRolo, which anyone can use, is also included. It is easy to learn since it introduces only a few new mechanisms and has a menu interface, which may be operated from the keyboard or the mouse;
the fastest, easiest-to-use window and frame control available for GNU Emacs, see HyControl. With just a few keystrokes, you can shift from increasing a window’s height by 5 lines to moving a frame by 220 pixels or immediately moving it to a screen corner. Text in each window or frame may be enlarged or shrunk (zoomed) for easy viewing, plus many other features;
an advanced outliner, see Koutliner, with multi-level autonumbering and permanent identifiers attached to each outline node for use as hypertext link anchors, per node properties and flexible view specifications that can be embedded within links or used interactively;
a set of programming libraries, see Developing with Hyperbole, for system developers who want to integrate Hyperbole with another user interface or as a back-end to a distinct system. (All of Hyperbole is written in Emacs Lisp for ease of modification. It has been engineered for real-world usage and is well structured).
Hyperbole may be used simply for browsing through documents pre-configured with Hyperbole buttons, in which case, you can safely ignore most of the information in this manual. Jump right into the Hyperbole demonstration by typing {C-h h d d}, assuming Hyperbole has been installed at your site. If you need to install Hyperbole, see Setup, for Hyperbole installation and configuration information. The demo offers a much less technical introduction to Hyperbole by supplying good examples of use.
You likely will want to do more than browse with Hyperbole, e.g. create your own buttons. The standard Hyperbole button editing user interface is Emacs-based, so a basic familiarity with the Emacs editing model is useful. The material covered in the Emacs tutorial, normally bound to {C-h t}, is more than sufficient as background. See Glossary in the GNU Emacs Manual, if some emacs-related terms are unfamiliar to you.
A Hyperbole user works with chunks of information that need to be organized, interlinked, and processed. Such chunks can be hyperbuttons, address book contacts, items in an outline, or even database query results. Hyperbole does not enforce any particular hypertext or information management model, but instead allows you to organize your information in large or small chunks as you see fit. The Hyperbole outliner organizes information into hierarchies which may also contain links to external information sources. See Koutliner.
Some of Hyperbole’s most significant features are:
Typical Hyperbole applications include:
Hyperlinks provide a variety of views into an information space. A search facility locates hyperbuttons in context and permits quick selection.
Cross-references may be embedded within documentation and code. Existing documentation may be augmented with point-and-click interfaces to link code with associated design documents, or to permit direct access to the definition of identifiers by selecting their names within code or other documents.
The Hyperbole outliner (see Koutliner) is an effective tool for capturing ideas and then quickly reorganizing them in a meaningful way. Links to related ideas are easy to create so the need to copy and paste information is greatly reduced.
Tutorials with buttons can show students how things work while explaining the concepts, e.g. an introduction to the commands available on a computer system. This technique can be much more effective than written documentation alone.
Programs that manage archives from incoming information streams may be supplemented by having them add topic-based buttons that link to the archive holdings. Users can then search and create their own links to archive entries.
Previous: Hyperbole Overview, Up: Introduction [Contents][Index]
If you use Hyperbole, you may join the mailing list <hyperbole-users@gnu.org> to discuss Hyperbole with users and maintainers. There is a separate mail list to report problems or bugs with Hyperbole, <bug-hyperbole@gnu.org>. For more details, see Suggestion or Bug Reporting.
Next: Buttons, Previous: Introduction, Up: Top [Contents][Index]
Hyperbole offers two special Smart Keys, the Action Key and the Assist Key, that perform an extensive array of context-sensitive operations across emacs usage. In many popular modes, they allow you to perform common, sometimes complex operations without having to use a different key for each operation. Just press a Smart Key and the right thing happens. This chapter explains typical uses of the Smart Keys. See Smart Key Reference, for complete descriptions of their behavior in all contexts.
| • Smart Key Bindings: | ||
| • Smart Key Operations: | ||
| • Smart Key Argument Selection: | ||
| • Smart Key Debugging: | ||
| • Smart Key Thing Selection: | ||
| • Smart Mouse Key Modeline Clicks: | ||
| • Smart Mouse Key Drags: |
Next: Smart Key Operations, Previous: Smart Keys, Up: Smart Keys [Contents][Index]
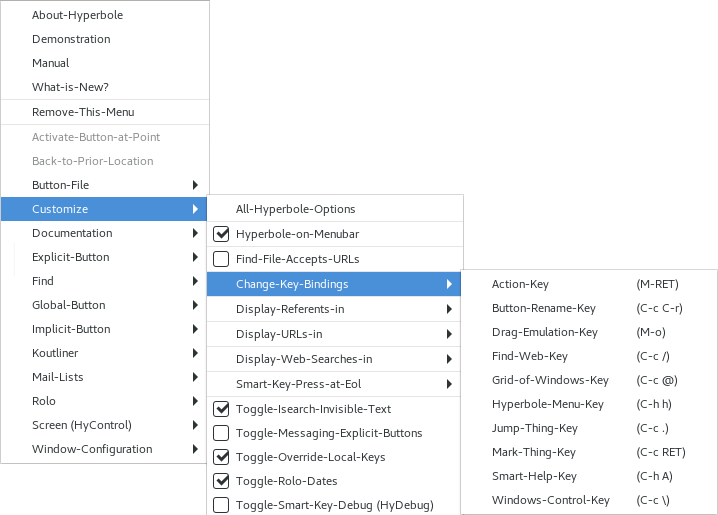
From the keyboard, {M-RET} is the Action Key and {C-u M-RET} is the Assist Key. These keys allow context-sensitive operation from any keyboard.
From the mouse, the Action Key is bound to your shift-middle mouse key (or shift-left on a 2-button mouse). The Assist Key is bound to your shift-right mouse key, assuming Hyperbole is run under an external window system.
If you set the variable, hmouse-middle-flag, to ‘t’ before
loading Hyperbole, then you may also use the middle mouse key as the Action
Key). If you want both the middle mouse key as the Action Key and the
right mouse key as the Assist Key for ease of use, then within your
personal ~/.emacs file, add: (add-hook 'hyperbole-init-hook
'hmouse-add-unshifted-smart-keys) and then restart Emacs.
If you prefer other key assignments, simply bind the commands
action-key and assist-key to keyboard keys.
Hyperbole binds {M-RET} to the command hkey-either.
It allows for a single key binding for both commands; a prefix
argument, such as {C-u}, then invokes assist-key.
You may also bind action-mouse-key and assist-mouse-key
to other mouse keys, though you won’t be able to execute mouse drag
actions with such key bindings.
Mouse configuration of the Smart Keys is automatic for GNU Emacs under Mac OS X, the X Window System and MS Windows assuming your emacs program has been built with support for any of these window systems.
If you ever need to temporarily disable the Hyperbole keyboard and mouse
bindings, use the hyperbole-toggle-bindings command. It switches
between the Hyperbole key bindings and those set prior to loading Hyperbole
and then back again if invoked once more. There is no default key binding
for this command; use {M-x hyperbole-toggle-bindings
RET}. Alternatively, you may select a key and bind it as part of any
setting of hyperbole-init-hook within your personal ~/.emacs
file. For example, (add-hook 'hyperbole-init-hook (lambda ()
(global-set-key "\C-ch" 'hyperbole-toggle-bindings))).
Next: Smart Key Argument Selection, Previous: Smart Key Bindings, Up: Smart Keys [Contents][Index]
The Action Key generally selects entities, creates links and activates buttons. The Assist Key generally provides help, such as reporting on a button’s attributes, or serves a complementary function to whatever the Action Key does within a context.
The Hyperbole Doc/SmartKeys menu entry, {C-h h d s}, displays a summary of what the Smart Keys do in all of their different contexts. Alternatively, a click of the Assist Mouse Key in the right corner of a window modeline (within the rightmost 3 characters) toggles between displaying this summary and hiding it. Reference this summary whenever you need it.
The following table is the same summary. Much of the browsing power of Hyperbole comes from the use of the Smart Keys, so spend some time practicing how to use them. Study what modeline clicks and window drag actions do as these will give you a lot of power without much effort. This table may appear daunting at first, but as you practice and notice that the Smart Keys do just a few context-sensitive things per editor mode, you will find it easy to just press or point and click and let Hyperbole do the right thing in each context.
========================================================================================
                                              Smart Keys
Context                         Action Key                 Assist Key
========================================================================================
Hyperbole
  On a minibuffer menu item     Activates item             Item help
  On an explicit button         Activates button           Button help
  Reading argument
    1st press at an arg value   Value copied to minibuffer <- same
    2nd press at an arg value   Value used as argument     <- same
    In minibuffer               Accepts minibuffer arg     Completion help
  On an implicit button         Activates button           Button help
  Within a koutline cell        Collapses and expands      Shows tree props
  Left of a koutline cell       Creates a klink            Moves a tree
  HyRolo Match Buffer           Edits entries and mails to e-mail addresses

Mouse or Keyboard Display Control
  Line end, not end of buffer
    smart-scroll-proportional
      = t   (default)           Makes curr line top line   Bottom line
      = nil                     Scrolls up a windowful     Scrolls down
  End of Any Help buffer        Restores screen to the previous state
  Read-only View Mode           Scrolls up a windowful     Scrolls wind down

Mouse-only Control
  Drag from thing start or end  Yanks thing at release     Kills thing and yanks
    A thing is a delimited                                 at release
    expression, such as a
    string, list or markup
    language tag pair

  Drag from shared window side
    or from left of scroll bar  Resizes window width       <- same
  Modeline vertical drag        Resizes window height      <- same

  Other Modeline drag to        Replaces dest. buffer      Swaps window buffers
    another window                with source buffer

  Drag to a Modeline from:
    buffer/file menu item       Displays buffer/file in    Swaps window buffers
                                  new window by release
    buffer/file menu 1st line   Moves buffer/file menu to  Swaps window buffers
                                  new window by release
    anywhere else               Displays buffer in         Swaps window buffers
                                  new window by release

  Drag between windows from:
    buffer/file menu item       Displays buffer/file in    Swaps window buffers
                                  window of button release
    buffer/file menu 1st line   Moves buffer/file menu     Swaps window buffers
    anywhere else               Creates/modifies a link    Swaps window buffers

  Drag outside of Emacs from:
    buffer/file menu item       Displays buffer/file in    Moves window to new frame
                                  a new frame
    Modeline or other window    Clones window to new frame Moves window to new frame

  Modeline Click
    Left modeline edge          Buries current buffer      Unburies bottom buffer
    Right modeline edge         Info manual browser        Smart Key summary
    Buffer ID                   Dired on buffer's dir      Next buffer
                                  or on parent when a dir
    Other blank area            Action Key modeline hook   Assist Key modeline hook
                                  Shows/Hides Buffer Menu    Popup Jump & Manage Menu

  Drag in window, region active Error, not allowed         Error, not allowed
  Horizontal drag in a window   Splits window below        Deletes window
  Vertical drag in a window     Splits window side-by-side Deletes window
  Diagonal drag in a window     Saves wconfig              Restores wconfig from ring

  Active region exists, click   Yanks region at release    Kills and yanks at release
   outside of the region

Hyperbole Key Press/Click in Special Modes
  Region Active                 Yanks region at release    Kills and yanks at release
  Emacs Push Button             Activates button           Button help
  Thing Begin or End            Mark thing region          Mark & kill thing region
  Page Directory Listing        Jumps to page              <- same
  Imenu Programming Identifier  Jumps to in-buffer def     Prompts for id to jump to
  C,C++,Objective-C,Java Modes  Jumps to id/include def    Jumps to next def
  Assembly Language Mode        Jumps to id/include def    Jumps to next def
  Java Cross-reference Tag      Jumps to identifier def    Jumps to next def
  JavaScript and Python Modes   Jumps to identifier def    Jumps to next def
  Any Lisp or Fortran Mode      Jumps to identifier def    Jumps to next def
  Emacs Lisp Compiler Error     Jumps to def with error    <- same
  Other Compiler Error          Jumps to src error line    <- same
  Grep or Occur Match           Jumps to match source line <- same
  Multi-buffer Occur Match      Jumps to match source line <- same
  Etags `TAGS' file entry       Jumps to source line       Button help
  Ctags file entry              Jumps to source line       Button help
  Texinfo Cross-reference
    Before opening brace        Jumps to Texinfo referent  Button help
    Within braces               Jumps to Info referent     Button help
    Menu Item or node hdr       Jumps to Texinfo referent  Button help
    Include file                Jumps to Texinfo referent  Button help
    code/var reference          Displays doc for referent  Button help
  Org Mode                      Follows links and cycles outline views
  Outline Major/Minor Modes     Collapses, expands, and moves outline entries
  Man Apropos                   Displays man page entry    <- same
  Man Pages                     Follows cross refs, file refs and C code refs
  I/Buffer Menu                 Saves, deletes and displays buffers

Emacs Info Reader
  Menu Entry or Cross Ref       To referent                <- same
  Up, Next or Prev Header       To referent                To prior node
  File entry of Header          To top node                To (DIR) node
  End of current node           To next node               To previous node
  Anywhere else                 Scrolls up a windowful     Scrolls wind down

Subsystems
  Calendar                      Scrolls or shows appts     Scrolls/marks date
  GNU Debbugs Tracker           Displays issue discussion  Displays issue status
  Dired Mode                    Views and deletes files from dir listing
  GNUS News Reader              Toggles group subscriptions, gets new news,
                                  and browses articles
  Mail Reader and Summaries     Browses, deletes and expunges messages
  OO-Browser                    Browses object classes and elements
  Tar Mode                      Views and edits files from tar archive files

Any other context (defaults)    Invalid context error      Invalid context error
========================================================================================
See Smart Key Reference, for extensive reference documentation on the Smart Keys.
Note how the last line in the table explains that the default behavior of
the Smart Keys in an unknown context is to report an error. You can change
these behaviors by setting two variables. See the documentation
for the variables action-key-default-function and
assist-key-default-function for information on how to customize
the behavior of the Smart Keys within default contexts.
When you use a mouse and you want to find out what either of the Smart Keys does within a context, depress the one you want to check on and hold it down, then press the other and release as you please. A help buffer will pop up explaining the actions that will be performed in that context, if any. A press of either Smart Key at the end of that help buffer will restore your display to its configuration prior to invoking help.
On the keyboard, {C-h A} displays this same context-sensitive help for the Action Key while {C-u C-h A} displays the help for the Assist Key. Note that {C-h a} performs a function unrelated to Hyperbole, so you must press the shift key when you type the A character.
Next: Smart Key Debugging, Previous: Smart Key Operations, Up: Smart Keys [Contents][Index]
A prime design criterion of Hyperbole’s user interface is that you should be able to see what an operation will do before using it. The Assist Key typically shows you what a button or minibuffer menu item will do before you activate it. Hyperbole also displays the result of directly selecting an argument value with the Action Key, to provide feedback as to whether the correct item has been selected. A second press/click is necessary before an argument is accepted and processed.
Many Hyperbole commands prompt you for arguments. The standard
Hyperbole user interface has an extensive core of argument types that
it recognizes. Whenever Hyperbole is prompting you for an argument,
it knows the type that it needs and provides some error checking to
help you get it right. More importantly, it allows you to press the
Action Key within an entity that you want to use as an argument and it
will grab the appropriate thing and show it to you at the input prompt
within the minibuffer. If you press (click with a mouse) the Action
Key on the same thing again, it accepts the entity as the argument
and moves on. Thus, a double click registers a desired argument.
Double-quoted strings, pathnames, mail messages, Info nodes, dired
listings, buffers, numbers, completion items and so forth are all
recognized at appropriate times. All of the argument types mentioned
in the documentation for the Emacs Lisp interactive function
are recognized. Experiment a little and you will quickly get used to
this direct selection technique.
Wherever possible, standard Emacs completion is offered, as described in Completion in the GNU Emacs Manual. Remember to use {?} to see what your possibilities for an argument are. Once you have a list of possible completions on screen, press the Action Key twice on any item to enter it as the argument.
Next: Smart Key Thing Selection, Previous: Smart Key Argument Selection, Up: Smart Keys [Contents][Index]
Typically, {C-h A} and {C-u C-h A} which show Action and Assist Key help for the current context, are sufficient for seeing how the Smart Keys behave no matter where they are used.
However, if a Smart Key ever behaves differently than you think it should or if you want to test how the Smart Keys respond in a new context, then the Smart Key debugging flag may be of use. You toggle it on and off with {C-h h c d} (minibuffer menu Cust/Debug-Toggle). Once enabled, this displays a message in the minibuffer each time the Action or Assist Key is released, showing the context of the press and its associated action, so you can see exactly what is happening whenever you use a Smart Key. These messages are all prefaced with “(HyDebug)” and logged to the “*Messages*” buffer for later viewing.
If you do find a problem with the Smart Keys and want to report a bug, use {C-h h m r} to compose an email message to the bug-hyperbole list. Hyperbole will automatically include all of the “(HyDebug)” messages from your current emacs session into your email. Similarly, when you compose an email to the hyperbole-users mailing list with {C-h h m c}, these messages are also included.
Next: Smart Mouse Key Modeline Clicks, Previous: Smart Key Debugging, Up: Smart Keys [Contents][Index]
Hyperbole has some radically cool ways to select regions of structured text or source code and to copy or move them between buffers with a single mouse drag or two key presses. A great deal of smarts are built-in so that it does the right thing most of the time; many other attempts at similar behavior such as thing.el fail to deal with many file format complexities.
We use the term things to refer to structured entities that Hyperbole can select. These include: delimited pairs of (), {}, <>, [] and quote marks, source code functions, source code comments and matching tag pairs in HTML and SGML modes. Delimited things are those things that contain a selectable delimiter such as an opening parenthesis.
The best way to mark a delimited thing is to move your cursor to the starting delimiter of the thing and then press the Action Key. Typically, you will see the thing highlight. You can then operate upon it as you would any Emacs region. In many cases, you can do the same thing upon the closing delimiter, but this is not as reliable. An Action Key press on the start of an HTML or SGML tag pair marks the entire region span of the pair. If you use the Assist Key instead, it will mark and kill (delete) the thing.
Even better are Smart Mouse Key drags which let you copy or move delimited things in one operation without even highlighting them. To copy, simply drag with the Action Key from a thing’s opening delimiter and release somewhere outside of the thing, either within the same window or within another window. The thing will be copied to the point of release. If you want to move a thing, simply perform the same drag but with the Assist Mouse Key. Ensure that you do not move any explicit buttons from one buffer to another as that does not work.
Try out some of these operations in HTML or source code files to see how they can speed your editing.
Hyperbole also binds two convenience keys for working with things.
The first such key is {C-c RET} hui-select-thing which
selects bigger and bigger syntactic regions with each successive use.
Double or triple clicks of the Selection Key (left mouse key) do the same
thing. The first press selects a region based upon the character at point.
For example, with point over an opening or closing grouping character, such
as { or }, the whole grouping is selected, e.g. a C function. When on an
_ or - within a programming language identifier name, the whole name is
selected. The type of selection is displayed in the minibuffer as
feedback. When using a language in which indentation determines nesting
level like Python, a double click on the first alpha character of a line,
such as an if statement, selects the current clause (until the next line at
the same or lesser indentation). Use {C-g} to unmark the region when
done. Use, hui-select-thing-with-mouse if you want to bind this to
a different mouse key to use single clicks instead of double clicks.
The second convenience key is bound only in HTML/web mode. {C-c
.} hui-select-goto-matching-tag jumps between the opening and
closing tag of a pair. It moves point to the start of the tag paired
with the closest tag that point is within or which it precedes. A
second press moves point to the matching tag of the pair, allowing you
to quickly jump back and forth between opening and closing tags.
Next: Smart Mouse Key Drags, Previous: Smart Key Thing Selection, Up: Smart Keys [Contents][Index]
Smart Mouse Key clicks on a window’s modeline offer many powerful browsing features, including directory editing (dired), user manual browsing, and window, buffer and frame selection. Generally, only Hyperbole-specific modeline actions are discussed herein.
Action Key clicks on the first (usually blank) character of the modeline bury the current buffer in the buffer list and display the next buffer in the list. Assist Key clicks do the reverse and unbury the bottom buffer.
A similar effect can be achieved with the standard Emacs mouse 1 (left) and 3 (right) buttons on the Buffer ID element of modeline to cycle through previous and next buffers, respectively. This may be easier to use since you can click anywhere on the buffer identifier.
On the left part of the modeline is the buffer identification, generally the name of the buffer in use. An Action Key click on that switches the window to edit the buffer’s directory using dired. Then Action Key clicks on directory items in the dired buffer display the items selected in other windows. An Action Key drag from an item to another window displays the item in that window.
An Action Key click on the first line in a dired buffer which contains the current directory path, specifically on any ancestor part of the path (the part to the left of the click point), starts another dired session on the ancestor directory. Click at the end of this line to end the dired session (bury its buffer).
An Action Mouse Key click in a blank area of a window modeline (away from left and right edges) toggles between displaying and hiding a list of all buffers. Once displayed, an Action Key click on a buffer item will display it in another window. You can drag items to specific windows for display as well.
Alternatively, you may (1) display the buffer menu, (2) use its {m}
command to mark buffers, and (3) use the Hyperbole {@} command to
display the marked buffers in a grid of popup windows whose number of
rows and columns you specify at the prompt or via a prefix argument.
This also works in ibuffer-menu and dired modes.
See HyControl.
An Assist Key click in the blank area of the modeline displays a quick access menu of display-oriented commands. You can jump to buffers categorized by major mode, jump to windows by buffer name, or to frames by name. Manage your windows and frames quickly with this menu as well. As always with Hyperbole, just try it and you’ll begin to wonder how you lived without it before.
A click of the Action Mouse Key in the right corner of a window modeline (within the rightmost 3 characters) displays or hides the GNU Info Manual Browser, giving you quick point and click access to an amazing wealth of documentation, since the Action Key also browses through these manuals and follows their hyperlinked cross-references. A click of the Assist Key in the same location displays or hides the Smart Key summary, as noted earlier.
Hyperbole modeline mouse click actions are controlled by the two functions,
action-key-modeline and assist-key-modeline. If you know
a little Emacs Lisp you can change these to do whatever you like. When a
Smart Key press is on a blank part of a modeline but not at the left or
right, the function given by one of these two variables is
executed: action-key-modeline-function or
assist-key-modeline-function. By default, the Action Key toggles
between displaying and hiding the buffer menu. If you like the more
advanced features of Ibuffer Mode, you can change the buffer menu to
use that with the following in your Emacs initialization file:
(setq action-key-modeline-function #'hmouse-context-ibuffer-menu).
To set it back to the default use:
(setq action-key-modeline-function #'hmouse-context-menu).
The default assist-key-modeline-function is to pop up a menu of
convenient screen commands that lets you select buffers grouped by
major mode, use HyControl, or jump to specific windows, window
configurations or frames. If you would prefer it runs the directory
editor dired on the directory associated with the window of the
modeline press, use this: (setq assist-key-modeline-function #'dired-jump).
To set it back to the default use:
(setq assist-key-modeline-function #'hui-menu-screen-commands).
These variables may also be changed permanently with the Emacs
interactive customization interface. Use {M-x customize-variable
RET assist-key-modeline-function RET}. In the Assist
Modeline Function text field that appears, change the value
to dired-jump. Then press the “Apply and Save” button.
Previous: Smart Mouse Key Modeline Clicks, Up: Smart Keys [Contents][Index]
As mentioned in the section on Thing Selection, Hyperbole Smart Mouse Key drag actions can be quite useful. This section summarizes other drag contexts and actions; for complete documentation, see Smart Mouse Keys.
| • Creating and Deleting Windows: | ||
| • Saving and Restoring Window Configurations: | ||
| • Resizing Windows: | ||
| • Dragging Buffers: |
Next: Saving and Restoring Window Configurations, Previous: Smart Mouse Key Drags, Up: Smart Mouse Key Drags [Contents][Index]
Horizontal and vertical drags of the Smart Mouse Keys are used to split and delete Emacs windows.
An Action Mouse Key horizontal drag of five or more characters in either direction within a single window creates a new window by splitting the current window into two windows, one atop the other. An Action Mouse Key vertical drag in either direction splits the current window into two side-by-side windows. A horizontal or vertical drag of the Assist Mouse Key within a single window, deletes that window.
If you split windows many times and then delete a number of the windows, you’ll be left with windows of differing heights. Use {C-x +} to re-balance the sizes of the remaining windows, so they are fairly even.
Next: Resizing Windows, Previous: Creating and Deleting Windows, Up: Smart Mouse Key Drags [Contents][Index]
A window configuration consists of the set of windows within a single Emacs frame. This includes their locations, buffers, and the scrolled positions of their buffers.
Hyperbole allows you to save and restore window configurations with simple diagonal mouse drags within a single window. A diagonal drag in any direction of the Action Key saves the current window configuration to a ring of window configurations, just like the Emacs text kill ring. (See Kill Ring in the Emacs Manual). Each diagonal drag in any direction of the Assist Key restores a prior saved window configuration from the ring. Window configurations are restored in reverse order of the way they were saved. Since a ring is circular, after the oldest element is restored, the newest element will again be restored and so on.
Next: Dragging Buffers, Previous: Saving and Restoring Window Configurations, Up: Smart Mouse Key Drags [Contents][Index]
Emacs windows may be resized by dragging their window separators (modelines or vertical side lines) within a frame. Simply depress either Smart Mouse Key on a modeline or near a window side, hold it down while you drag to a new location and then release. The window separator will then jump to the location of release. Basically, just drag the window separator to where you want it. Nowadays a better version of Emacs window resizing exists on the left mouse key. A drag with this key from a blank area of a modeline or a window side divider shows visible feedback as the window is resized. But if you are always using the Smart Mouse Keys, you may prefer to use them for resizing windows as well.
Note that you cannot drag the bottom-most modeline; you would have to resize the frame to move the bottom of that window up.
Previous: Resizing Windows, Up: Smart Mouse Key Drags [Contents][Index]
Smart Mouse Key drags let you display buffers and windows however you want them. Dired and buffer-menu items may also be displayed in specific locations with drags. Below we explore these drag actions.
| • Swapping Buffers: | ||
| • Displaying Buffers: | ||
| • Cloning Windows: | ||
| • Displaying File and Buffer Items: |
Next: Displaying Buffers, Previous: Dragging Buffers, Up: Dragging Buffers [Contents][Index]
Swapping buffer locations is quick and easy with Hyperbole. Simply drag from one window to another with the Assist Key (not the Action Key). This works across frames as well.
If you have just two windows in an Emacs frame, you can swap their buffers from the keyboard. Use this Hyperbole minibuffer menu key sequence involving the tilde key to swap the buffers and quit from the Hyperbole minibuffer menu: {C-h h s w ~ q}.
Next: Cloning Windows, Previous: Swapping Buffers, Up: Dragging Buffers [Contents][Index]
What if you want to display the same buffer in another window and not swap buffers? Depress the Action Mouse Key in the open area of the modeline of the source window and drag to the text area of the destination window. Voila, the buffer appears in the new location as well as the old one.
If you want a new window where you release (so the original destination window’s buffer stays onscreen), just drag to a window’s modeline; that window will be split before the buffer is displayed.
Next: Displaying File and Buffer Items, Previous: Displaying Buffers, Up: Dragging Buffers [Contents][Index]
To clone a window with its buffer to a new frame, simply drag the Action Mouse Key from the window to outside of Emacs and release the key. A new frame will be created, selected and sized according to the original window. Do the same thing with the Assist Mouse Key and the original window will be deleted as well, unless it is the only window in that frame.
Previous: Cloning Windows, Up: Dragging Buffers [Contents][Index]
You can do the same thing with items in dired, buffer menu and ibuffer menus rather than buffers themselves. Drag with the Action Mouse Key and the selected item will be displayed in any Emacs window in which you release. Drag outside Emacs and it will be displayed in a new frame.
So now you can put a bunch of buffers and files on your screen wherever you like. Typically, a brief visual pulse is shown first at the source item and then in the whole destination window, to help you see that the transfer has been made. An Assist Key Drag will move the the item list buffer to the destination (swapping buffers), just as it does with other buffers.
Next: Menus, Previous: Smart Keys, Up: Top [Contents][Index]
This chapter explains use of Hyperbole buttons. There are several kinds of Hyperbole buttons: buttons that are created one at a time and stored in files (explicit buttons); buttons that can be activated by name anytime (global buttons); and buttons defined by textual patterns where one definition can create an infinite number of buttons (implicit buttons).
Hyperbole buttons are embedded within textual documents; they may be created, modified, moved or deleted. Each button performs a specific action, such as linking to a file or executing a shell command.
There are three categories of Hyperbole buttons:
created by Hyperbole, accessible from within a single document;
created by Hyperbole, specific to each user, and accessible anywhere within a user’s network of documents;
created and managed by other programs or embedded within the structure of a document, accessible from within a single document. Hyperbole recognizes implicit buttons by contextual patterns given in their type specifications (explained later).
Explicit Hyperbole buttons may be embedded within any type of text file. Implicit buttons may appear only within document contexts allowed by their types, which may limit the kinds of documents or the locations within those documents at which such buttons may be found. All global buttons for a user are stored in a single location and are activated by typing their names, rather than by direct selection, the means used to activate explicit and implicit buttons.
To summarize:
Button Category   Active Within        Activation Means      Managed By
========================================================================
Explicit          a single document    direct selection      Hyperbole
Global            any document         typing its name       Hyperbole
Implicit          a matching context   direct selection      other tools
A click on a Hyperbole button may activate it or describe its actions, depending on which mouse key is used. Buttons may also be activated from a keyboard. (In fact, many Hyperbole operations, including menu usage, may be performed from any standard character terminal interface, so you need not be anchored to a desktop all day). See Smart Keys. There is also a key that shows you how a button will behave before you activate it, see Smart Key Operations.
| • Explicit Buttons: | ||
| • Global Buttons: | ||
| • Implicit Buttons: | ||
| • Button Files: | ||
| • Action Types: | ||
| • Button Type Precedence: | ||
| • Utilizing Explicit Buttons: |
Next: Global Buttons, Previous: Buttons, Up: Buttons [Contents][Index]
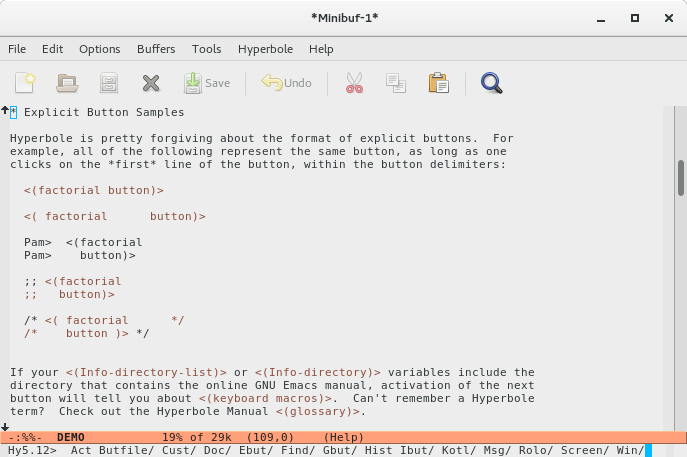
Hyperbole creates and manages explicit buttons which perform specific actions when activated (typically through a button press). They look like this ‘<(fake button)>’. They are quickly recognizable, yet relatively non-distracting as you scan the text in which they are embedded. The text between the ‘<(’ and ‘)>’ delimiters is called the button label or button name. Spacing between words within a button label is irrelevant to Hyperbole. Button labels may wrap across several lines without causing a problem; just be sure to select the first line of the button to activate it.
Explicit buttons may be added to any editable text file; for source code files, simply place buttons within comments. Buttons that you use for quick navigation to websites or other things you do often should be added to your personal button file. See Button Files.
Explicit buttons may be freely moved about within the buffer in which they are created. (No present support exists for moving buttons between buffers; support the Hyperbole project if you would like to help make this happen). A single button may also appear multiple times within the same buffer; simply copy the button label with its delimiters to a new location if you need another copy of it.
For details on how to create, activate, delete or modify explicit buttons, see Utilizing Explicit Buttons.
Each explicit button is assigned an action type that determines the actions
it performs. Link action types connect buttons to particular types
of referents, the targets of their links. Link action type names all
begin with link-. Link action button referents are displayed when
such buttons are activated with a press or a click. See Action Types,
for a list of standard action types including link types.
Hyperbole does not manage referent data; this is left to the applications that generate the data. This means that Hyperbole provides in-place linking and does not require reformatting data to integrate it with Hyperbole.
Hyperbole stores the button data that gives an explicit button its behavior, separately from the button label, in a file named .hypb (_hypb under MS Windows) within the same directory as the file in which the button is created. Thus, all files in the same directory share a common button data file. Button data is comprised of individual button attribute values. A user never sees this data in its raw form but may see a formatted version by asking for help on a button.
Next: Implicit Buttons, Previous: Explicit Buttons, Up: Buttons [Contents][Index]
Access to explicit buttons depends upon the information on your screen since they are embedded within particular buffers. Sometimes it is useful to activate buttons without regard to the information with which you are working. In such instances, you use global buttons, which are buttons that may be activated or otherwise operated upon by typing their labels/names when they are prompted for, rather than selecting the buttons within a buffer.
If you want a permanent link to a file section that you can follow at
any time, you can use a global button. Or what about an Emacs keyboard
macro that you use frequently? Create an exec-kbd-macro button
with an easy to type name and then you can activate it whenever the need
arises.
Global buttons are managed with the Hyperbole Gbut/ menu accessed with {C-h h g}. The Create item, {C-h h g c}, prompts for a global button name, an action type, and the action’s associated arguments, such as a file to link to. It then creates the button. To activate the button, use the Act menu item, {C-h h g a}. Type the button’s name and its action will be executed.
Global buttons are actually explicit buttons stored at the end of your personal button file, see Button Files. You can always go into that file and activate, edit or annotate these buttons with comments.
Emacs has a built-in feature similar to Global Buttons called Bookmarks. Bookmarks store places in files or link to URLs, so they are more limited than Hyperbole’s global buttons and cannot utilize all of Hyperbole’s capabilities for performing actions. See Bookmarks in the Emacs Manual, for details on bookmarks.
Next: Button Files, Previous: Global Buttons, Up: Buttons [Contents][Index]
Implicit buttons are virtual buttons recognized within the natural structure of a document. For example, a web URL button that displays its link or an email address button that starts a mail message to the associated address. Implicit buttons are identified by contextual patterns found within documents. An Implicit button type identifies a pattern or state that when matched triggers an action associated with the implicit button type. The action is specified by either a Hyperbole action type (see Action Types) or an Emacs Lisp function. Implicit button types may use the same action types that explicit buttons use. As an example, a pathname implicit button type would match to any existing local filename or directory name and its action would be to display the associated file or directory, typically in another window.
Unlike explicit buttons, implicit buttons have no individual button data other than their textual labels. You use implicit button types which include boolean expressions (predicates) that match to both the label and the context required of any button of the type. Each time a Smart Key is pressed at a location, Hyperbole evaluates the predicates from the list of implicit button types and the first one that evaluates true is selected and its associated action is triggered. The Ibut/Act menu item, {C-h h i a}, also activates any implicit button found at the current point.
All of this happens transparently and is easy to use once you try it. The Hyperbole Smart Keys offer additional extensive context-sensitive point-and-click type behavior beyond implicit button types. See Smart Key Operations.
Below, standard implicit button types are listed in the order in which Hyperbole tries to match to the types when looking for an implicit button; {C-h h i t RET} provides similar information. See the Hyperbole file, hibtypes.el, for complete examples of implicit button types (where they are listed in reverse in increasing order of priority).
completionInserts the completion at point (from a completions buffer) into the minibuffer or the other window.
hyp-sourceTurns source location entries following an ‘@loc>’ line in Hyperbole reports into buttons that jump to the associated location. For example, {C-h h d d C-h h e h o} summarizes the properties of the explicit buttons in the DEMO file and each button in that report buffer behaves the same as the corresponding button in the original DEMO file.
hyp-addressWithin a mail or Usenet news composer window, makes a Hyperbole
support/discussion e-mail address insert Hyperbole environment and
version information. This is useful when sending mail to a Hyperbole
discussion mail list. See also the documentation
for actypes::hyp-config. For example, an Action Mouse Key
click on <hyperbole-users@gnu.org> in a mail composer window would
activate this implicit button type.
Info-nodeMakes a "(filename)nodename" button display the associated Info node. Also makes a "(filename)itemname" button display the associated Info index item. Examples are "(hyperbole)Implicit Buttons" and “(hyperbole)C-c /”.
www-urlWhen not in an Emacs web browser buffer, follows any non-ftp URL (link) at point.
The variable, browse-url-browser-function, may be used to customize
which URL browser is called. Terse URLs which lack a protocol prefix,
like www.gnu.org, are also recognized.
gnus-push-buttonActivates GNUS-specific article push-buttons, e.g. for hiding signatures. GNUS is a news and mail reader.
texinfo-refDisplays Texinfo, Info node or help associated with Texinfo node, menu item, @xref, @pxref, @ref, @code, @findex, @var or @vindex at point. If point is within the braces of a cross-reference, the associated Info node is shown. If point is to the left of the braces but after the @ symbol and the reference is to a node within the current Texinfo file, then the Texinfo node is shown.
For @code, @findex, @var and @vindex references, the associated documentation string is displayed.
mail-addressIf on an e-mail address in a specific buffer type, compose mail to that
address in another window. Applies to the rolo match buffer, any buffer
attached to a file in hyrolo-file-list, or any buffer
with mail or rolo (case-insensitive) within its name.
patch-msgJumps to the source code associated with output from the ‘patch’ program. Patch applies diffs to source code.
elisp-compiler-msgJumps to the source code for a definition associated with an Emacs Lisp byte-compiler error message. Works when activated anywhere within an error line.
debugger-sourceJumps to the source line associated with a debugger stack frame or breakpoint line. This works with gdb, dbx, and xdb. Such lines are recognized in any buffer.
grep-msgJumps to a line associated with grep or compilation error messages. Messages are recognized in any buffer.
klinkFollows a link delimited by <> to a koutline cell.
See the documentation for actypes::link-to-kotl for valid link
specifiers.
man-aproposMakes man apropos entries (from ‘man -k’) display associated man pages when selected.
rfcRetrieves and displays an Internet rfc referenced at point. The
following formats are recognized: RFC822, rfc-822, and RFC 822. The
hpath:rfc variable specifies the location from which to
retrieve RFCs. Requires the Emacs builtin Tramp library for ftp file
retrievals.
kbd-keyExecutes a key sequence found around point, delimited by curly braces, {}, if any. Key sequences should be in human readable form, e.g. {C-x C-b}. Formats such as {^x^b} will not be recognized.
Any key sequence must be a string of one of the following:
dir-summaryDetects filename buttons in files named "MANIFEST" or "DIR". Displays selected files. Each file name must be at the beginning of the line and must be followed by one or more spaces and then another non-space, non-parenthesis, non-brace character.
text-tocJumps to the text file section referenced by a table of contents entry at point. The file name of the current buffer must contain README and there must be a ‘Table of Contents’ or ‘Contents’ label on a line by itself (it may begin with an asterisk), preceding the table of contents. Each toc entry must begin with some whitespace followed by one or more asterisk characters. Each line which begins a new file section must start with one or more asterisk characters at the very beginning of the line.
cscopeJumps to a C/C++ source line associated with a Cscope C analyzer output line. Requires pre-loading of the cscope.el Lisp library available from the Emacs Lisp archives and the open source cscope program available from http://cscope.sf.net. Otherwise, does nothing.
etagsJumps to the source line associated with an etags file entry in a TAGS buffer. If on a tag entry line, jumps to the source line for the tag. If on a pathname line or line preceding it, jumps to the associated file.
ctagsJumps to the source line associated with a ctags file entry in any buffer. Ctags files are used by old editors like vi to lookup identifiers. Emacs uses the newer, more flexible Etags format.
id-cflowExpands or collapses C call trees and jumps to code definitions.
Requires cross-reference tables built by the external cxref
program.
rfc-tocSummarizes contents of an Internet rfc from anywhere within an rfc buffer. Each line of the summary may be selected to jump to the associated section.
markdown-internal-linkDisplays any in-file Markdown link referent. Pathnames and urls are handled elsewhere.
git-referenceDisplays the git entity associated with REFERENCE and optional PROJECT. See DEMO#Git (Local) References for examples.
REFERENCE is a string of one of the following forms:
<ref-item> is one of these:
the associated items are listed
the item is shown
the commit diff is displayed
the files in the branch are listed.
If given, PROJECT overrides any project value in REFERENCE. If no PROJECT
value is provided, it defaults to the value of hibtypes-git-default-project.
git-commit-referenceDisplays the diff for a git commit reference, e.g. commit a55e21, typically produced by git log.
github-referenceDisplays the Github entity associated with REFERENCE and optional USER and PROJECT. See DEMO#Github (Remote) References for examples.
REFERENCE is a string of one of the following forms:
<ref-item> is one of these:
the associated items are listed
the item is shown
the issue is displayed
the commit diff is displayed
the files in the branch are listed.
USER defaults to the value of hibtypes-github-default-user.
If given, PROJECT overrides any project value in REFERENCE. If no
PROJECT value is provided, it defaults to the value of
hibtypes-github-default-project.
social-referenceDisplays the web page associated with a social media hashtag or username reference at point.
Reference format is:
[facebook|instagram|twitter]?[#@]<hashtag-or-username> or
[fb|in|tw]?[#@]<hashtag-or-username>
For example, ‘fb@someuser’ displays the home page for facebook user
‘someuser’ and ‘in#hashtag’ displays photos with the hashtag
‘hashtag’. The first part of the label for a button of this type
is the social media service name. The service name defaults to the
value of hibtypes-social-default-service (default value of
“twitter”) when not given, so #hashtag would be the same as
twitter#hashtag.
debbugs-gnu-modeDebbugs is a client-server issue tracker used by GNU free software
projects, including Hyperbole, to manage issues and maintain threads
of discussion around them. You issues queries to a Debbugs server and
it returns a listing entry for each matching issue. When on a GNU
Debbugs listing entry in debbugs-gnu-mode, an Action Key press
displays the discussion of the selected issue; an Assist Key press
pretty prints the status of the issue to a window below the listing
window.
debbugs-gnu-queryDebbugs queries may be issued by activating this implicit button type. It displays the results of a Gnu debbugs query based on the string at point and works in most kinds of buffers. If the query includes a single id number, it displays the original message submission for that id and allows browsing of the followup discussion. The following buffer text formats are accepted (with point prior to any attribute):
bug#id-number, bug# id-number, bug #id-number or bug id-number
bug?attr1=val1&attr2=val2&attr3=val3
bug#id-number?attr1=val1&attr2=val2&attr3=val3
Note that issue or debbugs may be used as well in place of bug. See the documentation at the top of the hib-debbugs.el file for detailed query format information.
annot-bibDisplays annotated bibliography entries defined within the same buffer as the reference. References must be delimited by square brackets, must begin with a word constituent character, and must not be in buffers whose names begin with a ‘ ’ or ‘*’ character.
function-in-bufferReturns the function name defined within this buffer that point is within or after, else ‘nil’. This triggers only when the func-menu library has been loaded and the current major mode is one handled by func-menu.
pathname-line-and-columnMakes a valid pathname:line-num[:column-num] pattern display the path at line-num and optional column-num. Also works for remote pathnames.
pathnameMakes a valid pathname display the path entry. Also works for
delimited and non-delimited remote pathnames, Texinfo entries,
and hash-style link references to HTML, Markdown or Emacs outline
headings. Emacs Lisp library files (filenames without any directory
component that end in .el and .elc) are looked up using
the load-path directory list.
See the function documentation for hpath:at-p for possible
delimiters. See the variable documentation for hpath:suffixes for
suffixes that are added to or removed from the pathname when searching
for a valid match. See the function documentation for hpath:find
for special file display options.
org-modeThe Action Key follows any Org mode link at point or cycles through views of the outline subtree at point. In any other context besides the end of a line, the Action Key will invoke the Org mode standard binding of {M-RET}, (org-meta-return). The Assist Key on an Org mode heading cycles through views of the whole buffer outline and on an Org mode link, displays standard Hyperbole help.
The variable, browse-url-browser-function, customizes the url
browser that is used for urls. Valid values of this variable
include browse-url-default-browser and browse-url-generic.
doc-idDisplays a document from a local document library given its id. Ids must be
delimited by doc-id-start and doc-id-end and must match the
function given by doc-id-p. (Note that this implicit button type is
not installed by default. You must manually configure it and load it from
the file, ${hyperb:dir}/hib-doc-id.el). See the commentary
at the top of that file for more information.
Next: Action Types, Previous: Implicit Buttons, Up: Buttons [Contents][Index]
It is often convenient to create files filled with buttons as a means of navigating distributed information pools or for other purposes. These files can also serve as useful roadmaps that guide a user through both unfamiliar and highly familiar information spaces. Files that are created specifically for this purpose are called Hyperbole button files.
The Hyperbole menu system provides quick access to two types of these
button files: personal and directory-specific, through the ButFile menu.
(The variable, hbmap:filename, contains the base name of these
button files. Its standard value is HYPB.)
A personal button file may serve as a user’s own roadmap to frequently
used resources, like a personal home page. Selection of the
ButFile/PersonalFile menu item, {C-h h b p}, displays this file for
editing. The default personal button file is stored within the
directory given by the hbmap:dir-user variable whose standard
value is ~/.hyperb. The default Hyperbole configuration also
appends all global buttons to the end of this file, one per line, as
they are created. So you can edit or annotate them within the file.
A directory-specific button file may exist for each file system directory. Such files are useful for explaining the contents of directories and pointing readers to particular highlights within the directories. Selection of the ButFile/DirFile menu item, {C-h h b d}, displays the button file for the current directory; this provides an easy means of updating this file when working on a file within the same directory. If you want to view some other directory-specific button file, simply use the normal Emacs file finding commands.
If you want group and site-specific button files, simply place links to such files at the top of your personal button file and do so for your colleagues. This provides a flexible means of connecting to such resources.
Next: Button Type Precedence, Previous: Button Files, Up: Buttons [Contents][Index]
Action types are special functions that specify Hyperbole button behaviors. Each action type may be used by any category of button: global, explicit, or implicit. The arguments needed by an action type are prompted for at button creation time or in the case of an implicit button, computed when the button is activated. During button activation, the arguments are fed to the action type’s body to achieve the desired result. This body is called the button action.
Hyperbole handles all of this processing transparently. As a user, all you need know is the set of action types that you can work with when creating explicit or global buttons.
The standard action types included with Hyperbole in alphabetical order are:
annot-bibFollows an internal reference KEY within an annotated bibliography, delimiters = [ ].
completionInserts a completion at point into the minibuffer or a buffer. Unless point is at the end of buffer or if a completion has already been inserted, in which case the completions window is deleted.
eval-elispEvaluates a Lisp expression LISP-EXPR.
exec-kbd-macroExecutes a KBD-MACRO REPEAT-COUNT times. KBD-MACRO may be a string of editor command characters, a function symbol or nil to use the last defined keyboard macro. Optional REPEAT-COUNT nil means execute once, zero means repeat until error.
exec-shell-cmdExecutes a SHELL-CMD string asynchronously. Optional non-nil second argument INTERNAL-CMD inhibits display of the shell command line executed. Optional non-nil third argument KILL-PREV means kill the last output to the shell buffer before executing SHELL-CMD.
exec-window-cmdAsynchronously executes an external window-based SHELL-CMD string.
function-in-bufferDisplays the definition of function NAME found at POS in the current buffer.
hyp-configInserts Hyperbole configuration and debugging information at the end of the current buffer or within optional OUT-BUF.
hyp-requestInserts help for composing a Hyperbole support/discussion message into the current buffer or the optional OUT-BUF.
hyp-sourceDisplays a buffer or file from a line beginning with
hbut:source-prefix.
kbd-keyExecutes the function binding for KEY-SEQUENCE, delimited by {}. Returns ‘t’ if a KEY-SEQUENCE has a binding, else ‘nil’.
link-to-buffer-tmpDisplays a BUFFER. This type of link generally can
only be used within a single editor session. Use link-to-file
instead for a permanent link.
link-to-directoryDisplays a DIRECTORY in Dired mode.
link-to-docDisplays an online version of a document given by DOC-ID. If the online
version of a document is not found in doc-id-indices, an error is
signalled.
link-to-ebutPerforms an action given by another explicit button, specified by KEY and KEY-FILE.
link-to-elisp-docDisplays the documentation for FUNC-SYMBOL.
link-to-fileDisplays a file given by PATH scrolled to optional POINT. If POINT is given, the buffer is displayed with POINT at the top of the window.
link-to-file-lineDisplays a file given by PATH scrolled to LINE-NUM.
link-to-Info-index-itemDisplays an Info index ITEM cross-reference. ITEM must be a string of the form (filename)item-name. During button creation, completion for both filename and item-name is available. Filename may be given without the .info suffix."
link-to-Info-nodeDisplays an Info NODE. NODE must be a string of the form (filename)nodename. During button creation, completion for both filename and nodename is available. Filename may be given without the .info suffix.
link-to-kcellDisplays a Hyperbole outline cell, given by FILE and CELL-REF, at the
top of a window. See the documentation for (kcell:ref-to-id) for
valid CELL-REF formats.
If FILE is ‘nil’, the current buffer is used. If CELL-REF is ‘nil’, the first cell in the view is shown.
link-to-kotlDisplays at the top of a window the referent pointed to by LINK. LINK may be of any of the following forms, with or without delimiters:
  < pathname [, cell-ref] >
  < [-!&] pathname >
  < @ cell-ref >
See the documentation for (kcell:ref-to-id) for valid cell-ref
formats.
link-to-mailDisplays a mail message with MAIL-MSG-ID from optional MAIL-FILE. See
the documentation for the variable hmail:init-function for
information on how to specify the mail reader to use.
link-to-regexp-matchFinds REGEXP’s Nth occurrence in SOURCE and displays the location at the top of the selected window. SOURCE is a pathname unless optional BUFFER-P is non-nil, then SOURCE must be a buffer name or buffer. Returns ‘t’ if found, signals an error if not.
link-to-rfcRetrieves and displays an Internet rfc given by RFC-NUM. RFC-NUM may be a string or an integer.
link-to-string-matchFinds STRING’s Nth occurrence in SOURCE and displays the location at the top of the selected window. SOURCE is a pathname unless optional BUFFER-P is non-nil, then SOURCE must be a buffer name or buffer. Returns ‘t’ if found, ‘nil’ if not.
link-to-texinfo-nodeDisplays the Texinfo node with NODENAME (a string) from the current buffer.
link-to-web-searchSearches web SERVICE-NAME for SEARCH-TERM. Uses hyperbole-web-search-alist
to match each service to its search url. Uses hyperbole-web-search-browser-function
and the browse-url package to display search results.
man-showDisplays a man page on TOPIC, which may be of the form ‘<command>(<section>’).
If using the Superman manual entry package, see the documentation for sm-notify
to control where the man page is displayed.
rfc-tocComputes and displays a summary of an Internet rfc in BUF-NAME. Assumes point has already been moved to the start of the region to summarize. Optional OPOINT is the point to return to in BUF-NAME after displaying the summary.
text-tocJumps to the text file SECTION referenced by a table of contents entry at point.
www-urlFollows a link given by a URL. The variable,
browse-url-browser-function, customizes the url browser
that is used. See its documentation string for details.
Action types create a convenient way of specifying button behavior
without the need to know how to program. Expert users who are familiar
with Emacs Lisp, however, may find that they often want to tailor button
actions in a variety of ways not easily captured within a type system.
In such cases, hui:ebut-prompt-for-action should be set to
‘t’. This will cause Hyperbole to prompt for an action to override
the button’s action type at each explicit button creation. For those cases
where the action type is sufficient, a ‘nil’ value should be
entered for the action. An action may be any Lisp form that Emacs
Lisp can evaluate.
Next: Utilizing Explicit Buttons, Previous: Action Types, Up: Buttons [Contents][Index]
Explicit buttons always take precedence over implicit buttons. Thus, if a button selection is made which falls within both an explicit and implicit button, only the explicit button will be selected. Explicit button labels are not allowed to overlap; Hyperbole’s behavior in such cases is undefined.
If there is no explicit button at point during a selection request, then each implicit button type predicate is tested in turn until one returns non-nil or all are exhausted. Since two implicit button types may have overlapping domains, those contexts in which their predicates are true, only the first matching type is used. The type predicates are tested in reverse order of definition, i.e. most recently entered types are tested first, so that personal types defined after standard system types take precedence. It is important to keep this order in mind when defining new implicit button types. By making match predicates as specific as possible, one can minimize any overlapping implicit button domains.
Once a type name is defined, its precedence relative to other types remains the same even if its body is redefined, as long as its name is not changed. This allows incremental modifications to types without any worry of altering their precedences. See Creating Types, for information on how to develop or modify types.
Previous: Button Type Precedence, Up: Buttons [Contents][Index]
Explicit buttons are a fundamental building block for creating personal or organizational hypertext networks with Hyperbole. This section summarizes the user-level operations available for managing these buttons.
| • Creation: | ||
| • Renaming: | ||
| • Deletion: | ||
| • Modification: | ||
| • Searching and Summarizing: | ||
| • Buttons in Mail: | ||
| • Buttons in News: |
Next: Renaming, Previous: Utilizing Explicit Buttons, Up: Utilizing Explicit Buttons [Contents][Index]
Creating explicit buttons is fun and easy. You can always try them out immediately after creating them or can utilize the Assist Key to verify what buttons do. There are two ways to create them: by dragging between windows with the Action Mouse Key or by using the Hyperbole menus.
| • By Dragging: | Creation Via Action Key Drags | |
| • By Menu: | Creation Via Menus |
The most efficient way to create an explicit link button interactively is to use the Action Mouse Key to drag from a non-read-only button source window to a window showing its desired link referent. More specifically, you should split your current Emacs frame into two windows: one which contains the point at which you want a button to be inserted and another which shows the point to which you want to link. Depress the Action Mouse Key at the source point for the button (anywhere but on a paired delimiter such as double quotes or parentheses). Then drag to the other window and release the Action Mouse Key at the start point of the link referent. The process becomes quite simple with a little practice. (See Creation Via Menus, for a more detailed explanation of the explicit button creation process).
If a region was selected prior to the start of the drag, it is used as the button label, otherwise, you are prompted for the label. Then Hyperbole uses the link referent context to determine the type of link to make. If there are a few different types of links which are applicable from the context, you will be prompted with a list of the types. Simply use the Action Key or the first letter of the link type to select one of the type names and to finish the link creation. Hyperbole will then insert explicit button delimiters around the button label and will display a message in the minibuffer indicating the button label, its action/link type, and any arguments, notably the thing to which it links.
The following table shows the type of link that will be created based upon the referent context in which the Action Key is released.
Referent Context         Link Type
----------------------------------------------------
Explicit Button          link-to-ebut
Info Index Item          link-to-Info-index-item
Info Node                link-to-Info-node
Mail Reader Message      link-to-mail
Directory Name           link-to-directory
File Name                link-to-file
Koutline Cell            link-to-kcell
Outline Heading          link-to-string-match
Buffer attached to File  link-to-file
Buffer without File      link-to-buffer-tmp
If you run Emacs under a window system and there is no prior key
binding on {M-o} when you load Hyperbole, then you can emulate
an Action Key drag from the keyboard by typing {M-o}, the
hkey-operate command, at the button source location, moving
to the link destination, e.g. with {C-x o}, and then typing
{M-o} again. This simulates a depress and then release of the
Action Key. {C-u M-o} emulates drags of the Assist Key.
This will not work when Hyperbole is run from a dumb terminal Emacs
session since drag actions are not supported without a window system.
Previous: By Dragging, Up: Creation [Contents][Index]
You may instead use the Hyperbole menus to create explicit buttons. First, mark a short region of text in any fashion allowed by Emacs and then select the Hyperbole menu item sequence, Ebut/Create. You will be prompted for the button’s label with the marked region as the default. If you accept the default and enter the rest of the information you are prompted for, the button will be created within the current buffer and Hyperbole will surround the marked region with explicit button delimiters to indicate success.
If you do not mark a region before invoking the button create command, you will be prompted for both a label and a target buffer for the button and the delimited label text will be inserted into the target buffer after a successful button creation.
After Hyperbole has the button label and its target buffer, it will prompt you for an action type for the button. Use the {?} completion list key to see the available types. The type selected determines any following values for which you are prompted.
If a previous button with the same label exists in the same buffer, Hyperbole will add an instance number to the label when it adds the delimiters so that the name is unique. Thus, you don’t have to worry about accidental button name conflicts. If you want the same button to appear in multiple places within the buffer, just enter the label again and delimit it yourself or copy and paste the button with its delimiters. Hyperbole will interpret all occurrences of the same delimited label within a buffer as the same button.
If you create link buttons using the Hyperbole menus, the best
technique is to place on screen both the source buffer for the button
and the buffer to which it will link. Mark the region of text to use
as your button label, invoke the button create command from the menu,
choose an action type which begins with link-to- and then use
the direct selection techniques mentioned in Smart Key Argument Selection, to select the link referent.
Next: Deletion, Previous: Creation, Up: Utilizing Explicit Buttons [Contents][Index]
Once an explicit button has been created, its label text must be treated specially. Any inter-word spacing within the label may be freely changed, as may happen when a paragraph is refilled, but a special command must be invoked to rename it.
The rename command operates in two different ways. If point is within a button label when it is invoked, it will tell you to edit the button label and then to invoke the rename command again after the edit. The second invocation will actually rename the button. If instead the command is originally invoked outside of any explicit button, it will prompt for the button label to replace and the label to replace it with and then will perform the renaming. All occurrences of the same button in the buffer will be renamed.
The rename command may be invoked from the Hyperbole menu via
Ebut/Rename. A faster method is to use a key bound to the
hui:ebut-rename command. Hyperbole typically binds this to
{C-c C-r}. {C-h w hui:ebut-rename RET} will show
what if any key runs it. If no key binding has been established or if
you prefer one of your own, simply bind it within your ~/.emacs
file: (global-set-key "\C-c\C-r" 'hui:ebut-rename).
Next: Modification, Previous: Renaming, Up: Utilizing Explicit Buttons [Contents][Index]
Ebut/Delete works similarly to the Rename command but deletes the selected button. The button’s delimiters are removed to confirm the deletion. If the delete command is invoked with a prefix argument, then both the button label and the delimiters are removed as confirmation.
Presently there is no way to recover a deleted button; it must
be recreated. Therefore, the hui:ebut-delete-confirm-p variable
is true by default, causing Hyperbole to require confirmation before
interactively deleting explicit buttons. Set it to ‘nil’ if you
prefer no confirmation.
Next: Searching and Summarizing, Previous: Deletion, Up: Utilizing Explicit Buttons [Contents][Index]
Ebut/Modify prompts you with each of the elements from the button’s attributes list and allows you to modify each in turn. Ebut/Edit does the exact same thing and is there for people who prefer that term.
There is a quicker way to modify explicit link buttons, however. Simply drag with the Action Mouse Key from within the button label to a link destination in a different window, just as you would when creating a new button with a mouse drag. Remember that drags may also be emulated from the keyboard. See Creation.
Next: Buttons in Mail, Previous: Modification, Up: Utilizing Explicit Buttons [Contents][Index]
The Ebut/Help menu may be used to summarize either a single explicit button or all such buttons within a buffer. The buttons summarized may then be activated directly from the summary.
Ebut/Help/BufferButs summarizes the explicit buttons in the order in which they appear in the buffer. Ebut/Help/CurrentBut summarizes only the button at point. Ebut/Help/OrderedButs summarizes the buttons in alphabetical order. All of these summary commands eliminate duplicate occurrences of buttons from their help displays.
Ebut/Search prompts for a search pattern and searches across all the locations in which you have previously created explicit buttons. It asks you whether to match to any part of a button label or to whole labels only. It then displays a list of button matches with a single line of surrounding context from their sources. Any button in the match list may be activated as usual. An Action Key press on the surrounding context jumps to the associated source line. A press on the filename preceding the matches jumps to the file without selecting a particular line.
There are presently no user-level facilities for globally locating buttons created by others or for searching on particular button attributes.
Next: Buttons in News, Previous: Searching and Summarizing, Up: Utilizing Explicit Buttons [Contents][Index]
Hyperbole supports embedding buttons within electronic mail messages composed in Emacs. An enhanced mail reader may then be used to activate the buttons within messages just like any other buttons. Because this involves complex changes to mail support functions, this feature is disabled by default. Use the Cust/Msg-Toggle-Ebuts minibuffer menu item to enable it.
Hyperbole supports the following mail readers: Rmail (see Reading Mail with Rmail in the GNU Emacs Manual), VM (see Introduction in the VM Manual) and MH-e. Button inclusion and activation within USENET news articles is also supported in the same fashion via the Gnus news reader if available at your site (see The Gnus Newsreader in the Gnus Manual). (The hmail.el file defines a generalized interface that can be used to hook in other mail or news readers if the necessary interface functions are written.)
All explicit buttons to be mailed must be created within the outgoing
message buffer. There is no present support for including text from
other buffers or files which contain explicit buttons, except for the
ability to yank the contents of a message being replied to, together
with all of its buttons, via the (mail-yank-original) command
bound to {C-c C-y}. From a user’s perspective, buttons are
created in precisely the same way as in any other buffer. They also
appear just like any other buttons to both the message sender and the
reader who uses the Hyperbole enhanced readers. Button operation may be
tested any time before a message is sent. A person who does not use
Hyperbole enhanced mail readers can still send messages with embedded
buttons since mail composing is independent of any mail reader
choice.
Hyperbole buttons embedded within received mail messages behave as do any other buttons. The mail does not contain any of the action type definitions used by the buttons, so the receiver must have these or she will receive an error when she activates the buttons. Buttons which appear in message Subject lines are copied to summary buffers whenever such summaries are generated. Thus, they may be activated from either the message or the summary buffers.
Nothing bad will happen if a mail message with explicit buttons is sent to a non-Hyperbole user. The user will simply see the text of the message followed by a series of lines of button data at its end. Hyperbole mail users never see this data in its raw form.
In order to alert readers of your mail messages that you can handle
Hyperbole mail buttons, you can set the variable, smail:comment,
to an expression that automatically inserts a comment into each
outgoing message to announce this fact. See its documentation for
technical details. By default, no comment is added. To have a
comment line added to your outgoing message, add the following to
to your ~/.emacs file before the point at which you load
Hyperbole.
(setq smail:comment
 (format "Comments: GNU Hyperbole mail buttons accepted, v%s.\n"
          hyperb:version))
This will produce the following line in outgoing messages:
Comments: GNU Hyperbole mail buttons accepted, vX.X.X.
where the X’s indicate your Hyperbole version number. You can cut this out of particular messages before you send them when need be.
A final mail-related facility provided by Hyperbole is the ability to
save a pointer to a received mail message by creating an explicit button
with a link-to-mail action type. When prompted for the mail
message to link to, if you press the Action Key within the message, the
appropriate link parameters will be copied to the argument prompt, as
described in Smart Key Argument Selection.
Previous: Buttons in Mail, Up: Utilizing Explicit Buttons [Contents][Index]
Explicit buttons may be embedded within outgoing USENET news articles and may be activated from within the Gnus news reader. Because this involves complex changes to news support functions, this feature is disabled by default. Use the Cust/Msg-Toggle-Ebuts minibuffer menu item to enable it (enabling it for mail also enables it for news and vice versa).
Once enabled, all Hyperbole support should work just as it does when reading or sending mail. See Buttons in Mail. When reading news, buttons which appear in message Subject lines may be activated within the Gnus subject buffer as well as the article buffer. When posting news, the *post-news* buffer is used for outgoing news articles rather than a mail-related buffer.
Remember that the articles you post do not contain the action type definitions used by the buttons, so the receiver must have these or she will receive an error when she activates the buttons. You should also keep in mind that most USENET readers will not be using Hyperbole, so if they receive a news article containing explicit buttons, they will wonder what the button data at the end of the message is. You should therefore limit distribution of such messages. For example, if most people at your site read news with Gnus and use Hyperbole, it would be reasonable to embed buttons in postings to local newsgroups.
In order to alert readers of your postings that they may send you personal replies with embedded Hyperbole buttons, the system inserts into news postings the same comment that is included within mail messages, if enabled. See Buttons in Mail, for details and an explanation of how to turn this feature on.
Pulldown and popup menus are available to invoke Hyperbole commands,
including those from the HyRolo and the Koutliner. These menus operate
like any other application menus and are fairly self-explanatory. Use
the Remove-This-Menu command on the Hyperbole menubar menu to
get rid of the menu if you do not need it. Invoking Hyperbole from
the keyboard, as explained below, will add the menu back to the
menubar. Here is the Hyperbole Menubar Menu and its Find submenu.
The Hyperbole popup menu, hyperbole-popup-menu, replicates the
Hyperbole menubar menu. It can be bound to a mouse key but is not
bound to one by default. It can also be assigned as the default
Action or Assist Key action to use when no matching context is found.
See Smart Key - Default Context, for details.
The rest of this section discusses only the specialized minibuffer menus which appear in the minibuffer window and work with all emacs versions on all display devices. They provide similar capabilities to those of the Hyperbole menubar but additionally allow for fast menu item selection via the keyboard or mouse. When used with the keyboard, they provide command access similar to key bindings.
The top-level Hyperbole minibuffer menu is invoked from a key given in your hyperbole.el file (by default, {C-h h}) or with a click of the Action Mouse Key in the minibuffer when it is inactive. It should look like this:
Hy> Act Butfile/ Cust/ Doc/ Ebut/ Find/ Gbut/ Hist Ibut/ Kotl/ Msg/ Rolo/ Screen/ Win/
All menu items are selected via the first character of their names (letter case does not matter), with presses of the Action Key or by using {TAB} or {M-f} to move forward an item, {Shift-TAB} or {M-b} to move backward an item and {RET} to select the current item. A press of the Assist Key on an item displays help for the item, including the action that it performs. "/" at the end of an item name indicates that it brings up a submenu.
While a menu is active, to re-activate the top-level Hyperbole menu, use {C-t} or press the Action Key while on the menu prefix (before the ‘>’ character). This allows you to browse the submenus and then return to the top menu. You can quit without selecting an item by using {q} or pressing {RET} when at the end of a menu. {C-g} aborts from the minibuffer whether you are at a menu prompt or any other Hyperbole prompt.
The top-level Hyperbole minibuffer menu items serve the following purposes:
Activation of any button at point. If there is no button at point, it prompts for the label of an explicit button within the current buffer to activate.
Easy access to a directory-specific or personal file of buttons. HYPB is the name of the directory-specific button file and ~/.hyperb/HYPB is the personal file of global buttons. These are good places to begin experimenting with button creation.
Hyperbole option customization. This includes whether ftp and www
URLs are recognized by the find-file commands, where Hyperbole
link referents are displayed, where URLs are displayed, where web
search results are displayed, whether date stamps are added to rolo
entries, and whether to use proportional or windowful scrolling when a
Smart Key is pressed at the end of a line.
See Customization.
The ‘KeyBindings/’ submenu allows individual changes to each keyboard key that Hyperbole binds for its commands, notably the Action Key. See Smart Key Bindings, for more information.
See Global Key Bindings, for complete descriptions of Hyperbole’s global key bindings, how to temporarily disable them and how to manage its overriding of local bindings that hide global Hyperbole keys.
All explicit button commands. The window-system-based Hyperbole menu includes an activation menu item for each explicit button found in the current buffer.
Hyperbole documentation quick access. This menu contains an About item which describes Hyperbole and a Demo item which demonstrates a number of interactive Hyperbole features. It also contains the Types/ submenu for documentation on Hyperbole implicit button and action types.
Buffer and file line finding commands and web searching. This menu brings together many existing line finding commands that are difficult to recall quickly when needed, simplifying finding and then jumping to matching lines by using the Action Key. It includes commands for filtering a buffer to just those lines that either match or do not match a regular expression. It also includes a submenu for quick access to popular web search engines.
Below are each of the commands on the Find menu.
hypb:rgrep-command to change the
grep command or options.
mdfind command); on UNIX, it uses
the locate command. Within the resulting
*Locate* buffer, Find/Grep-Files will find matching lines
within only these paths (files and directories).
hyperbole-web-search-browser-function,
which determines whether web search results are displayed
within Emacs or with an external web browser. A short
video introduction to the Find/Web menu may be
found at https://youtu.be/8lMlJed0-OM. The
Find/Web menu looks like this:
Web>  Amazon Bing Dictionary Elisp Facebook Google Hub(git) Images
      Maps RFCs StackOverflow Twitter Wikipedia Youtube
All global button commands. Global buttons are accessed by name rather than by direct selection. The window-system-based Hyperbole menu also includes an activation menu item for each global button.
Return to previous positions in the button traversal history.
All implicit button commands.
Hyperbole-specific email messaging commands. Use this to send mail to a Hyperbole discussion mailing list.
Autonumbered, structured outliner and hyper-node manager commands. See Koutliner.
Hierarchical, multi-file rolo lookup and edit commands. See HyRolo.
Window, frame and buffer display control commands. See HyControl.
Window configuration management, such as adding and restoring window configurations by name. See Window Configurations.
Hyperbole includes the fastest, easiest-to-use Emacs window and frame management system available, HyControl, found under the Hyperbole Screen menu. If you use a lot of Emacs windows or frames (typically, window system windows) then this chapter is for you.
HyControl interactively adjusts the layout of your windows and frames down to the pixel-level if desired. You adjust the location, size and display elements of your windows and frames until they look as you like and then simply quit HyControl and go back to work.
Hyperbole binds the key {C-c \} for quick access to HyControl’s window control menu, if it was not already bound prior to Hyperbole’s initialization; otherwise, the Screen/WindowsControl minibuffer menu item, {C-h h s w}, will do the same thing. To start HyControl with the frames menu instead, use Screen/FramesControl, {C-h h s f}.
Once in HyControl, your minibuffer window at the bottom of the selected frame will display a summary of keys you may use to adjust your windows until you press {q} to quit from HyControl. The key, {t}, will always toggle between controlling frames and windows, the submodes of HyControl, with the upper left of the minibuffer prompt showing which type of control is active.
A number of commands take a single numeric argument, e.g. movement and sizing, which you can enter by typing a period to clear the argument, followed by any positive number up to 1000. You may also use the {C-u} universal argument key to apply a multiplier of 4 to the argument, any number of times. Any entry that pushes the argument over 1000, restarts it, so 10005 would produce an argument of 5.
The table below explains what each key does in HyControl mode. If the explanation does not say otherwise, then the key applies in both window and frame submodes.
Toggle whether HyControl displays key binding help in the minibuffer.
Clear the prefix argument to a value of 0.
Multiply the prefix argument by 10 and add the digit pressed.
Display a grid of windows in the selected frame sized according to the prefix argument or via a prompted input. Left digit of the argument is the number of grid rows and the right digit is the number of grid columns to display.
If the prefix argument is 0, prompt for a major mode whose buffers should be displayed first in the grid windows, then prompt for the grid size.
Otherwise, prompt for the grid size if the prefix argument is an invalid size.
With a current buffer in Dired, Buffer Menu or IBuffer mode that contains marked items, the buffers associated with those items are displayed first in the grid (unless the prefix argument is 0).
Then the most recently used buffers are displayed in each window, first
selecting only those buffers which match any of the predicate expressions
in hycontrol-display-buffer-predicate-list. (The default predicate
list chooses buffers with attached files).
Then, if there are not enough buffers for all windows, the buffers that failed to match to any predicate are used. In all cases, buffers whose names start with a space are ignored.
When done, this resets the persistent prefix argument to 1 to prevent following commands from using the often large grid size argument.
If you ever need to experiment with different sized window grids, use {M-x hycontrol-window-grid-repeatedly RET}. It will repeatedly prompt you for a grid size and then display it. When you are done, simply press {RET} to exit.
Cycle through common width adjustments of a frame, such as 25% and
50%. Widths are given in screen percentages by the list
hycontrol-frame-widths and typically go from widest to
narrowest.
Cycle through common height adjustments of a frame, such as 33.3% and
75%. Heights are given in screen percentages by the list
hycontrol-frame-heights and typically go from tallest to shortest.
Increase height by argument lines (line height determined by buffer character height).
Shorten height by argument lines.
Widen by argument characters.
Narrow by argument characters.
In FRAMES mode, resize frame’s height and width to about argument percent of the screen size.
In FRAMES mode, resize frame’s height to about argument percent of the screen size.
In FRAMES mode, resize frame’s width to about argument percent of the screen size.
Move frame in the specified direction by argument pixels.
With each press, cycle the selected frame’s position clockwise through
the middle of edges and corners of the screen. With an argument of 0,
reset the cycle position to the upper left corner. Respects the pixel
edge offsets returned by hycontrol-get-screen-offsets.
Prompt for confirmation and then delete non-selected windows or frames based on mode.
In FRAMES mode, lower the selected frame below all other Emacs session frames.
Select the next window in the window list, across all visible frames.
Select the next visible frame.
In FRAMES mode, move the frame directly to the screen edge position given
by the numeric keypad layout. For example, 3 moves the frame to the
bottom right corner and 8 moves it to the middle of the top edge.
Keypad numeric keys do not adjust the argument. Respects the pixel edge
offsets returned by hycontrol-get-screen-offsets.
Display a virtual numeric keypad for emulating a keypad on keyboards without one. Each digit key operates just as a numeric keypad key would.
In FRAMES mode, raise the selected frame above all other Emacs session frames.
Create a new atop window or frame depending on mode. If a frame, it is
sized to the same size as the selected window and offset from the
selected frame by the pixel amounts given by
hycontrol-frame-offset.
Create a new sideways window or frame depending on mode.
Save the current window or frame configuration based on mode. Whenever, HyControl is invoked, the current window and frame configurations are saved automatically. So use this command only if you have changed the configuration and wish to save it temporarily.
After confirmation, restore the last saved window or frame configuration based on mode.
Clone the selected window to a new similarly sized frame. Delete the
original window unless there is only one window in the source frame or
if hycontrol-keep-window-flag is non-nil.
Expand the selected frame to the respective screen edge based on U.S.
keyboard key layout. i=top, j=left, k=right and m=bottom screen edge.
If already at the edge, adjusts the perpendicular dimension to ARG percent
of the screen (50% by default if ARG is 1 or nil) but keep it at the screen
edge. Respects the pixel edge offsets returned by
hycontrol-get-screen-offsets.
After confirmation, in WINDOWS mode, make the current frame’s windows approximately the same size. In FRAMES mode, make all visible frames the size of the selected frame.
In WINDOWS mode, shrink window to its smallest possible number of lines to display the entire buffer, if possible. Otherwise or if the window is already displaying all of its lines, shrink it to about one line, if possible.
In FRAMES mode, make the frame as small as possible while still displaying it.
Make the window or frame (based on mode) as large as possible. In FRAMES mode, a second press of this key restores its size to whatever it was prior to the first use of this command.
Bury the selected buffer within the buffer list, displaying the next buffer.
Unbury the bottom buffer in the buffer list and display it in the selected window.
Swap two buffers between the selected window or frame and one other. In WINDOWS mode, there must be precisely two windows in the selected frame. In FRAMES mode, the second frame must have a single window.
Zoom in selected window or frame text based on mode, increasing default face size.
Zoom out selected window or frame text based on mode, increasing default face size. Zooming supports an argument of between 1 and 9 (any other value sets the argument to 1). The argument determines the number of sizes by which to zoom.
FRAMES mode zooming requires the separately available zoom-frm.el library. WINDOWS zooming works without this library.
Toggle between WINDOWS and FRAMES submodes.
Quit from HyControl mode and restore normal key bindings.
The rest of this section goes into some technicalities about HyControl settings. You may ignore it if you are not familiar with Emacs variables and functions or with customized Emacs.
HyControl allows placement of frames at screen edges and corners with the frame cycle command, {c}, and direct placement using the layout of the numeric keypad keys, if available, or the p virtual keypad key otherwise. (Note that a screen may span multiple physical monitors).
To prevent widgets and toolbars at the corners of the screen from
being obscured, HyControl can offset each frame from each screen edge
by a fixed number of pixels. These offsets are specified by the
variable,hycontrol-screen-offset-alist and can differ for each type of
screen; see its documentation for details. If you change its value,
then call hycontrol-set-screen-offsets to set any new offset
values. hycontrol-get-screen-offsets returns the list of offsets
in clockwise order starting from the top edge. Both functions display a
minibuffer message with the current offsets when called interactively.
When HyControl creates a new frame, it automatically sizes it to the
same size as the previously selected frame and offsets it from that
frame by the (X . Y) number of pixels given in the variable,
hycontrol-frame-offset.
The source code for the HyControl system is in hycontrol.el
within your Hyperbole source directory, given by hyperb:dir.
HyControl uses standard Emacs keymaps, so any keys can be rebound.
Remember that Hyperbole typically binds {C-c \} to the windows
control menu, but if you would like to bind either of the two
HyControl minor mode invocation commands to keys, they are,
hycontrol-enable-windows-mode and hycontrol-enable-frames-mode.
Generally, you need only one of these bound to a key since when you
press that key, the other command can be reached by pressing {t}.
The Hyperbole outliner, the Koutliner (pronounced Kay-outliner), produces structured, autonumbered documents composed of hierarchies of cells. Each cell has two identifiers, a relative identifier indicating its present position within the outline and a permanent identifier called an idstamp, suitable for use within hyperlink references to the cell. The idstamp is typically not displayed but is available when needed. See Autonumbering.
Cells also store their time of creation and the user who created the cell. User-defined attributes may also be added to cells. See Cell Attributes.
This chapter expands on the information given in the EXAMPLE.kotl file included with Hyperbole. Use {C-h h k e} to display that file, as pictured on the following page. It is an actual outline file that explains major outliner operations. You can test out the viewing, editing and motion commands with this file since a personal copy is made when you invoke this command.
See Koutliner Keys, for a full summary of the key bindings and commands available in the Koutliner.
| • Menu Commands: | ||
| • Creating Outlines: | ||
| • Autonumbering: | ||
| • Idstamps: | ||
| • Editing: | ||
| • Viewing: | ||
| • Links: | ||
| • Cell Attributes: | ||
| • Koutliner History: |
Next: Creating Outlines, Previous: Koutliner, Up: Koutliner [Contents][Index]
The Kotl/ menu entry on the Hyperbole minibuffer menu provides access to a number of major outliner commands:
Menu Item    Command                    Description
====================================================================
All          kotl-mode:show-all         Expand all cells
Blanks       kvspec:toggle-blank-lines  Toggle blank lines on or off
Create       kfile:find                 Edit or create an outline
Downto       kotl-mode:hide-sublevels   Hide cells deeper than a level
Examp        <sample outliner file>     Show self-descriptive example
Hide         kotl-mode:hide-tree        Hide tree with root at point
Info         <outliner documentation>   Show outliner manual section
Kill         kotl-mode:kill-tree        Kill the current tree
Link         klink:create               Create a link to another cell
Overvw       kotl-mode:overview         Show first line of each cell
Show         kotl-mode:show-tree        Show tree with root at point
Top          kotl-mode:top-cells        Collapse to top-level cells
Vspec        kvspec:activate            Set a view specification
====================================================================
The popup and menubar Koutline menu, as displayed here, offers a more complete set of the Koutliner commands. Experiment with the menu or read the following sections explaining commands.
Next: Autonumbering, Previous: Menu Commands, Up: Koutliner [Contents][Index]
In addition to the Kotl/Create menu item, you can create and experiment with outline files simply by finding a file, {C-x C-f}, with a .kotl suffix. .kot will also work for users impaired by operating systems with 3-character suffix limitations.
When a new koutline is created, an invisible root cell is added. Its permanent and relative ids are both 0, and it is considered to be at level 0 in the outline. All visible cells in the outline are at level 1 or deeper, and thus are descendants of this root cell. Some koutliner commands prompt for cell numbers as arguments. An argument of 0 makes commands operate upon the entire outline.
An initial level 1 cell is also created to make it easy to start entering text in the outline. A koutline always has at least one visible cell in it.
See Autonumbering, which explains how cells are labeled according to their respective levels in the outline and how these labels are updated as the structure of the outline changes.
Next: Idstamps, Previous: Creating Outlines, Up: Koutliner [Contents][Index]
See Adding and Killing, for information on how to add new cells to or remove cells from a koutline. As you do this, or as you promote or demote cells within the outline, the labels preceding the contents of each cell automatically update to reflect the new structure. These labels are also known as autonumbers and as relative ids because they change as the structure changes.
The outline structure is shown by these labels and by the indentation of each outline level. Normally, each deeper level is indented another three characters, to reflect the nesting.
The default autonumbers are called alphanumeric labels because they alternate between using numbers and letters to distinguish each successive level. Each alphanumeric label uniquely identifies a cell’s position in an outline, so that there is no need to scan back to prior cells to see what the current section number of an outline is. This is similar to a legal numbering scheme but without all the period characters between level numbers. As an example, 1b3 is equivalent to a legal label of 1.2.3. Both refer to the 3rd cell at level 3, below the 2nd child of the first cell at level 1. Said another way, this is the 3rd child of the 1st cell’s 2nd child. In other words, it is easier to visualize hierarchies than to talk about them.
Alphanumeric labels are the default because they are shorter and easier to read aloud than equivalent legal ones. They also simplify distinguishing between even and odd level labels because of the alternating character set.
You can change the labeling scheme used in a particular outline with the command {C-c C-l}. A {?} will show all of the labeling options. The default, alpha labels, legal labels, and permanent idstamps (permanent cell ids) are all available.
A cell label is normally followed by a period and a space, called the label separator, prior to the start of the cell contents. You can change the separator for the current outline with {C-c M-l}. {C-u C-c M-l} will additionally change the default separator value used when new outlines are created (for the current session only). For example, use the value " " (two spaces) to get eliminate the trailing period after each cell label. The separator must be at least two characters long but may be longer.
If you find a separator that you prefer for all outlines, change the separator setting permanently by adding the following line to your Emacs initialization file, ~/.emacs, substituting for ‘your-separator’:
(setq kview:default-label-separator "your-separator")
Next: Editing, Previous: Autonumbering, Up: Koutliner [Contents][Index]
Idstamps (permanent ids) are associated with each cell. They maintain hyperlinks as cells are reordered within a koutline. See Links. Idstamps may be displayed in place of the outline level relative ids. Use {C-c C-l id RET}.
An idstamp counter for each outline starts at 0 and is incremented by one each time a cell is added to the outline. This idstamp stays with the cell no matter where it is moved within the outline. If the cell is deleted, its idstamp is not reused.
The 0 idstamp is always assigned to the root node of the entire outline. This node is never visible within the outline, but is used so that the outline may be treated as a single tree when needed. Idstamps always begin with a 0, as in 012, to distinguish them from relative ids.
Text editing within the Koutliner works just as it does for other buffers, except when you need to deal with the structural components of an outline. Within the contents of a cell, all of your standard editing keys should work properly. You can just type in text and the left and right margins of the lines will be maintained for you. See Filling, for the times when you need to refill a paragraph or to control when filling occurs.
Don’t invoke editing commands with {M-x command-name RET} since the Koutliner uses differently named commands made to act like the regular editing commands. Koutliner commands, however, account for the structure and indentation in koutlines.
You may use the mouse to select parts of the contents of a single cell for editing. But don’t drag across cell boundaries and then edit the selected region, since that will destroy the outline structure.
| • Adding and Killing: | ||
| • Relocating and Copying: | ||
| • Moving Around: | ||
| • Filling: | ||
| • Transposing: | ||
| • Splitting and Appending: | ||
| • Inserting and Importing: | ||
| • Exporting: |
Next: Relocating and Copying, Previous: Editing, Up: Editing [Contents][Index]
{C-j} adds a new cell as a successor sibling of the current cell, that is, the next cell at the same level as the current cell. If you enter a positive number as a prefix argument, that number of cells will be inserted, all at the same level. {C-u C-j} is handled specially. It adds a single cell as a child of the current cell. {C-c a} does the same thing. {C-c p} adds the cell as the successor of the current cell’s parent.
{C-c C-k} kills the current cell and its entire subtree. {C-c k} kills the contents of a cell from point through the end of the cell; it does not remove the cell itself. {C-u C-c k} kills the entire contents of the cell regardless of the location of point. You may then yank the contents into another cell or another buffer with {C-y}.
Next: Moving Around, Previous: Adding and Killing, Up: Editing [Contents][Index]
Demotion is the act of moving a tree down one or more levels in the outline. The new tree will become either the successor or the first child of the cell which precedes it in the outline. Promotion is the inverse operation. Note that trees (cells and their entire substructure) are promoted and demoted, not individual cells.
Trees may be demoted or promoted by pressing TAB or {M-TAB} (or {SHIFT-TAB}) respectively, as in most outliners today. {M-0 TAB} and {M-0 M-TAB} demote and promote trees and additionally refill each cell that is not specially marked to prevent refilling. See Filling. A positive or negative prefix argument to these commands promotes or demotes the tree up to a maximum of the number of levels given by the argument. The outline may not support movement of the tree by the number of levels requested, however, in which case the maximal possible adjustment is made.
{M-1 TAB} behaves specially. It toggles the function of
TAB and {M-TAB} so that they insert a tab
and remove the previous character, respectively. This is useful when
one is formatting information within a single cell. When in this
mode, {TAB} inserts a literal TAB character, by default.
Set the variable, kotl-mode:indent-tabs-mode, to
‘nil’ if you want space characters used to form the tab.
Use {M-1 TAB} to toggle the TAB and
{M-TAB} keys back to promoting and demoting trees.
For maximum flexibility in rearranging outlines, there are commands that move or copy entire trees. Each of these commands prompts for the label of the root cell to move or copy and for a second cell which specifies the new location for the moved or copied tree. You may either accept the default provided, type in the cell label, or when a mouse is available, simply double click with the Action Key on the contents of a cell. The Koutliner knows to use the cell’s label in such cases.
In the following commands, words delimited with <> represent the arguments for which each command prompts. Note how the use of prefix arguments changes each command’s behavior from insertion at the sibling level to insertion at the child level.
Copy <tree> to follow as the first child of <cell>.
Copy <tree> to be the first child of the parent of <cell>.
Move <tree> to follow as the first child of <cell>.
Move <tree> to be the first child of the parent of <cell>.
If you have mouse support under Hyperbole, you can move entire trees with mouse clicks. Click the Assist Key within the indentation to the left of a cell and you will be prompted for a tree to move. Double click the Action Key within the contents of the root cell of the tree to move and then double click within the root contents of the tree you want it to follow as a sucessor.
The Koutliner supports copying and moving within a single outline only right now, so don’t try to to move trees across different outline files. You can, however, copy an outline tree to a non-outline buffer with:
Copy a <tree> to an outgoing mail message.
You may also import cells into the current koutline from another koutline with the {M-x kimport:text RET} command. See Inserting and Importing.
Next: Filling, Previous: Relocating and Copying, Up: Editing [Contents][Index]
In addition to normal emacs movement commands, you can move within a cell or from one cell or tree to another.
Move to the end of the current cell.
Move to the previous visible cell, regardless of level.
Move backward to this cell’s predecessor, if any.
Move to the parent cell of the current cell, if any.
Move to the first sibling at the current level within this tree.
Move to the last sibling at the current level within this tree.
Move to the last cell in the tree rooted at point, regardless of level.
Next: Transposing, Previous: Moving Around, Up: Editing [Contents][Index]
Filling is the process of distributing words among lines to extend short lines and to reduce long ones. Commands are provided to fill a paragraph within a cell or to fill a whole cell, which may have multiple paragraphs.
{M-q} or {M-j} refills a paragraph within a cell so that its lines wrap within the current margin settings. {C-c M-q} or {C-c M-j} refills all paragraphs within a cell. {C-M-q} or {C-M-j} refills all cells within a tree. See the GNU Emacs manual for information on how to set the left and right margins.
Set the variable, kotl-mode:refill-flag, to ‘t’ if you want
moving, promoting, demoting, exchanging, splitting and appending cells
to also automatically refill each cell. Generally, this is not
recommended since if you happen to move a cell that you carefully
formatted yet forgot to give a ‘no-fill’ property, then your formatting
will be lost.
Next: Splitting and Appending, Previous: Filling, Up: Editing [Contents][Index]
The Koutliner move and copy commands rearrange entire trees. The following two commands, in contrast, exchange the locations of two individual cells.
{C-c e} prompts for two cell addresses and exchanges the cell locations.
{C-c t} does not prompt. It exchanges the current and immediatly prior cell, regardless of their levels. If there is no prior cell it exchanges the current and next cell.
{M-0 C-c t} exchanges the cells in which point and mark fall. {C-c t} with a non-zero numeric prefix argument, N, moves the current tree maximally past the next N visible cells. If there are fewer visible, it makes the current cell the last cell in the outline.
Next: Inserting and Importing, Previous: Transposing, Up: Editing [Contents][Index]
One cell may be split into two adjacent sibling cells with {C-c s}. This leaves the cell contents preceding point in the current cell, minus any trailing whitespace, and moves the contents following point to a new sibling cell which is inserted into the outline. {C-u C-c s} instead adds the new cell as the first child of the original cell, rather than as its successor.
All cell attributes in the original cell are propagated to the new one, aside from the creation attributes and idstamp.
{C-c +} appends the contents of a specified cell to the end of another cell. It has no effect on cell attributes, except that if one cell has a ‘no-fill’ attribute, which prevents all but user requested filling of a cell, then the cell appended to inherits this property. This helps maintain any special formatting the appended text may have.
Next: Exporting, Previous: Splitting and Appending, Up: Editing [Contents][Index]
The paragraphs of another buffer or file may be inserted into a koutline as a set of cells by using the {C-x i} command. When prompted, you may use a buffer name or file name from which to insert; completion is provided for file names only.
The elements from the original buffer are converted into kcells and inserted as the successors of the current cell. If {C-u C-x i} is used, they are instead inserted as the initial children of the current cell.
For information on mode and suffix-specific conversions performed on
file elements before they are inserted, see the documentation for the
variables, kimport:mode-alist and kimport:suffix-alist. This
same conversion process applies if you invoke {M-x kotl-mode
RET} in a non-koutline buffer or if you perform a generic file import
as described later in this section.
Use {M-x kimport:insert-file-contents RET} to insert an entire file into the current cell following point.
The outliner supports conversion of three types of files into koutline files. You can import a file into an existing koutline, following the tree at point, or can create a new koutline from the imported file contents. {M-x kimport:file RET} selects the importation type based on the buffer or file name suffix of the file to import.
If you want to convert a buffer from some other mode into a koutline and then want to save the converted buffer back to its original file, thereby replacing the original format, use {M-x kotl-mode RET}. Remember that you will lose the old format of the buffer when you do this.
Use one of the following commands when you need explicit control over the type of importation used on some text. With these commands, your original file remains intact.
Use {M-x kimport:text RET} and you will be prompted for a text buffer or file to import and the new koutline buffer or file to create from its text. Each paragraph will be imported as a separate cell, with all imported cells at the same level, since indentation of paragraphs is presently ignored. This same command can be used to import the contents, attributes and level structure of cells from another koutline.
Star outlines are standard emacs outlines where each entry begins with one or more asterisk characters. Use {M-x kimport:star-outline RET} and you will be prompted for the star outline buffer or file to import and the new koutline buffer or file to create.
(Skip this if you are unfamiliar with the Augment/NLS system originally created at SRI.) Files exported from the Augment system as text often have alphanumeric statement identifiers on the right side. You can import such files while maintaining their outline structure. Use {M-x kimport:aug-post-outline RET} and you will be prompted for the Augment buffer or file to import and the koutline to create.
Previous: Inserting and Importing, Up: Editing [Contents][Index]
Koutlines may be exported to other file formats. Presently, the only format supported is conversion to HTML for publishing on the World-Wide Web.
{M-x kexport:html RET} prompts for the koutline buffer or file to export, the HTML file or buffer to which to output, and the title to use for the HTML file. Completion of file names is provided. The conversion will then be done and the output file or buffer will be written; the output file will not be displayed.
The Koutliner has very flexible viewing facilities to allow you to effectively browse and study large amounts of material.
| • Hiding and Showing: | ||
| • View Specs: |
Next: View Specs, Previous: Viewing, Up: Viewing [Contents][Index]
Individual cells, branches, or particular levels in the outline may be hidden or shown. These commands work even when an outline buffer is read-only, e.g. when its file is not checked out of a version control system yet, so that you can get effective views of an outline without editing it. Some of these commands affect the current view spec. See View Specs.
Here are the major commands for showing and hiding Koutline cells.
Show (expand) the tree rooted at point.
Show (expand) all of the cells in the outline. With a prefix arg, also toggle the display of blank lines between cells.
Show all of the cells down to a particular <level>. You are prompted for the level or a prefix argument may be given.
Show the subtree at point. Use {C-c C-s} to achieve a similar effect; the only difference is that it will additionally expand the root cell.
Show an overview of the outline by showing only the first line of every cell. With a prefix arg, also toggle the display of blank lines between cells.
Show a top-level view of the outline by hiding all cells but those at level 1 and collapsing the visible cells so that only their first lines are visible. With a prefix arg, also toggle the display of blank lines between cells.
A click or a press of the Action Key within a cell’s body, but not on a Hyperbole button, toggles between hiding and showing the tree rooted at point. Try it with either your mouse or with {M-RET}.
Previous: Hiding and Showing, Up: Viewing [Contents][Index]
View specifications (view specs, for short) are short codes used
to control the view of a koutline. The view specs in effect for an
outline are always displayed in the modeline of the outline’s window,
following the outline buffer name, unless the variable,
kvspec:string, has been set to ‘nil’ to disable view spec
display. The modeline display appears as <|viewspec> to aid rapid
visual location. The | (pipe character) is also used in links that
specify view specs to indicate the start of a view spec sequence.
See Links.
The current view spec is saved whenever the outline is saved. The next time the outline is read in, the same view spec will be applied.
The rest of this section documents the view spec characters that are presently supported and explains how to invoke a view spec. There is no user-level means of adding your own view spec characters, so all other character codes are reserved for future use.
{C-c C-v} prompts for a new view spec setting in which the following codes are valid. Any invalid characters in a view spec are ignored. Characters are evaluated in an order meant to do the right thing, even when you use conflicting view spec characters. The standard initial view spec is <|ben>.
Show all cell levels and all lines in cells.
Turn on blank lines between cells. Without this character, blank lines will be turned off. You may also use the {C-c b} key binding to toggle blank lines on and off independently of any other view settings.
Hide any lines greater than N in each cell. 0 means don’t cutoff any lines.
Show ellipses when some content of a cell or its subtree is hidden. This cannot be turned off.
Hide cells at levels deeper than N. 0 means don’t hide any cells.
Turn on the default label type, as given by the variable,
kview:default-label-type. Normally, this is alphanumeric labels.
Display legal labels, e.g. 1.4.3
As a test, use {C-h h k e} to display the example koutline. Then use {C-c C-v} to set a view spec of ‘c2l1’. This will turn off blank lines, clip each cell after its second line, and hide all cells below level one.
Next: Cell Attributes, Previous: Viewing, Up: Koutliner [Contents][Index]
Cells may include hyperlinks that refer to other cells or to external sources of information. Explicit Hyperbole buttons may be created as usual with mouse drags (see Creation Via Action Key Drags). A klink is a special implicit link button, delimited by <> separators, that jumps to a koutline cell. This section discusses klinks.
Press the Action Key over a klink to follow it. This will flash the klink as a button and then will display its referent in the other window. If the klink contains a view spec, it will be applied when the referent is displayed.
There are a number of easy ways to insert klinks into koutlines. If you have mouse support under Hyperbole, simply click the Action Key within the indentation to the left of a cell text. If you then double click on some cell, a link to that cell will be inserted where you started. From a keyboard, use {C-c l} when in a koutline or {C-h h k l} when not in a koutline to insert a klink. Since klinks are implicit buttons, you may instead type in the text of the klink just as you see it in the examples below and it will work exactly as if it had been entered with the insert link command.
There are basically three forms of klinks:
‘<@ 2b=06>’ is an internal klink, since it refers to the koutline in which it is embedded. When activated, it jumps to the cell within the current outline which has permanent id ‘06’ and relative id ‘2b’. ‘<@ 06>’ does the same thing, as does ‘<@ 2b>’, though this latter form will not maintain the link properly if the cell is moved elsewhere within the outline. The form, ‘<@ 2b=06 |ben>’ additionally sets the view spec of the current outline back to the default value, with a blank line between each cell and the whole outline visible.
The second klink format is an external link to another koutline, such as, ‘<EXAMPLE.kotl, 3=012 |c1e>’, which displays the named file, starting at the cell 3 (whose permanent identifer is 012), with the view specification of: blank lines turned off, cutoff after one line per cell, and showing ellipses for cells or trees which are collapsed.
The third format sets a view spec for the current koutline. For example, ‘<|ben>’, when activated, sets the view in the current outline to display blank lines, to use ellipses after collapsed lines and to label cells with the alphanumeric style.
Next: Koutliner History, Previous: Links, Up: Koutliner [Contents][Index]
Attributes are named variables whose values are specific to an outline cell. Thus, each cell has its own attribute list. Every cell has three standard attributes:
The permanent id of the cell, typically used in cross-file hyperlinks that reference the cell.
The e-mail address of the person who created this cell.
The time at which the cell was created. This is stored in a form that allows for easy data comparisons but is displayed in a human readable format, such as ‘Jan 28 18:27:59 CST 2017’.
{C-c C-i} is the command to add an attribute to or to modify an existing attribute of the cell at point. Think of it as inserting an attribute value. To remove an attribute from a cell, set its value to ‘nil’.
The ‘no-fill’ attribute is special. When set to ‘t’, it
prevents movement, promotion, demotion, exchange, split or append
commands from refilling the cell, even if the variable,
kotl-mode:refill-flag, is set to ‘t’. It does not prevent
you from invoking explicit commands that refill the cell.
See Filling.
The attribute lists for the cells in the tree rooted at point may be inspected by pressing the Assist Key within the contents of a cell. {C-c h} prompts for a cell label and displays the cell’s attributes. {C-u C-c h} prompts for a cell label and shows the attributes for it and its subtree; use 0 as the kcell id to see attributes for all visible cells in the outline.
Previous: Cell Attributes, Up: Koutliner [Contents][Index]
Much of the Hyperbole outliner design is based upon concepts pioneered in the Augment/NLS system, [Eng84a]. Augment treated documents as a hierarchical set of nodes, called statements, rather than cells. Every Augment document utilized this intrinsic structure.
The system could rapidly change the view of a document by collapsing, expanding, generating, clipping, filtering, including or reordering these nodes. It could also map individual views to multiple workstation displays across a network to aid in distributed, collaborative work.
These facilities aided greatly in idea structuring, cross-referencing, and knowledge transfer. The Koutliner is a start at bringing these capabilities back into the mainstream of modern computing culture.
Next: Window Configurations, Previous: Koutliner, Up: Top [Contents][Index]
Hyperbole includes a complete, advanced rolo system, HyRolo, for convenient management of hierarchical, record-oriented information. Most often this is used for contact management but it can quickly be adapted to most any record-oriented lookup task requiring fast retrieval.
Hyperbole buttons may be included within rolo records and then manually activated whenever their records are retrieved in a search.
The following subsections explain use and basic customization of this tool.
| • HyRolo Concepts: | ||
| • HyRolo Menu: | ||
| • HyRolo Searching: | ||
| • HyRolo Keys: | ||
| • HyRolo Settings: |
Next: HyRolo Menu, Previous: HyRolo, Up: HyRolo [Contents][Index]
HyRolo manages and searches rolo files. A rolo file consists of an optional header that starts and ends with a line of equal signs (at least three equal signs starting at the beginning of a line), followed by zero or more rolo records. You must manually add a header to any rolo file if you want it to have one.
Here is an example of a simple rolo file. The date at the end is automatically added by HyRolo whenever a new record is added.
==================================================================
                          PERSONAL ROLO
<Last-Name>, <First>  <Email>        W<Work#>       F<Fax#>
==================================================================
*   Smith, John       <js@hiho.com> W708-555-2001  F708-321-1492
        Chief Ether Maintainer, HiHo Industries
        05/24/2017
We call rolo records, entries. Entries begin with a delimiter of one or more ‘*’ characters at the beginning of a line. Entries may be arranged in a hierarchy, where child entries start with one more ‘*’ character than do their parents. Top-level entries begin with a single ‘*’.
Beyond this initial delimiter, entries are completely free-form text. It is best to use a "lastname, firstname" format, however, when adding contact entries into a rolo. Then HyRolo will automatically keep your entries alphabetized as you enter them. Then you can sort the entries if you ever need. This ordering is what the rolo will use if you accept the default entry with which it prompts you when adding a new entry.
Any search done on the rolo scans the full text of each entry. During a search, the rolo file header separator lines and anything in between are appended to the buffer of matched entries before any entries are retrieved from the file. Whenever an entry is matched, it and all of its descendant entries are retrieved. If your emacs version supports textual highlighting, each search match is highlighted for quick, visual location.
For example, a search on "Company" could retrieve the following:
==================================================================
                        COMPANY ROLO
==================================================================
*    Company
**     Manager
***      Staffer
Thus, searching for Company retrieves all listed employees. Searching for Manager turns up all Staffer entries.
Next: HyRolo Searching, Previous: HyRolo Concepts, Up: HyRolo [Contents][Index]
The Rolo submenu of the Hyperbole menu offers a full set of commands for searching and maintaining a personal address book. It looks like so.
The Rolo/ menu entry on the Hyperbole minibuffer menu provides the same set of commands as the menubar menu, with more concise labels. The Rolo/ menu offers the following commands:
Menu Item       Command                 Description
=====================================================================
Add             hyrolo-add              Adds a hyrolo entry
Display         hyrolo-display-matches  Displays last matches again
Edit            hyrolo-edit             Edits an existing hyrolo entry
Info                                    Displays a hyrolo manual entry
Kill            hyrolo-kill             Deletes a hyrolo entry
Mail            hyrolo-mail             Mails to an address at point
Order           hyrolo-sort             Sorts all hyrolo levels
RegexFind       hyrolo-grep             Finds all entries containing
                                          a regular expression
StringFind      hyrolo-fgrep            Finds all entries containing
                                          a string (or logical
                                          expression)
WordFind        hyrolo-word             Finds all entries containing
                                          a string of whole words
Yank            hyrolo-yank             Inserts the first matching
                                          hyrolo entry at point
=====================================================================
A prefix argument used with any of the find commands listed above limits the search to a maximum number of matches given by the argument. The search is terminated whenever that number of matches is found.
For any of the above commands that prompt for a name such as Edit or Add (not the Find commands), you may use the form parent/child to locate a child entry below a specific parent. Hence, for a HyRolo which looks like so:
*    Company
**     Manager
***      Staffer
you can refer to the Staffer entry with the following hierarchical notation, Company/Manager/Staffer. This hierarchical notation is not used in search expressions since they search the entire HyRolo anyway. Thus, "Staffer" as a search pattern will find an entry containing "Staffer" at any level in a hierarchy, like so:
*** Staffer
Next: HyRolo Keys, Previous: HyRolo Menu, Up: HyRolo [Contents][Index]
See HyRolo Menu, for the list of HyRolo search commands. In this section, the menu item names from the minibuffer menu are used to refer to each command.
The RegexFind menu item searches the rolo list for all entries
which contain matches for a given regular expression. The regular
expression syntax used is the same as the one used within Emacs
and across the GNU set of tools. See Syntax of Regular
Expressions in the GNU Emacs Manual, for full documentation on this
format.
The WordFind menu item locates full-word matches so that if you
search for ‘product’, it won’t match to occurrences of
‘production’. It is also handy for more precise name matching.
The StringFind menu item has two uses. It can find all entry
matches for a string or can execute logical queries for more
precise matching. The format of logical queries is explained here; a
simple parenthesis delimited prefix format is used with the following
logical operators.
Operator Name   Number of Arguments    Description
=====================================================================
and             two or more            Match entries with all args
or              two or more            Match entries with any args
xor             two or more            Match entries with 1 arg only
not             one                    Match entries without the arg
=====================================================================
For example:
(and Company (not Vice-President))
would match those entries for people associated with ‘Company’ who do not have ‘Vice-President’ titles.
The following example would provide a list of all people marked as clients whose area codes are outside of 408 and all non-clients within the 408 area code. This could be useful after all clients within the 408 area code have been contacted and you want to see who else you should contact.
(xor 408- client)
Next: HyRolo Settings, Previous: HyRolo Searching, Up: HyRolo [Contents][Index]
After a rolo search is performed, point is left in the rolo
match buffer, *Hyperbole Rolo*, which uses hyrolo-mode to
simplify browsing many rolo matches. Press {?} when in the
match buffer for a summary of available keys, all of which are
documented in this section.
If your emacs version supports textual highlighting, each search match is highlighted for quick, visual location. {TAB} moves point forward to successive spans of text which match the search expression. {M-TAB} {SHIFT-TAB} or {r} move point backward to earlier matches. These keys allow you to quickly find the matching entry of most interest to you if your search expression failed to narrow the matches sufficiently.
If you want to extend the match expression with some more characters to find a particular entry, use {M-s}. This performs an interactive search forward for the match expression. You may add to or delete characters from this expression to find different occurrences or move to the next match with {C-s}. {C-r} reverses the direction of the search.
If you would like to search for a specific entry name in the match buffer, use {l} to interactively locate the text immediately following the entry start delimiter, typically one or more asterisks. This lets you find entries by last name quickly, eliminating other matches. Standard string, {C-s}, and regular expression, {C-M-s}, interactive search commands are also available within the rolo match buffer.
Single key outlining commands are also available for browsing matches. If your search matches a large number of entries, use {t} to get a top-level summary of entries. Only the first line of each first-level match is shown. If you want to see an overview of all the levels, use {o} which shows the first line of every entry level. If you want an overview of just the first two levels, {C-u 2 o} will work.
Press {s} to show (expand) the entry at point. Use {h} to hide (collapse) the entry. Press {a} to expand all entries in the buffer.
Many other keys are defined to help you move through matching entries.
Move to the previous entry at the same level as the current entry.
Move to the next entry at the same level as the current entry.
Scroll forward a windowful.
Use the {e} key to edit the current entry within your personal
rolo file. A datestamp will automatically be added or updated at the end
of the entry, unless this feature has been turned off via the
Cust/Toggle-Rolo-Dates menu item. The variable, hyrolo-edit-hook,
is evaluated after the update of the entry datestamp. This allows
programmed modification of the way rolo edits work. The variable,
hyrolo-add-hook, works the same way but is evaluated when a new
entry is first added.
Once you have found an entry of interest and you want to remove the rolo match buffer, use {q} to quit. This will restore your current frame to its state prior to the rolo search.
Previous: HyRolo Keys, Up: HyRolo [Contents][Index]
The files used in any rolo search are given by the
hyrolo-file-list variable, whose default value is
typically ("~/.rolo.otl". Searches scan only your
personal rolo file. Any entries added to this list should be absolute
filenames. If a file in the list does not exist or is not readable, it
is skipped. Files are searched in the order in which they appear in the
list. In general, you should leave your personal rolo file as the
first entry in the list, since this is the only file to which the Add
command on the rolo menu adds entries.
Hyperbole releases earlier than 4.17 used a different file name for the personal rolo. If such a file exists, you will be prompted to rename it whenever the HyRolo system is loaded.
If you use the Big Brother DataBase (BBDB) Emacs package to capture
email addresses and store contact information, the rolo automatically
works with it. If the BBDB package is loaded before HyRolo, then your
bbdb-file of contacts is added as the second entry in
hyrolo-file-list and will be searched automatically for any matches by
the rolo find commands. Presently there is no support for editing
BBDB entries, just finding them.
For finding matches within only BBDB, there are the commands
hyrolo-bbdb-fgrep (string finding) and hyrolo-bbdb-grep
(regular expression finding). They may be bound to keys if desired.
If you use Google/Gmail Contacts, you can configure the HyRolo to query your Google Contacts for matches. First you must download and install the external google-contacts package using the Emacs Package Manager. Then you must install the non-Emacs GNU Privacy Guard (GPG) package from https://gnupg.org so that the gpg or gpg2 executable is in your command-line search path. Once these are in place, either restart Emacs or use {M-x hyrolo-initialize-file-list RET} to add Google Contacts to your searches.
When you next do a search, you will be prompted for your Google Contacts password and may also have to enter an authorization code that will be displayed on your screen. After authorization, you may at times be re-prompted for your password.
For finding matches within only Google Contacts, there are the commands
hyrolo-google-contacts-fgrep (string finding) and
hyrolo-google-contacts-grep (regular expression finding). They
may be bound to keys if desired.
Because Google can require frequent reauthorization to search your
contacts, there is a flag, hyrolo-google-contacts-flag, which
when set to ‘nil’ disables searching of your Google Contacts.
Below are the rest of the settings available with HyRolo:
hyrolo-highlight-face
If textual highlighting is available in your emacs on your current
display type, the rolo uses the value of hyrolo-highlight-face as
the face which highlights search matches.
hyrolo-kill-buffers-after-use
HyRolo file buffers are left around after they are searched, on the
assumption that another search is likely to follow within this emacs
session. You may wish to change this behavior with the following
setting: (setq hyrolo-kill-buffers-after-use t).
hyrolo-save-buffers-after-use
After an entry is killed, the modified rolo file is automatically
saved. If you would rather always save files yourself, use this
setting: (setq hyrolo-save-buffers-after-use nil).
hyrolo-email-format
When an entry is being added from within a mail reader buffer, the
rolo extracts the sender’s name and e-mail address and prompts you
with the name as a default. If you accept the default, it will enter
the name and the email address using the format given by the
hyrolo-email-format variable. See its documentation if you want to
change its value.
hyrolo-hdr-regexp
A rolo file may begin with an optional header section which is copied
to the match display buffer whenever any matches are found during a
search. The start and end lines of this header are controlled by the
regular expression variable, hyrolo-hdr-regexp, whose default value
is "^===". This allows lines of all equal signs to visually separate
matching entries retrieved from multiple files during a single search.
hyrolo-entry-regexp
The rolo entry start delimiter is given by the regular expression
variable, hyrolo-entry-regexp, whose default value is "^\*+", i.e.
one or more asterisks at the beginning of a line.
hyrolo-display-format-function
When a rolo search is done, each matching entry is passed through the
function given by the variable, hyrolo-display-format-function,
before it is displayed. This should be a function of one argument,
namely the matching rolo entry as a string. The string that this
function returns is what is displayed in the rolo match buffer. The
default function used is identity which passes the string through
unchanged. If you use the rolo code to search other kinds of
record-oriented data, this variable can be used to format each entry
however you would like to see it displayed. With a little experience,
you can quickly write functions that use local bindings of the rolo
entry and file settings to search all kinds of record-oriented data.
There is never a need to learn a complicated query language.
Next: Developing with Hyperbole, Previous: HyRolo, Up: Top [Contents][Index]
This chapter explains Hyperbole’s hywconfig.el library. It lets you save and restore window configurations, i.e. the layout of windows and buffers displayed within an emacs frame. This is useful to save a particular working context and then to jump back to it at a later time during an emacs session. It is also useful during demonstrations to display many informational artifacts all at once, e.g. all of the windows for a particular subsystem. None of this information is stored between emacs sessions, so your window configurations will last through only a single session of use. Each window configuration is tied to the emacs frame in which it is created.
The hywconfig library offers two independent ways of managing window configurations. The first way associates a name with each stored window configuration. The name may then be used to retrieve the window configuration later. The second way uses a ring structure to save window configurations and then allows cycling through the ring of saved configurations, finally wrapping around to the first entry after the last entry is encountered. Simply stop when the desired configuration is displayed.
The Win/ menu entry on the Hyperbole top-level menu displays a menu of hywconfig window configuration commands:
WinConfig> AddName DeleteName RestoreName PopRing SaveRing YankRing
The operations on this menu are defined as follows.
Menu Item       Command                     Description
=====================================================================
AddName         hywconfig-add-by-name       Name current wconfig
DeleteName      hywconfig-delete-by-name    Delete wconfig by name
RestoreName     hywconfig-restore-by-name   Restore wconfig by name

PopRing         hywconfig-delete-pop        Restore and delete wconfig
SaveRing        hywconfig-ring-save         Store wconfig to the ring
YankRing        hywconfig-yank-pop          Restore the next wconfig
=====================================================================
The easiest method to save and restore window configurations shown here is by name, but it requires that you type the chosen name. Instead, the ring commands permit saves and restores using only the mouse. Since the ring commands are a bit more complex than their by-name counterparts, the following paragraphs explain them in more detail.
HyWconfig creates a ring structure that operates just like the Emacs
kill-ring (see Kill Ring in the GNU Emacs Manual) but its
elements are window configurations rather than text regions. You can
add an element to the ring to save the current window configuration in
the selected frame. After several elements are in the ring, you can
walk through all of them in sequence until the desired configuration
is restored.
SaveRing executes the hywconfig-ring-save command which
saves the current window configuration to the ring.
YankRing executes the hywconfig-yank-pop command. It restores
the window configuration currently pointed to within the ring. It
does not delete this configuration from the ring but it does move the
pointer to the prior ring element. Repeated calls to this command
thus restore successive window configurations until the ring pointer
wraps around. Simply stop when a desired configuration appears and
use {q} to quit from the minibuffer menu.
PopRing calls the hywconfig-delete-pop command. It is used to
restore a previously saved configuration and to delete it from the ring.
Simply stop when a desired configuration appears and use {q} to
quit from the minibuffer menu.
The maximum number of elements the ring can hold is set by the
hywconfig-ring-max variable whose default is 10. Any saves beyond
this value will delete the oldest element in the ring before a new one
is added.
Next: Glossary, Previous: Window Configurations, Up: Top [Contents][Index]
This chapter is for people who are familiar with Emacs Lisp and wish to customize Hyperbole, to extend it, or to develop other systems using Hyperbole as a base.
| • Hook Variables: | ||
| • Creating Types: | ||
| • Explicit Button Technicalities: | ||
| • Encapsulating Systems: | ||
| • Embedding Hyperbole: |
Next: Creating Types, Previous: Developing with Hyperbole, Up: Developing with Hyperbole [Contents][Index]
Hyperbole supplies a number of hook variables that allow you to adjust its basic operations to meet your own needs, without requiring you to change the code for those operations.
We find it best to always set the value of hook variables either to
‘nil’ or to a list of function names of no arguments, each of which
will be called in sequence when the hook is triggered. If you use
the add-hook function to adjust the value of hooks, it will do
this automatically for you.
Given the name of a function, a Hyperbole hook variable triggered within that function has the same name as the function with a ‘-hook’ appended. Hyperbole includes the following hook variables:
hyperbole-init-hook
For customization at Hyperbole initialization time. Use this to load any personal Hyperbole type definitions or key bindings you might have. It is run after Hyperbole support code is loaded but before Hyperbole is initialized, i.e. prior to keyboard and mouse bindings.
action-key-depress-hook
assist-key-depress-hook
Run after an Action or Assist Mouse Key depress is detected.
action-key-release-hook
assist-key-release-hook
Run after an Action or Assist Mouse Key release is detected, before any associated action is executed.
action-act-hook
Run before each Hyperbole button activation.
The variable hbut:current contains the button to be activated when
this is run.
ebut-create-hook
Adds to the Hyperbole explicit button creation process.
ebut-delete-hook
Adds to the Hyperbole explicit button deletion process.
ebut-modify-hook
Executed when an explicit button’s attributes are modified.
hibtypes-begin-load-hook
Executed prior to loading of standard Hyperbole implicit button types. Used to load site-specific low priority implicit button types since lowest priority ibtypes are loaded first.
hibtypes-end-load-hook
Executed after loading of standard Hyperbole implicit button types. Used to load site-specific high priority implicit button types since highest priority ibtypes are loaded last.
htype-create-hook
Executed whenever a Hyperbole type (e.g. action type or implicit button type) is added to the environment.
htype-delete-hook
Executed whenever a type is deleted from the environment.
kotl-mode-hook
Executed whenever a koutline is created or read in or when kotl-mode is invoked.
hyrolo-add-hook
Executed after the addition of a new rolo entry.
hyrolo-display-hook
Executed when rolo matches are displayed.
hyrolo-edit-hook
Executed after point is successfully moved to an entry to be edited.
hyrolo-mode-hook
Executed when a rolo match buffer is created and put into hyrolo-mode.
hyrolo-yank-reformat-function
A variable whose value may be set to a function of two arguments, START and END, which give the region of the rolo entry yanked into the current buffer by the hyrolo-yank command. The function may reformat this region to meet user-specific needs.
Hyperbole also makes use of a number of standard Emacs hook variables.
find-file-hook
This is called whenever a file is read into a buffer. Hyperbole uses it to highlight any buttons within files.
write-file-hooks
This is called whenever a buffer is written to a file. Hyperbole uses it to save modified button attributes associated with any file from the same directory as the current file.
Hyperbole mail and news facilities also utilize a number of Emacs hook variables. These hide button data and highlight buttons if possible. See the Hyperbole files with ‘mail’ and ‘gnus’ in their names for specific usage of such hooks.
Next: Explicit Button Technicalities, Previous: Hook Variables, Up: Developing with Hyperbole [Contents][Index]
To define or redefine a single Hyperbole type, you may either:
(eval-defun) (only works in Emacs Lisp mode);
(eval-last-sexp) (works in most modes).
The functions from the ‘htype’ class may be applied to any Hyperbole types, if needed.
The following subsections explain the specifics of Hyperbole type definitions which are beyond standard practice for Emacs Lisp programming. See the definitions of the standard types in hactypes.el and hibtypes.el for examples.
| • Action Type Creation: | ||
| • Implicit Button Types: |
Next: Implicit Button Types, Previous: Creating Types, Up: Creating Types [Contents][Index]
New forms of explicit buttons may be created by adding new action types to a Hyperbole environment. The file, hactypes.el, contains many examples of working action types.
An action type is created, i.e. loaded into the Hyperbole environment,
with the (defact) function (which is an alias for
(actype:create)). The calling signature for this function is
given in its documentation; it is the same as that of (defun)
except that a documentation string is required. An interactive
calling form is also required if the action type has formal parameters
and is to be used in explicit or global button definitions. Implicit
buttons never use an action type’s interactive form; however, it is
good practice to include an interactive form since the type creator
cannot know how users may choose to apply the type.
An action type’s parameters are used differently than those of a function being called. Its interactive calling form is used to prompt for type-specific button attributes whenever an explicit button is created. The rest of its body is used when a button with this action type is activated. Then the button attributes together with the action type body are used to form an action that is executed in response to the button activation. The action’s result is returned to the action caller unless it returns ‘nil’, in which case ‘t’ is returned to the caller to ensure that it registers the performance of the action.
An action type body may perform any computation that uses Emacs Lisp and Hyperbole functions.
The interactive calling form for an action type is of the same form as
that of a regular Emacs Lisp function definition (see the
documentation for the Emacs Lisp (interactive) form
or see Code Characters for ’interactive’ in the GNU Emacs Lisp Reference Manual. It may additionally use
Hyperbole command character extensions when the form is given as a
string. Each such extension character must be preceded by a
plus sign, ‘+’, in order to be recognized, since such characters
may also have different standard interactive meanings.
The present Hyperbole extension characters are:
+IPrompts with completion for an existing Info (filename)nodename.
+KPrompts for an existing kcell identifier, either a full outline level identifier or a permanent idstamp.
+LPrompts for a klink specification. See the documentation for the function
(kcell-view:reference) for details of the format of a klink.
+MPrompts for a mail message date and the file name in which it resides. The mail parameters prompted for by this character code may change in the future.
+VPrompts for a Koutliner view specification string, with the current view spec, if any, as a default.
+XPrompts with completion for an existing Info index (filename)itemname.
Arguments are read by the functions in Hyperbole’s hargs class,
rather than the standard Lisp read functions, in order to allow
direct selection of arguments via the Action Key.
If an action type create is successful, the symbol that Hyperbole uses internally to reference the type is returned. On failure, ‘nil’ is returned so that you may test whether or not the operation succeeds.
Once you have defined an action type within your present Hyperbole environment, you can create new explicit buttons which use it. There is no explicit button type beyond its action type, so no other work is necessary.
Call (actype:delete) to remove an action type from a Hyperbole
environment. It takes a single parameter which should be the same type
symbol used in the type definition call (not the Hyperbole symbol
returned by the call).
Previous: Action Type Creation, Up: Creating Types [Contents][Index]
An implicit button type is created or loaded via the (defib)
function (which is an alias for (ibtype:create)). The calling
signature for this function is given in its documentation; it is the
same as that of (defun), but with a number of constraints. The
parameter list should always be empty since no parameters will be used.
A documentation string is required; it is followed by the body of the
type.
The body of an implicit button type is a predicate which determines
whether or not point is within an implicit button of the type. If not,
the predicate returns ‘nil’. If so, it may optionally setup to
flash the button and then to perform one or more actions. A call of the
form: (ibut:label-set label start-pos end-pos) is used to setup
the button flashing, if desired. This is then typically immediately
followed by an action invocation of the form:
(hact 'actype &rest actype-arguments). It is imperative that all
actions (non-predicate code) be invoked through the (hact)
function or your ibtypes will not work properly. (Hyperbole first tests
to see if any ibtype matches the current context before activating any
type, so it ensures that (hact) calls are disabled during this
testing.) Any action types used in the definition of an implicit button
type may be created before or after the definition, but obviously, must
be defined before any implicit buttons of the given type are activated;
an error will result, otherwise.
If an implicit button type create is successful, the symbol that Hyperbole uses internally to reference the type is returned. On failure, ‘nil’ is returned so that you may test whether or not the operation succeeds. Implicit button type names and action type names may be the same without any conflict. In fact, such naming is encouraged when an implicit button type is the exclusive user of an action type.
Call (ibtype:delete) to remove an implicit button type from a
Hyperbole environment. It takes a single parameter which should be the
same type symbol used in the type definition call (not the Hyperbole
symbol returned by the call). This will not delete the action type used
by the implicit button; that must be done separately.
By default, a request for help on an implicit button will display the
button’s attributes in the same manner as is done for explicit buttons.
For some implicit button types, other forms of help will be more
appropriate. If an Emacs Lisp function is defined whose name is formed
from the concatenation of the type name followed by ‘:help’, e.g.
my-ibtype:help, it is used as the assist-action whenever the
Assist Key is pressed, to respond to requests for help on buttons of
that type. Any such function should take a single argument of an
implicit button construct. (This is what
(ibut:at-p) returns when point is within an implicit button
context.) The button may be queried for its attributes using
functions from the ‘hbut’ and ‘hattr’ classes. See
the hib-kbd.el file for an example of a custom help function.
Next: Encapsulating Systems, Previous: Creating Types, Up: Developing with Hyperbole [Contents][Index]
| • Button Label Normalization: | ||
| • Operational and Storage Formats: | ||
| • Programmatic Button Creation: |
Next: Operational and Storage Formats, Previous: Explicit Button Technicalities, Up: Explicit Button Technicalities [Contents][Index]
Hyperbole uses a normalized form of button labels called button keys (or
label keys) for all internal operations. See the documentation for the
function (hbut:label-to-key) for details of the normalization
process. The normalized form permits Hyperbole to recognize buttons that
are the same but whose labels appear different from one another, due to
text formatting conventions. For example, all of the following would
be recognized as the same button.
  <(fake button)>     <( fake      button)>

  Pam>  <(fake
  Pam>    button)>

  ;; <(fake
  ;;   button)>

  /* <( fake      */
  /*    button )> */
The last three examples demonstrate how Hyperbole ignores common fill
prefix patterns that happen to fall within the middle of a button label
that spans multiple lines. As long as such buttons are selected with
point at a location within the label’s first line, the button will be
recognized. The variable hbut:fill-prefix-regexps holds the list
of fill prefixes recognized when embedded within button labels. All
such prefixes are recognized (one per button label), regardless of the
setting of the Emacs variable, fill-prefix, so no user
intervention is required.
Next: Programmatic Button Creation, Previous: Button Label Normalization, Up: Explicit Button Technicalities [Contents][Index]
Hyperbole uses a terse format to store explicit buttons and a more
meaningful one to show users and to manipulate during editing. The
terse format consists solely of button attribute values whereas the edit
format includes an attribute name with each attribute value. A button
in edit format consists of a Lisp symbol together with its attribute list
which holds the attribute names and values. In this way, buttons may be
passed along from function to function simply by passing the symbol to
which the button is attached. Most functions utilize the pre-defined
hbut:current symbol by default to store and retrieve the last
encountered button in edit format.
The ‘hbdata’ class handles the terse, stored format. The ‘hbut’, ‘ebut’, and ‘ibut’ classes work with the name/value format. This separation permits the wholesale replacement of the storage manager with another, with any interface changes hidden from any Hyperbole client programming.
Previous: Operational and Storage Formats, Up: Explicit Button Technicalities [Contents][Index]
A common need when developing with Hyperbole is to create or to modify explicit buttons without user interaction. For example, an application might require the addition of an explicit summary button to a file for each new mail message a user reads that contains a set of keywords. The user could then check the summary file and jump to desired messages quickly.
The Hyperbole class ‘ebut’ supports programmatic access to explicit
buttons. Examine it within the hbut.el file for full details.
The documentation for (ebut:create) explains the set of
attributes necessary to create an explicit button. For operations over
the whole set of buttons within the visible (non-narrowed) portion of a
buffer, use the (ebut:map) function.
Next: Embedding Hyperbole, Previous: Explicit Button Technicalities, Up: Developing with Hyperbole [Contents][Index]
A powerful use of implicit button types is to provide a Hyperbole-based interface to external systems. The basic idea is to interpret patterns output by the application as implicit buttons.
See the hsys-* files for examples of how to do this. Encapsulations are provided for the following systems (the systems themselves are not included with Hyperbole):
The world-wide web system originally developed at CERN, that now spans the Internet universe. This is automatically loaded by Hyperbole so that a press of the Action Key follows a URL.
Previous: Encapsulating Systems, Up: Developing with Hyperbole [Contents][Index]
[NOTE: We have never done this ourselves, though we have done similar things which leads us to infer that the task should not be difficult.]
The standard Hyperbole user interface has purposely been separated from the Hyperbole backend to support the development of alternative interfaces and the embedding of Hyperbole functionality within other system prototypes. The Hyperbole backend functionality that system developers can make use of is called its Application Programming Interface (API). The API may be used to make server-based calls to Hyperbole when Emacs is run as a non-interactive (batch) process, with its input/output streams attached to another process.
The public functions and variables from the following files may be considered the present Hyperbole API:
hact.el, hargs.el, hbmap.el, hbut.el, hhist.el, hmail.el, hmoccur.el, hpath.el, htz.el, hypb.el, hyrolo.el, hyrolo-logic.el, hywconfig.el and set.el.
Note when looking at these files, that they are divided into sections that separate one data abstraction (class) from another. A line of dashes within a class separates public parts of the class from the private parts that follow the line.
This API does not include the Hyperbole Koutliner, as it has been designed for interactive use, rather than programmatic extensibility. You are welcome, however, to study its code, below the hyperbole-${hyperb:version}/kotl/ directory.
Next: Setup, Previous: Developing with Hyperbole, Up: Top [Contents][Index]
Concepts pertinent to operational usage of Hyperbole are defined here. See Glossary in the GNU Emacs Manual, if any emacs-related terms are unfamiliar to you.
An executable behavior associated with a Hyperbole button. Links are a specific class of actions which display existing entities, such as files. See also Action Type.
See Smart Key.
A behavioral specification for use within Hyperbole buttons. Action types usually contain a set of parameters which must be given values for each button with which they are associated. An action type together with a set of values, called arguments, is an action. Actype is a synonym for action type.
A request to a Hyperbole button to perform its action. Ordinarily the user presses a key which selects and activates a button.
A button-specific value fed to a Hyperbole type specification when the button is activated.
See Smart Key.
A named parameter slot associated with a category or type of Hyperbole button. An attribute value is typically specific to a particular button instance.
The Augment system, originally named NLS, was a pioneering research and production system aimed at augmenting human intellect and group knowledge processing capabilities through integrated tools and organizational development strategies. This approach led to the invention of much of interactive computing technology decades ahead of other efforts, including: the mouse, chord keyboards, screen windows, true hypertext, outline processors, groupware, and digitally signed documents. See References, which cites several Douglas Engelbart papers on the subject. The Koutliner demonstrates a few of the concepts pioneered in Augment.
An Emacs buffer is an editable or viewable text, possibly with special formatting such as an outline or table. It may also be attached to a process, receiving and updating its text as the process handles changing information.
A selectable Hyperbole construct which performs an action. A button consists of a set of attributes that includes: a textual label, a category, a type and zero or more arguments. Explicit buttons also have creator, create time, last modifier, and last modifier time attributes.
Buttons provide user gateways to information. Users see and interact with button labels; the rest of the button attributes are managed invisibly by Hyperbole and displayed only in response to user queries.
See Activation.
See Attributes.
Lists of button attribute values explicitly saved and managed by Hyperbole. One list for each button created by Hyperbole.
A per-directory file named HYPB that may be used to store any buttons that link to files within the directory. It may be displayed via a menu selection whenever a user is within the directory.
A per-user file named HYPB that stores all global buttons for the user and any other buttons used to navigate to other information spaces. It may be displayed via a menu selection at any time.
A normalized form of a button label used internally by Hyperbole.
A text string that visually indicates a Hyperbole button location and that serves as its name and unique identifier. Within a buffer, buttons with the same label are considered separate views of the same button and so behave exactly alike. Since button labels are simply text strings, they may be embedded within any text to provide non-linear information or operational access points.
The maximum length of a button label is limited by the variable
ebut:max-len.
The act of designating a Hyperbole button upon which to operate. Use the Action Key to select a button.
A class of Hyperbole buttons: implicit, explicit or global.
See Kcell.
The set of koutline cells which share a common parent cell and thus, are one level deeper than the parent.
A group of functions and variables with the same prefix in their names, used to provide an interface to an internal or external Hyperbole abstraction.
A programmatic or positional state recognized by Hyperbole. We speak of Smart Key and implicit button contexts. Both are typically defined in terms of surrounding patterns within a buffer, but may be defined by arbitrary Emacs Lisp predicates.
See Screen.
The contexts in which an implicit button type may be found, i.e. where its predicate is true.
A mouse button press in one location and following release in another location.
See Hyperbole Environment.
A button created and managed by Hyperbole, associated with a specific action type. By default, explicit buttons are delimited like this ‘<(fake button)>’. Direct selection is used to operate upon an explicit button.
An Emacs frame displays one or more Emacs windows and widgets (menubars, toolbars, scrollbars). Under a graphical window system, this is a single window system window. On a dumb terminal, only one frame is visible at a time as each frame generally fills the whole terminal display, providing a virtual screen capability. Emacs windows exist within a frame.
A form of explicit button which is accessed by name rather than direct
selection. Global buttons are useful when one wants quick access to
actions such as jumping to common file locations or for performing
sequences of operations. One need not locate them since they are always
available by name, with full completion offered. All global buttons are
stored in the file given by the variable gbut:file and may be
activated as regular explicit buttons by visiting this file. By
default, this is the same as the user’s personal button file.
See Button File, personal and Global Button.
See Windows Grid.
A variable that permits customization of an existing function’s
operation without the need to edit the function’s code. See also the
documentation for the function (run-hooks).
HyControl, the Hyperbole window and frame control manager, offers fast, single key manipulation of window and frame creation, deletion, sizing, position and face zooming (enlarging/shrinking).
The flexible, programmable information management and viewing system documented by this manual. It utilizes a button-action model and supports hypertextual linkages. Hyperbole is all things to all people.
A programmatic context within which Hyperbole operates. This includes the set of Hyperbole types defined and the set of Hyperbole code modules loaded. It does not include the set of accessible buttons. Although the entire Emacs environment is available to Hyperbole, we do not speak of this as part of the Hyperbole environment.
A text or group of texts which may be explored in a non-linear fashion through associative linkages embedded throughout the text. Instead of simply referring to other pieces of work, hypertext references when followed actually take you to the works themselves.
HyRolo, the Hyperbole record/contact manager, provides rapid lookup of multi-line, hierarchically ordered free form text records. It can also lookup records from Google/GMail Contacts and the Big Brother DataBase (BBDB) package.
A button recognized contextually by Hyperbole. Such buttons contain no button data. See also implicit button type.
A specification of how to recognize and activate implicit buttons of a specific kind. Implicit button types often utilize structure internal to documents created and managed by tools other than Hyperbole, for example, programming documentation. Ibtype is a synonym for implicit button type. See also system encapsulation.
A colon prefaced number appended to the label of a newly created button when the button’s label duplicates the label of an existing button in the current buffer. This number makes the label unique and so allows any number of buttons with the same base label within a single buffer.
A hierarchically ordered grouping of cells which may be stored as a file and viewed and edited as an outline.
Koutliner, the Hyperbole outliner, is a powerful autonumbering outliner with permanent hypertext anchors for easy hyperlinking and view specs for rapid outline view alteration.
Cells or kcells are elements within koutlines. Each cell may contain textual and graphical contents, a relative identifier, a permanent identifier and a set of attributes such as the user who created the cell and the time of creation. See also Koutliner.
A reference from a Hyperbole button to an existing (non-computed) entity. The referenced entity is called a referent. Links are a subset of the types of actions that Hyperbole buttons support.
See Button File, local.
The one line window at the bottom of a frame where messages and prompts are displayed.
A Hyperbole menu displayed in the minibuffer window. Each menu item within a minibuffer menu begins with a different letter that can be used to invoke the item (case doesn’t matter). Items that display other menus end with a forward slash, ‘/’.
See Smart Key.
See Augment.
See Link or Cell.
The GNU OO-Browser is a multi-windowed, interactive object-oriented class browser similar in use to the well-known Smalltalk browsers. It runs inside Emacs. It is unique in a number of respects foremost of which is that it works well with most major object-oriented languages in use today. You can switch from browsing in one language to another in a few seconds. It provides both textual views within an editor and graphical views under the X window system and Windows. It includes support for C, C++, Common Lisp and its Object System (CLOS), Eiffel, Java, Objective-C, Python and Smalltalk.
Hyperbole provides the mouse support for the OO-Browser, providing Smart Keys that utilize the OO-Browser’s capabilities both when it is displayed on screen and when editing code.
See Koutline.
Any koutline cell which has children.
The previous same level koutline cell with the same parent.
A boolean (‘nil’ = false, non-nil = true = ‘t’) Lisp expression typically evaluated as part of a conditional expression. Implicit button types contain predicates that determine whether or not a button of that type is to be found at point.
See Link.
A file or directory on a system not shared within the local area network. The built-in Emacs library, Tramp, handles remote pathnames and Hyperbole uses it to enable viewing and editing of remote paths of the form: /<protocol>:<user>@<host>:<path> as well as web URLs. Use the Cust/Find-File-URLs menu option to enable this feature.
See HyRolo.
A koutline cell which has cells below it at lower outline levels. All such cells share the same root cell.
The total display area available to Emacs frames. This may consist of multiple physical monitors arranged into a single virtual display. Screen edges are thus the outer borders of the virtual display.
A context-sensitive key used within Hyperbole and beyond. There are two Smart Keys, the Action Key and the Assist Key. The Action Key activates Hyperbole buttons and scrolls the current buffer line to the top of the window when pressed at the end of a line.
The Assist Key shows help for Hyperbole buttons and scrolls the current line to the bottom of the window when pressed at the end of a line.
The {C-h h d s} Doc/SmartKeys menu item displays a full summary of Smart Key capabilities. See Smart Keys, for complete details.
Smart Menus are an older in-buffer menu system that worked on dumb terminals and pre-dated Emacs’ own dumb terminal menu support. They are included with InfoDock (which is no longer maintained) and are not available separately. They are not a part of Hyperbole and are not necesary for its use but are still supported by the Smart Keys.
The buffer or file within which a Hyperbole button is embedded.
All of the cells in a koutline which share the same root cell, excluding the root cell.
The next same level koutline cell which follows the current cell and shares the same parent.
Use of Hyperbole to provide an improved or consistent user interface to another system. Typically, implicit button types are defined to recognize and activate button-type constructs managed by the other system.
A remote file access library built-in to Emacs. It uses secure transfer and works with many types of hosts. It allows you to use remote pathnames that are accessible via Internet protocols just like other pathnames, for example when finding a file. Hyperbole recognizes pathnames of the form, /<protocol>:<user>@<host>:<path> and web URLs.
The set of cells in a koutline that share a common root cell, including the root cell.
A Universal Resource Locator specification used on the World-Wide web to access documents and services via a multiplicity of protocols.
A perspective on some information. A view can affect the extent of the information displayed, its format, modes used to operate on it, its display location and so forth.
A terse (and to the uninitiated, cryptic) string that specifies a particular view of a koutline or a link referent. If a view spec is active for a buffer, the view spec appears within the modeline like so, <|view spec>.
An Emacs window displays a single Emacs buffer within a single frame. Frames may contain many windows.
A feature of HyControl invoked with {@} which creates, lays out and populates a grid of a specified size of new Emacs windows, e.g. 4 rows by 3 columns, each displaying a different buffer chosen by a set of user specifiable filters.
Next: Global Key Bindings, Previous: Glossary, Up: Top [Contents][Index]
Hyperbole must be obtained and setup at your site before you can use it. Instructions are given below. If you are using InfoDock version 4.0.7 or higher, Hyperbole is pre-installed so you may skip the installation instructions and simply continue with the invocation instructions in this appendix.
| • Installation: | ||
| • Invocation: | ||
| • Customization: |
Next: Invocation, Previous: Setup, Up: Setup [Contents][Index]
Once you have Emacs set up at your site, GNU Hyperbole may be installed by using the Emacs Package Manager. If you are not familiar with it, see Packages in the GNU Emacs Manual.
If you have Hyperbole 5.10 or higher installed and simply want to upgrade it, invoke the Emacs Package Manager with {M-x list-packages RET}, then use the {U} key followed by the {x} key to upgrade all out-of-date packages, Hyperbole among them. Then skip the text below and move on to the next section, see Invocation.
Otherwise, to download and install the Hyperbole package, you should add several lines to your personal Emacs initialization file, ~/.emacs. (For further details, see The Emacs Initialization File in the GNU Emacs Manual).
Below are the lines to add:
(require 'package)
;; Prevent double loading of libraries
(setq package-enable-at-startup nil)
(package-initialize)
(unless (package-installed-p 'hyperbole)
  (package-refresh-contents)
  (package-install 'hyperbole))
(require 'hyperbole)
Now save the file and restart Emacs. Hyperbole will then be downloaded and compiled for use with your version of Emacs; give it a minute or two. You may see a bunch of compilation warnings but these can be safely ignored.
Now read the next section on Invocation.
Next: Customization, Previous: Installation, Up: Setup [Contents][Index]
Once Hyperbole has been installed for use at your site and loaded into your Emacs session, it is ready for use. You will see a Hyperbole menu on your menubar and {C-h h} will display a Hyperbole menu in the minibuffer for quick keyboard or mouse-based selection. Select an item from this menu by typing the item’s first letter. Use {q} to quit from the menu.
You can invoke Hyperbole’s commands in one of three ways:
Use {C-h h d d} for an interactive demonstration of standard Hyperbole button capabilities.
Type {C-h h k e} for an interactive demonstration of the Koutliner, Hyperbole’s multi-level autonumbered hypertextual outliner.
To try out HyControl, Hyperbole’s interactive frame and window control system, use {C-h h s w} for window control or {C-h h s f} for frame control. Pressing {t} switches between window and frame control once in HyControl. Hyperbole also binds {C-c \} for quick access to HyControl’s window control menu if it was not already bound prior to Hyperbole’s initialization. A long video demonstrating most of HyControl’s features is available at https://youtu.be/M3-aMh1ccJk.
The above are the best interactive ways to learn about Hyperbole. The Hyperbole Manual is a reference manual, not a simple introduction. It is included in the man/ subdirectory of the Hyperbole package directory in four forms:
man/hyperbole.info   - online Info browser version
man/hyperbole.html   - web HTML version
man/hyperbole.pdf    - printable version
man/hyperbole.texi   - source form
The Hyperbole package installation places the Info version of this
manual where needed and adds an entry for Hyperbole into the Info
directory under the Emacs category. {C-h h d i} will let you
browse the manual. Then use {s} to search for anything
throughout the manual. For web browsing, point your browser
at ${hyperb:dir}/man/hyperbole.html, wherever the
Hyperbole package directory is on your system; often this
is: ~/.emacs.d/elpa/hyperbole-${hyperb:version}/.
Advanced users may want to continue on to the next section about configuring Hyperbole’s behavior.
Previous: Invocation, Up: Setup [Contents][Index]
Major Hyperbole user options may be set from the Customize submenu below the Hyperbole menubar menu, as seen here.
Alternatively, the minibuffer-based menu, Cust/ may be used.
Generally, you should not need to change anything other than these options. However, if you like to customize your environment extensively, there are many additional Hyperbole customization options that may be changed with the Emacs customization interface, see Easy Customization Interface in the GNU Emacs Manual. When you save any changes within this interface, the changes are saved permanently to your personal Emacs initialization file and are available in future Emacs sessions.
Use Cust/All-Options {C-h h c a} to display an expandable tree of customizable Hyperbole options. Hyperbole’s customizations are further grouped into several sub-categories, one for the Koutliner, one for the HyRolo, etc. You can select either an entire category or a specfic option and they will appear in another window for editing. Simply follow the instructions on screen and then press the “Apply and Save” button to make any changes permanent.
If you know the name of the option you want to edit, you can edit it at any time without going through the tree of options. Use {M-x customize-variable RET} and then type the name of the variable and press RET to edit it.
The following sections discuss the customization options most likely to be of interest to users.
| • Referent Display: | ||
| • Internal Viewers: | ||
| • External Viewers: | ||
| • Link Variable Substitution: | ||
| • Web Search Engines: | ||
| • Using URLs with Find-File: | ||
| • Invisible Text Searches: | ||
| • Button Colors: |
Next: Internal Viewers, Previous: Customization, Up: Customization [Contents][Index]
Hyperbole lets you control where link referents are displayed and even what Emacs function or external program is used to display them. There are three categories of referents, each with its own display setting:
Referent Category             Variable Setting
========================================================================
Internal Standard Display     hpath:display-where
Internal Custom Display       hpath:internal-display-alist
External Display              hpath:external-display-alist
Regular file links are displayed in an Emacs window specified by the
hpath:display-where setting which may be changed with the Cust/Referents
{C-h h c r} menu.
Available options are:
Display in the selected window of another existing frame
Display in the selected (current) window
Display in the selected window of another existing frame, deleting its other windows
Display in a new single window frame
Display in another, possibly new window of the selected frame (this is the default)
Display in a window of the selected frame and delete its other windows
Alternatively, you can use the Hyperbole menubar menu as shown here:
Continue reading the next sections for information on custom Internal and External Viewers for link referencts.
Next: External Viewers, Previous: Referent Display, Up: Customization [Contents][Index]
When given a file name, Hyperbole will by default display the file for
editing within an Emacs buffer. The hpath:internal-display-alist
variable can be used to specify file name patterns, such as matching
suffixes, which will invoke a special Emacs Lisp function to display
any matching files within Emacs. This can be used to format raw data
files for convenient display.
For those who want to change this variable, hpath:internal-display-alist
is defined in hpath.el. Its value is an association list whose
elements are (<file-name-regular-expression> . <function-of-one-arg>)
pairs. Any path whose name matches a <file-name-regular-expression>
will be displayed by calling the associated <function-of-one-arg> with
the file name as the argument.
By default, this variable handles the following types of files:
Major audio format files are played with the play-sound-file command.
Files with a .info suffix (may also be compressed) are displayed in the Info browser.
Files with an .rdb suffix are displayed as relational databases using the RDB package available with InfoDock.
See External Viewers, for instructions on associating file names with external, window-system specific viewers.
Next: Link Variable Substitution, Previous: Internal Viewers, Up: Customization [Contents][Index]
If you will be using Hyperbole under a window system,
the hpath:get-external-display-alist function
in hpath.el supports hyperlinks that open files using external, non-Emacs
tools, e.g. a pdf reader or a vector graphic viewer.
The value returned by hpath:get-external-display-alist is determined
based on the window system supported by the current frame and the version
of Emacs in use. This value is an association list whose elements are
(<file-name-regular-expression> . <viewer-program-or-list>) pairs. Any
path whose name matches a <file-name-regular-expression> will be
displayed using the corresponding viewer-program or the first
viewer-program found on the system from a list of programs. If a
<viewer-program> entry contains a ‘%s’ string, the filename to
display will be substituted at that point within the string.
Otherwise, the filename will be appended to the <viewer-program>
entry. Alternatively, the viewer-program may be a Lisp function that
takes a single filename argument.
The association lists used by this function are stored in variables
for each available window system: hpath:external-display-alist-macos,
hpath:external-display-alist-mswindows, and
hpath:external-display-alist-x. Examine and modify these
values to suit your needs.
On systems that have a MIME mailcap file (see
www.wikiwand.com/en/Mailcap), this is used as a fallback
set of external viewer associations when none are found
within hpath:get-external-display-alist.
Next: Web Search Engines, Previous: External Viewers, Up: Customization [Contents][Index]
Another option to consider modifying is hpath:variables. This
option consists of a list of Emacs Lisp variable names, each of which
may have a pathname or a list of pathnames as a value. Whenever a
Hyperbole file or directory link button is created, its pathname is
compared against the values in hpath:variables. The first
match found, if any, is selected and its associated variable name is
substituted into the link pathname, in place of its literal value.
When a link button is activated, potentially at a different site,
Hyperbole replaces each variable within the link pathname with the
first matching value from this list to recreate the literal pathname.
Environment variables are also replaced whenever link paths are
resolved.
This permits sharing of links over wide areas, where the variable values
differ between link creator and link activator. The entire process
is wholly transparent to the user; it is explained here simply to help
you in deciding whether or not to modify the value of
hpath:variables.
Next: Using URLs with Find-File, Previous: Link Variable Substitution, Up: Customization [Contents][Index]
The Find/Web menu offers quick access to major web search engines. It is typically bound to {C-c /} or if not, then {C-h h f w} is always available. Your standard web browser will be used to return the search results.
Advanced users can change the search engines listed in the Find/Web menu with {M-x customize-variable RET hyperbole-web-search-alist RET}. Changes are automatically reflected in the Hyperbole menus once applied. Remember each search engine name must begin with a unique letter and each URL must have a %s format field indicating where to place the web search term when a search is performed.
You can change which browser is used with {C-h h c w}, the Cust/Web-Search menu. Below is the equivalent Hyperbole menubar menu.
Next: Invisible Text Searches, Previous: Web Search Engines, Up: Customization [Contents][Index]
Hyperbole always recognizes URLs within buffers when the Action Key is
pressed on them. But sometimes it is useful to enter a URL at a prompt
and have it displayed. Hyperbole can recognize ftp and www URLs given to
the find-file command (or any other find-file-* commands).
But because there is added overhead with this feature, it is not enabled by
default.
To enable the feature, use the Hyperbole menu item Cust/Find-File-URLs (or Find-File-Accepts-URLs on the Hyperbole/Customize pulldown menu). Either of these toggles acceptance of URLs. When enabled the string, URLs, appears in the parenthesized minor-mode section of the modeline.
To enable this feature each time you start the editor, add the
following to your personal initialization file after initializing
Hyperbole: (hpath:find-file-urls-mode 1).
Both full URLs and abbreviated ones, like www.gnu.org, are recognized. File name completion does not work with URLs; you have to type or paste in the entire URL. This feature will work only if you have the builtin Tramp Emacs Lisp package; if you don’t have Tramp, an error message will be displayed when you try to enable find-file URLs.
The web browser used to display URLs may be set with the minibuffer menu Cust/URL-Display {C-h h c u} or with this Hyperbole menubar menu.
Next: Button Colors, Previous: Using URLs with Find-File, Up: Customization [Contents][Index]
This is largely for outline modes such as the Koutliner. By default, character-by-character interactive search on {C-s} will search through invisible/hidden text, making the text temporarily visible until point moves past that hidden part. When a search match is selected, the surrounding text remains visible.
This command toggles that setting (turns it off if a prefix argument less than or equal to 0 is given) and makes searches look at only visible text.
Previous: Invisible Text Searches, Up: Customization [Contents][Index]
When Hyperbole is run under a window system, it automatically
highlights any explicit buttons in a buffer and makes them flash when
selected. The main setting you may want change is the selection of a
color (or style) for button highlighting and button flashing. See
the hui-*-b*.el files for lists of potential colors and the
code which supports this behavior. A call
to (hproperty:cycle-but-color) in the hsettings.el file
changes the color used to highlight and flash explicit buttons.
Whether or not buttons are highlighted is controlled
by hproperty:but-highlight-flag, which defaults to ‘t’.
To disable highlighting, change this setting in hsettings.el or
use Hyperbole menu item, Cust/All-Options, and select the Hyperbole
Buttons group to edit its options.
If you read in a file with explicit buttons before you load Hyperbole, these buttons won’t be highlighted. Load Hyperbole and then use {M-x hproperty:but-create RET} to highlight the buttons in the current buffer.
Additionally, if hproperty:but-emphasize-flag is set to ‘t’,
then whenever the mouse pointer moves over an explicit button, it will
be emphasized in a different color or style. This emphasis is in
addition to any non-mouse-sensitive button highlighting.
Next: Koutliner Keys, Previous: Setup, Up: Top [Contents][Index]
This appendix summarizes all of Hyperbole’s global key bindings and whether each overrides any existing binding or not. It also describes how to temporarily disable these bindings and how to manage whether Hyperbole overrides local, mode-specific key bindings that hide global Hyperbole keys.
These bindings can be viewed and edited from either the Cust/KeyBindings minibuffer menu or from the Hyperbole menubar menu as shown here:
Below are descriptions of Hyperbole’s default keyboard key bindings:
Assist Key: Invoke the Assist Key in the present context.
HyControl: Control windows, frames and buffer display. This binding is made only if the key is not bound prior to loading Hyperbole.
Search the Web: Display a minibuffer menu of web search engines. Once an engine is selected, prompt for a search term and perform the associated search. This binding is made only if the key is not bound prior to loading Hyperbole; otherwise, the Find/Web minibuffer menu item, {C-h h f w}, will do the same thing.
Display a grid of windows in the selected frame, sized according to the prefix argument. The left digit of the argument is the number of grid rows and the right digit is the number of grid columns. The argument is prompted for if not given. This binding is made only if the key is not bound prior to loading Hyperbole.
For further details, see the {@} key binding description in HyControl.
Button Rename: Rename an explicit button. This binding is made only if the key is not bound prior to loading Hyperbole.
Drag Operation: Keyboard emulation of the start and stop of mouse drags to invoke Smart Key actions. This binding is made only if the key is not bound prior to loading Hyperbole and if Emacs is run under a window system.
Hyperbole Mini Menu: Invoke the Hyperbole minibuffer menu, giving access to many Hyperbole commands.
Action Key Help: Show what the Action Key will do in the current context.
Assist Key Help: Show what the Assist Key will do in the same context.
Mark Things: Mark larger and larger synctactical units in a buffer when invoked repeatedly, showing in the minibuffer the type of unit marked each time. For example, if on an opening brace at the start of a C, Java or Javascript function, this marks the whole function. This binding is made only if the key is not bound prior to loading Hyperbole.
Delimited Thing Jump: Jump between the start and end of a delimited thing, which may be an HTML tag pair. This binding is made only if the key is not bound prior to loading Hyperbole. See Smart Key Thing Selection, for more information.
The variable, hkey-init, controls whether or not any Hyperbole
global key bindings are made. It is set to ‘t’ (true) by default in
hyperbole.el. This setting means all Hyperbole key bindings will
be initialized when Hyperbole is loaded. If you want to disable these
bindings permanently, simply add (setq hkey-init nil) to
your ~/.emacs file prior to the point at which you load Hyperbole
and restart Emacs. Then you will have to choose the Hyperbole commands
that you want to use and bind those to keys.
If you ever have a need to temporarily disable the Hyperbole keyboard and
mouse bindings, use the hyperbole-toggle-bindings command. It
switches between the Hyperbole key bindings and those set prior to loading
Hyperbole and then back again if invoked once more. There is no default
key binding for this command; use {M-x hyperbole-toggle-bindings
RET}. Alternatively, you may select a key and bind it as part of any
setting of hyperbole-init-hook within your personal ~/.emacs
file. For example, (add-hook 'hyperbole-init-hook (lambda ()
(global-set-key "\C-ch" 'hyperbole-toggle-bindings))).
If you want to restore only the mouse bindings that existed before
Hyperbole was loaded, use the hmouse-toggle-bindings command.
It switches between the Hyperbole mouse key bindings and those set
prior to loading Hyperbole and then back again if invoked once more.
There is no default key binding for this command; use {M-x
hmouse-toggle-bindings RET}. Alternatively, you may select a
key and bind it as part of any setting of hyperbole-init-hook
within your personal ~/.emacs file. For example, (add-hook
'hyperbole-init-hook (lambda () (global-set-key "\C-ct"
'hmouse-toggle-bindings))).
Major mode-specific keys take precedence over global key bindings. In
some cases, a major mode will unknowingly override some of the global
Hyperbole keys, preventing you from using them in that mode. By
default, Hyperbole automatically prevents this by checking each time a
major mode is invoked and unbinding any mode-specific keys that
interfere with global Hyperbole keys. If you prefer that this not
happen permanently, use {M-x customize-variable RET
hkey-init-override-local-keys RET}. Press the Toggle button to
change the value to nil. Then press the “Apply and Save”
button.
Next: Smart Key Reference, Previous: Global Key Bindings, Up: Top [Contents][Index]
This appendix summarizes the specialized key bindings available when editing a koutline with Hyperbole. Each key is shown together with its command binding and the documentation for that command. Normal emacs editing keys are modified to account for the structure within outlines. An outliner command which overloads an emacs command named cmd is named kotl-mode:cmd.
kfile:write {C-x C-w}Write the current outline to FILE.
klink:create {C-c l}Insert at point an implicit link to REFERENCE.
REFERENCE should be a cell-ref or a string containing "filename, cell-ref".
See the documentation for (kcell:ref-to-id) for valid cell-ref
formats.
kotl-mode:add-cell {C-j}Add a cell following current cell at optional RELATIVE-LEVEL with CONTENTS string. Optional prefix arg RELATIVE-LEVEL means add as sibling if nil or >= 0, as child if equal to universal argument, {C-u}, and as sibling of current cell’s parent, otherwise. If added as sibling of current level, RELATIVE-LEVEL is used as a repeat count for the number of cells to add.
Return last newly added cell.
kotl-mode:add-child {C-c a}Add a new cell to current kview as first child of current cell.
kotl-mode:add-parent {C-c p}Add a new cell to current kview as sibling of current cell’s parent.
kotl-mode:append-cell {C-c +}Append the CONTENTS-CELL to APPEND-TO-CELL. If neither cell has a
no-fill property and kotl-mode:refill-flag is enabled, then
APPEND-TO-CELL is refilled.
kotl-mode:back-to-indentation {M-m}Move point to the first non-read-only non-whitespace character on this line.
kotl-mode:backward-cell {C-c C-b}Move to prefix ARGth prior cell (same level) within current view. Return number of cells left to move.
kotl-mode:backward-char {C-b}Move point backward ARG (or 1) characters and return point.
kotl-mode:backward-kill-word {M-DEL}Kill up to prefix ARG (or 1) words preceding point within a single cell.
kotl-mode:backward-sentence {M-a}Move point backward ARG (or 1) sentences and return point.
kotl-mode:backward-word {M-b}Move point backward ARG (or 1) words and return point.
kotl-mode:beginning-of-buffer {M-<}Move point to beginning of buffer and return point.
kotl-mode:beginning-of-cell {C-c ,}Move point to beginning of current or ARGth - 1 prior cell and return point.
kotl-mode:beginning-of-line {C-a}Move point to beginning of current or ARGth - 1 line and return point.
kotl-mode:beginning-of-tree {C-c ^}Move point to the level 1 root of the current cell’s tree. Leave point at the start of the cell.
kotl-mode:cell-help {C-c h}Display a temporary buffer of CELL-REF’s attributes. CELL-REF defaults to current cell. Optional prefix arg CELLS-FLAG selects the cells to print:
If = 1, print CELL-REF's cell only;
If > 1, print the visible tree rooted at CELL-REF;
If < 1, print all visible cells in current view
  (In this last case, CELL-REF is not used).
See also the documentation for kotl-mode:cell-attributes.
kotl-mode:center-line {M-s}Center the line point is on, within the width specified by fill-column.
This means adjusting the indentation so that it equals the distance between
the end of the text and fill-column.
kotl-mode:center-paragraph {M-S}Center each nonblank line in the paragraph at or after point.
See center-line for more information.
kotl-mode:copy-after {C-c c}Copy tree rooted at FROM-CELL-REF to follow tree rooted at TO-CELL-REF. If prefix arg CHILD-P is non-nil, make FROM-CELL-REF the first child of TO-CELL-REF, otherwise make it the sibling following TO-CELL-REF.
Leave point at the start of the root cell of the new tree.
kotl-mode:copy-before {C-c C-c}Copy tree rooted at FROM-CELL-REF to precede tree rooted at TO-CELL-REF. If prefix arg PARENT-P is non-nil, make FROM-CELL-REF the first child of TO-CELL-REF’s parent, otherwise make it the preceding sibling of TO-CELL-REF.
Leave point at the start of the root cell of the new tree.
kotl-mode:copy-to-buffer {C-c M-c}Copy outline tree rooted at CELL-REF to a non-koutline BUFFER. Use 0 to copy the whole outline buffer.
kotl-mode:copy-to-register {C-x x}Copy into REGISTER the region START to END. With optional prefix arg DELETE-FLAG, delete region.
kotl-mode:delete-backward-char {DEL}Delete up to the preceding prefix ARG characters. Return number of characters deleted. Optional KILL-FLAG non-nil means save in kill ring instead of deleting. Does not delete across cell boundaries.
kotl-mode:delete-blank-lines {C-x C-o}On blank line within a cell, delete all surrounding blank lines, leaving just one. On isolated blank line, delete that one. On nonblank line, delete all blank lines that follow it.
If nothing but whitespace follows point until the end of a cell, delete all whitespace at the end of the cell.
kotl-mode:delete-char {C-d}Delete up to prefix ARG characters following point. Return number of characters deleted. Optional KILL-FLAG non-nil means save in kill ring instead of deleting. Does not delete across cell boundaries.
kotl-mode:delete-indentation {M-^}Join this line to previous and fix up whitespace at join. If there is a fill prefix, delete it from the beginning of this line. With argument, join this line to the following line.
kotl-mode:demote-tree {TAB}Move current tree a maximum of prefix ARG levels lower in current view.
Each cell is refilled iff its no-fill attribute is nil and
kotl-mode:refill-flag is non-nil. With prefix ARG = 0, cells are
demoted up to one level and kotl-mode:refill-flag is treated as
true.
kotl-mode:down-level {C-c C-d}Move down prefix ARG levels lower within current tree.
kotl-mode:end-of-buffer {M->}Move point to the end of buffer and return point.
kotl-mode:end-of-cell {C-c .}Move point to end of current or ARGth - 1 succeeding cell and return point.
kotl-mode:end-of-line {C-e}Move point to end of current or ARGth - 1 line and return point.
kotl-mode:end-of-tree {C-c $}Move point to the last cell in tree rooted at the current cell. Leave point at the start of the cell.
kotl-mode:exampleDisplay the Koutliner example file for demonstration use by a user.
kotl-mode:exchange-cells {C-c e}Exchange CELL-REF-1 with CELL-REF-2 in current view. Don’t move point.
kotl-mode:fill-cell {C-c M-j}Fill current cell if it lacks the no-fill attribute. With optional JUSTIFY, justify cell as well. IGNORE-COLLAPSED-P is used when caller has already expanded cell, indicating it is not collapsed.
kotl-mode:fill-paragraph {C-x f}Fill current paragraph within cell. With optional JUSTIFY, justify paragraph as well. Ignore any non-nil no-fill attribute attached to the cell.
kotl-mode:fill-tree {C-M-j}Refill each cell within the tree whose root is at point.
kotl-mode:first-sibling {C-c <}Move point to the first sibling of the present cell. Leave point at the start of the cell or at its present position if it is already within the first sibling cell.
kotl-mode:fkey-backward-char {C-b} or {left}Move point backward ARG (or 1) characters and return point.
kotl-mode:fkey-forward-char {C-f} or {right}Move point forward ARG (or 1) characters and return point.
kotl-mode:fkey-next-line {C-n} or {down}Move point to ARGth next line and return point.
kotl-mode:fkey-previous-line {C-p} or {up}Move point to ARGth previous line and return point.
kotl-mode:forward-cell {C-c C-f}Move to the prefix ARG following cell (same level) within current view. Return number of cells left to move.
kotl-mode:forward-char {C-f}Move point forward ARG (or 1) characters and return point.
kotl-mode:forward-para {M-n}Move to prefix ARGth next cell (any level) within current view.
kotl-mode:forward-paragraph {M-]}Move to prefix ARG next cell (any level) within current view.
kotl-mode:forward-sentence {M-e}Move point forward ARG (or 1) sentences and return point.
kotl-mode:forward-word {M-f}Move point forward ARG (or 1) words and return point.
kotl-mode:goto-cell {C-c g}Move point to start of cell given by CELL-REF. (See the documentation
for (kcell:ref-to-id), for valid formats.) Return point iff
CELL-REF is found within current view. With a prefix argument, CELL-REF
is assigned the argument value for use as an idstamp.
Optional second arg, ERROR-P, non-nil means signal an error if CELL-REF is not found within current view. Will signal same error if called interactively when CELL-REF is not found.
kotl-mode:hide-sublevels {C-X $}Hide all cells in outline at levels deeper than LEVELS-TO-KEEP (a number). Show any hidden cells within LEVELS-TO-KEEP. 1 is the first level.
kotl-mode:hide-subtree {C-M-h}Hide subtree, ignoring root, at optional CELL-REF (defaults to cell at point).
kotl-mode:hide-tree {C-c BS}Collapse tree rooted at optional CELL-REF (defaults to cell at point).
kotl-mode:indent-line {TAB}Indent line relative to the previous one. With optional prefix ARG greater than 1, tab forward ARG times. See the documentation string of ‘kotl-mode:indent-tabs-mode’ for details on when tabs are used for indenting.
kotl-mode:indent-region {C-M-\}Indent each nonblank line in the region from START to END. If there is a fill prefix, make each line start with the fill prefix. With argument COLUMN, indent each line to that column. Called from a program, takes three args: START, END and COLUMN.
kimport:insert-file {C-x i}Insert each paragraph in IMPORT-FROM as a separate cell in the current view. Insert as sibling cells following the current cell. IMPORT-FROM may be a buffer name or file name (file name completion is provided).
kimport:insert-register {C-x r i}Insert contents of REGISTER at point in current cell. REGISTER is a character naming the register to insert. Normally puts point before and mark after the inserted text. If optional second arg is non-nil, puts mark before and point after. Interactively, second arg is non-nil if prefix arg is supplied.
kotl-mode:just-one-space {M-\}Delete all spaces and tabs around point and leave one space.
kotl-mode:kill-contents {C-c k}Kill contents of cell from point to cell end. With prefix ARG, kill entire cell contents.
kotl-mode:kill-line {C-k}Kill ARG lines from point.
kotl-mode:kill-region {C-w}Kill region between START and END within a single kcell. With optional COPY-P equal to t, copy region to kill ring but don’t kill it. With COPY-P any other non-nil value, return region as a string without affecting the kill ring.
If the buffer is read-only and COPY-P is nil, the region will not be deleted but it will be copied to the kill ring and then an error will be signaled.
kotl-mode:kill-ring-save {M-w}Copy region between START and END within a single kcell to kill ring.
kotl-mode:kill-sentence {M-k}Kill up to prefix ARG (or 1) sentences following point within a single cell.
kotl-mode:kill-tree {C-c C-k}Kill ARG following trees starting with tree rooted at point. If ARG is a non-positive number, nothing is done.
kotl-mode:kill-word {M-d}Kill up to prefix ARG words following point within a single cell.
kotl-mode:last-sibling {C-c >}Move point to the last sibling of the present cell. Leave point at the start of the cell or at its present position if it is already within the last sibling cell.
kotl-mode:mail-tree {C-c @}Mail outline tree rooted at CELL-REF. Use "0" for whole outline buffer.
kotl-mode:move-after {C-c m}Move tree rooted at FROM-CELL-REF to follow tree rooted at TO-CELL-REF. If prefix arg CHILD-P is non-nil, make FROM-CELL-REF the first child of TO-CELL-REF, otherwise make it the sibling following TO-CELL-REF. With optional COPY-P, copy tree rather than moving it.
Leave point at original location but return the tree’s new start point.
kotl-mode:move-before {C-c RET}Move tree rooted at FROM-CELL-REF to precede tree rooted at TO-CELL-REF. If prefix arg PARENT-P is non-nil, make FROM-CELL-REF the first child of TO-CELL-REF’s parent, otherwise make it the preceding sibling of TO-CELL-REF. With optional COPY-P, copy tree rather than moving it.
Leave point at original location but return the tree’s new start point.
kotl-mode:newline {RET}Insert a newline. With ARG, insert ARG newlines. In Auto Fill mode, if no numeric arg, break the preceding line if it is too long.
kotl-mode:next-cell {C-c C-n}Move to prefix ARG next cell (any level) within current view.
kotl-mode:next-line {C-n}Move point to ARGth next line and return point.
kotl-mode:open-line {C-o}Insert a newline and leave point before it. With arg N, insert N newlines.
kotl-mode:overview {C-c C-o}Show only the first line of each cell in the current outline. With a prefix arg, also toggle the display of blank lines between cells.
kotl-mode:previous-cell {C-c C-p}Move to prefix ARG previous cell (any level) within current view.
kotl-mode:previous-line {C-p}Move point to ARGth previous line and return point.
kotl-mode:promote-tree {M-TAB} or {SHIFT-TAB}Move current tree a maximum of prefix ARG levels higher in current view.
Each cell is refilled iff its no-fill attribute is nil and
kotl-mode:refill-flag is non-nil. With prefix ARG = 0, cells are
promoted up to one level and kotl-mode:refill-flag is treated as true.
kotl-mode:scroll-down {M-v}Scroll text of current window downward ARG lines; or a windowful if no ARG.
kotl-mode:scroll-up {C-v}Scroll text of current window upward ARG lines; or a windowful if no ARG.
kotl-mode:set-cell-attribute {C-c C-i}Include ATTRIBUTE VALUE with the current cell or the cell at optional POS. Replace any existing value that ATTRIBUTE has. When called interactively, display the setting in the minibuffer as confirmation.
kotl-mode:set-fill-prefix {C-x l}Set fill prefix to line up to point. With prefix arg TURN-OFF or at begin of line, turn fill prefix off.
kotl-mode:show-all {C-c C-a}Show (expand) all cells in current view. With a prefix arg, also toggle the display of blank lines between cells.
kotl-mode:show-subtreeShow subtree, ignoring root, at optional CELL-REF (defaults to cell at point).
kotl-mode:show-tree {C-c C-s}Display fully expanded tree rooted at CELL-REF.
kotl-mode:split-cell {C-c s}Split cell into two cells and move to new cell. Cell contents after point become part of newly created cell. Default is to create new cell as sibling of current cell. With optional universal ARG, {C-u}, new cell is added as child of current cell.
kotl-mode:top-cells {C-c C-t}Collapse all level 1 cells in view and hide any deeper sublevels. With a prefix arg, also toggle the display of blank lines between cells.
kotl-mode:transpose-cells {C-c t}Exchange current and previous visible cells, leaving point after both. If no previous cell, exchange current with next cell. With prefix ARG, take current cell and move it past ARG cells. With prefix ARG = 0, interchange the cell that contains point with the cell that contains mark.
kotl-mode:transpose-chars {C-t}Interchange characters around point, moving forward one character. With prefix ARG, take character before point and drag it forward past ARG other characters (backward if ARG negative). If no prefix ARG and at end of line, the previous two characters are exchanged.
kotl-mode:transpose-lines {C-x C-t}Exchange current line and previous line, leaving point after both. If no previous line, exchange current with next line. With prefix ARG, take previous line and move it past ARG lines. With prefix ARG = 0, interchange the line that contains point with the line that contains mark.
kotl-mode:transpose-words {M-t}Interchange words around point, leaving point after both words. With prefix ARG, take word before or around point and drag it forward past ARG other words (backward if ARG negative). If ARG is zero, the words around or after point and around or after mark are interchanged.
kotl-mode:up-level {C-c C-u}Move up prefix ARG levels higher in current outline view.
kotl-mode:yank {C-y}Reinsert the last stretch of killed text.
More precisely, reinsert the stretch of killed text most recently
killed OR yanked. Put point at end, and set mark at beginning.
With just C-u as argument, same but put point at beginning (and mark at end).
With argument N, reinsert the Nth most recently killed stretch of killed
text.
See also the command, (kotl-mode:yank-pop).
kotl-mode:yank-pop {M-y}Replace just-yanked stretch of killed text with a different stretch.
This command is allowed only immediately after a (yank) or a
(yank-pop). At such a time, the region contains a stretch of
reinserted previously-killed text. (yank-pop) deletes that text
and inserts in its place a different stretch of killed text.
With no argument, the previous kill is inserted. With argument N, insert the Nth previous kill. If N is negative, this is a more recent kill.
The sequence of kills wraps around, so that after the oldest one comes the newest one.
kotl-mode:zap-to-char {M-z}Kill up to and including prefix ARGth occurrence of CHAR. Goes backward if ARG is negative; error if CHAR not found.
kview:set-label-separator {C-c M-l}Set the LABEL-SEPARATOR (a string) between labels and cell contents for the current kview. With optional prefix arg SET-DEFAULT-P, the default separator value used for new outlines is also set to this new value.
kview:set-label-type {C-c C-l}Change kview’s label display type to NEW-TYPE, updating all displayed labels.
See documentation for the kview:default-label-type variable,
for valid values of NEW-TYPE.
kvspec:activate {C-c C-v}Activate optional VIEW-SPEC or existing view specification over the
current koutline. VIEW-SPEC must be a string. See
‘<${hyperb:dir}/kotl/EXAMPLE.kotl, 2b17=048>’ for details
on valid view specs.
kvspec:toggle-blank-lines {C-c b}Toggle blank lines between cells on or off.
Next: Suggestion or Bug Reporting, Previous: Koutliner Keys, Up: Top [Contents][Index]
This appendix documents Hyperbole’s context-sensitive Smart Key operations. It is quite extensive and is meant for reference rather than sequential reading. See Smart Keys, for a description of the Smart Keys. That section also describes how to get context-sensitive Smart Key help, with which you can explore Smart Key operation bit by bit.
What a Smart Key does depends on the context in which it is used. Smart Key operations are context-sensitive. Contexts are defined by logic conditionals, e.g. when depressed here, if this is true, etc. Each Smart Key context is listed in the order in which it will be checked. The first matching context is always the one applied. Within each context, the actions performed by the Action and Assist Keys are given.
| • Smart Mouse Keys: | ||
| • Smart Keyboard Keys: |
Next: Smart Keyboard Keys, Previous: Smart Key Reference, Up: Smart Key Reference [Contents][Index]
The contexts and actions in this section, like drags and modeline clicks, apply only if you have mouse support within Hyperbole. The Smart Key operations in Smart Keyboard Keys, apply to both mouse and keyboard Smart Key usage.
The following section documents what the Smart Mouse Keys do in each context, with the contexts listed in decreasing order of priority, i.e. the first context to match is the one that is used. If no matching mouse key context is found, then the keyboard key contexts are searched in order.
Next: Thing Selection, Previous: Smart Mouse Keys, Up: Smart Mouse Keys [Contents][Index]
When clicked within an inactive minibuffer:
  ACTION KEY
     The Hyperbole minibuffer menu is displayed for selection, by default.
     The variable action-key-minibuffer-function controls this behavior.
  ASSIST KEY
     The buffer, window and frame jump menu is displayed for selection, by default.
     You can jump to buffers categorized by major mode, jump to windows by buffer
     name, or to frames by name.  Manage your windows and frames quickly with this
     menu as well.  This is the same menu that a click in a blank area of the
     modeline displays by default since they are typically so close together.  The
     variable assist-key-minibuffer-function controls this behavior.
Next: Side-by-Side Window Resizing, Previous: Minibuffer Menu Activation, Up: Smart Mouse Keys [Contents][Index]
In a programming or markup language buffer, when pressed/clicked at
the start or end of a delimited thing (including lists, comments,
strings, arrays/vectors, sets, functions and markup pair tags in a
markup language), and not at the end of a line:
  ACTION KEY
     Marks the thing for editing.
  ASSIST KEY
     Marks and kills the thing for yanking elsewhere.
Note that the press must be on the first character of the delimiter of the thing.
There are also drag actions that work on delimited things. Delimited things include parenthesized lists, single and double quoted strings, bracketed arrays/vectors, sets with braces, programming language functions and markup pair tags (e.g. <div> </div> in HTML).
If no region is selected when the Action Mouse Key is dragged from a thing delimiter to another location, it copies the delimited thing to the release point of the drag. The release location may be in the same or a different buffer but if in the same buffer it must be outside of the delimited thing itself. Similarly, the Assist Mouse Key kills (cuts) the delimited thing at its original location and yanks (pastes) it at the new location.
The start of the drag must be on the first character of the starting or ending delimiter. For strings and comments, the drag must start on the first line of the thing.
Experiment with these drag actions and you will quickly find them easy to use and indispensable.
Next: Modeline Clicks and Drags, Previous: Thing Selection, Up: Smart Mouse Keys [Contents][Index]
If dragged from a side-by-side window edge or from the immediate left of
a vertical scroll bar:
  ACTION KEY or ASSIST KEY
     Resizes adjacent window sides to the point of the drag release.
Next: Smart Mouse Drags between Windows, Previous: Side-by-Side Window Resizing, Up: Smart Mouse Keys [Contents][Index]
If depressed within a window modeline:
  ACTION KEY
     (1) clicked on the first blank character of a window’s modeline,
         the window’s buffer is buried (placed at the bottom of the
         buffer list);
     (2) clicked on the right edge of a window’s modeline, the Info
         buffer is displayed, or if it is already displayed and the
         modeline clicked upon belongs to a window displaying Info,
         the Info buffer is hidden;
     (3) clicked on the buffer id of a window’s modeline, dired is run
         on the current directory, replacing the window’s buffer;
         successive clicks walk up the directory tree
     (4) clicked anywhere within the middle of a window’s modeline,
         the function given by action-key-modeline-function is
         called;
     (5) dragged vertically from a modeline to within a window, the
         modeline is moved to the point of the drag release, thereby
         resizing its window and potentially its vertically neighboring
         windows.
     (6) dragged other than straight vertically from a modeline to another
         window, duplicate the modeline’s window buffer to the window of
         release.
     (7) dragged from a modeline to outside of Emacs, create a new frame
         sized to match the selected window with the same buffer.
  ASSIST KEY
     (1) clicked on the first blank character of a window’s modeline,
         the bottom buffer in the buffer list is unburied and placed in
         the window;
     (2) clicked on the right edge of a window’s modeline, the summary
         of Smart Key behavior is displayed, or if it is already
         displayed and the modeline clicked upon belongs to a window
         displaying the summary, the summary buffer is hidden;
     (3) clicked on the buffer id of a window’s modeline, the next
         buffer in sequence is displayed in the window
     (4) clicked anywhere within the middle of a window’s modeline,
         the function given by assist-key-modeline-function is
         called;
     (5) dragged vertically from a modeline to within a window, the
         modeline is moved to the point of the drag release, thereby
         resizing its window and potentially its vertically neighboring
         windows.
     (6) dragged other than straight vertically from a modeline to another
         window, swap buffers in the two windows.
     (7) dragged from a modeline to outside of Emacs, create a new frame
         sized to match the selected window with the same buffer.  If there
         is only one window in the source frame or if hycontrol-keep-window-flag
         is non-nil, leave the original window and just clone it into the
         new frame;otherwise, delete the original window.
If dragged from a window and released within a window modeline:
  ACTION KEY
     (1) If depress was on a buffer name in Buffer-menu/ibuffer mode or on
         a file/directory in dired mode, splits the release window and displays
         the item in the original release window.
     (2) Otherwise, splits the release window and displays the depress window’s
         buffer in the original release window.
  ASSIST KEY
     Swaps buffers in the two windows.
Next: Smart Mouse Drags within a Window, Previous: Modeline Clicks and Drags, Up: Smart Mouse Keys [Contents][Index]
If an active (highlighted) region exists within the editor:
  ACTION KEY
     Copies and yanks (pastes) the region to the release point in a
     different window.
  ASSIST KEY
     Kills (cuts) and yanks (pastes) the region to the release point
     in a different window.
Otherwise, if dragged from inside one window to another:
  ACTION KEY
     (1) If depress was on a buffer name in Buffer-menu/ibuffer mode or on
         a file/directory in dired mode, displays the item in window of release.
         See hmouse-drag-item-mode-forms for how to allow for draggable
         items in other modes.
     (2) Otherwise, creates a new link button at the drag start location, linked
         to the drag end location.  If the drag start position is within a button,
         this modifies the button to link to the drag end location.
  ASSIST KEY
     Swap buffers in the two windows.
Next: Smart Mouse Drags outside a Window, Previous: Smart Mouse Drags between Windows, Up: Smart Mouse Keys [Contents][Index]
If a region is active and a drag occurs within a single buffer/window:
  ACTION KEY
     Restores region to before Action Key drag and signals an error.
  ASSIST KEY
     Restores region to before Action Key drag and signals an error.
(Note that hmouse-x-drag-sensitivity sets the minimal horizontal
movement which registers a drag).  If dragged horizontally within a
single window from anywhere but a thing delimiter:
  ACTION KEY
     Splits the current window, adding a window below.
  ASSIST KEY
     Deletes the current window if it is not the sole window in the
     current frame.
(Note that hmouse-y-drag-sensitivity sets the minimal vertical
movement which registers a drag).  If dragged vertically within a
single window from anywhere but a thing delimiter:
  ACTION KEY
     Splits the current window, adding a window to the right.
  ASSIST KEY
     Deletes the current window if it is not the sole window in the
     current frame.
If dragged diagonally within a single window while depressed
(‘hmouse-x-diagonal-sensitivity’ and ‘hmouse-y-diagonal-sensitivity’ set
the minimal diagonal movements which register a drag):
  ACTION KEY
     Saves the window configuration for the selected frame onto a ring
     of window configurations.
  ASSIST KEY
     Restores the prior window configuration from the ring.  A prefix
     argument N specifies the Nth prior configuration from the ring.
Previous: Smart Mouse Drags within a Window, Up: Smart Mouse Keys [Contents][Index]
If dragged from an Emacs window to outside of Emacs:
  ACTION KEY
     (1) If depress was on a buffer name in Buffer-menu/ibuffer mode or on
         a file/directory in dired mode, display the item in a new frame.
         See hmouse-drag-item-mode-forms for how to allow for draggable
         items in other modes.
     (2) If depress was anywhere else, create a new frame sized to match the
         selected window with the same buffer.
  ASSIST KEY
     Create a new frame sized to match the selected window with the same buffer.
     If there is only one window in the source frame or if hycontrol-keep-window-flag
     is non-nil, leave the original window and just clone it into the new frame;
     otherwise, delete the original window.
Previous: Smart Mouse Keys, Up: Smart Key Reference [Contents][Index]
Next: Smart Key - Argument Completion, Previous: Smart Keyboard Keys, Up: Smart Keyboard Keys [Contents][Index]
When over an Emacs pushbutton:
  ACTION KEY
     Performs the button action
  ASSIST KEY
     Displays the help text for the button, if any.
Next: Smart Key - ID Edit Mode, Previous: Smart Key - Emacs Pushbuttons, Up: Smart Keyboard Keys [Contents][Index]
When prompting for a Hyperbole argument, a press in the minibuffer:
  ACTION KEY
     Accepts the current minibuffer argument.
  ASSIST KEY
     Offers completions for the current minibuffer argument.
When reading a Hyperbole menu item or an argument with completion:
  ACTION KEY
     Returns the value selected at point if any, else nil.  If the
     value is the same as the contents of the minibuffer, this value is
     accepted as the argument for which the minibuffer is presently
     prompting; otherwise, the minibuffer is erased and the value is
     inserted there, for inspection by the user.
  ASSIST KEY
     Displays Hyperbole menu item help when an item is selected.
Next: Smart Key - Emacs Cross-references (Xrefs), Previous: Smart Key - Argument Completion, Up: Smart Keyboard Keys [Contents][Index]
If in ID Edit mode (a package within InfoDock, not included in
Hyperbole, that supports rapid marking, killing, copying, yanking and
display-management):
  ACTION KEY or ASSIST KEY
     Yanks (pastes) last selected region at point.
Next: Smart Key - Smart Scrolling, Previous: Smart Key - ID Edit Mode, Up: Smart Keyboard Keys [Contents][Index]
When over an Emacs cross-reference:
  ACTION KEY
     Follows the cross-reference to its source definition in another window.
  ASSIST KEY
     Displays the cross-reference definition in another window but
     stays in the current window.
Next: Smart Key - Smart Menus, Previous: Smart Key - Emacs Cross-references (Xrefs), Up: Smart Keyboard Keys [Contents][Index]
When pressed at the end of a line but not the end of a buffer:
  ACTION KEY
     Calls the function given by action-key-eol-function whose
     default value is smart-scroll-up.  This scrolls up according
     to the value of smart-scroll-proportional.  If
     smart-scroll-proportional is nil or if point is on the top
     window line, it scrolls up (forward) a windowful.  Otherwise, it tries
     to bring the current line to the top of the window, leaving point at
     the end of the line and returning t if scrolled, nil if not.
  ASSIST KEY
     Calls the function given by assist-key-eol-function whose
     default value is smart-scroll-down.  This scrolls down according
     to the value of smart-scroll-proportional.  If
     smart-scroll-proportional is nil or if point is on the bottom
     window line, it scrolls down (backward) a windowful.  Otherwise, it tries
     to bring the current line to the bottom of the window, leaving point at
     the end of the line and returning t if scrolled, nil if not.
Next: Smart Key - Dired Mode, Previous: Smart Key - Smart Scrolling, Up: Smart Keyboard Keys [Contents][Index]
Smart Menus are an older in-buffer menu system that worked on dumb terminals and pre-dated Emacs’ own dumb terminal menu support. They are included with InfoDock (which is no longer maintained) and are not available separately. They are not a part of Hyperbole and are not necesary for its use.
When pressed on a Smart Menu item (this is an older in-buffer menu
  system that pre-dates Emacs’ own menus):
  ACTION KEY
    Activates the item.
  ASSIST KEY
    Displays help for the item.
If the Smart Menu package (part of InfoDock) has been loaded and
‘hkey-always-display-menu’ is non-nil:
  ACTION KEY or ASSIST KEY
     Pops up a window with a Smart Menu of commands.
     The menu displayed is selected by (smart-menu-choose-menu).
Next: Smart Key - Hyperbole Buttons, Previous: Smart Key - Smart Menus, Up: Smart Keyboard Keys [Contents][Index]
If pressed within a dired-mode (directory editor) buffer:
  ACTION KEY
     (1) within an entry line, the selected file/directory is displayed
         for editing, normally in another window but if an entry has been dragged
         for display in another window, then this entry is displayed in the current
         window (DisplayHere minor mode is shown in the mode-line; use {g} to
         disable it)
     (2) on the first line of the buffer:
         (a) within the leading whitespace, then if any deletes are to be
             performed, they are executed after user verification; otherwise,
             nothing is done;
         (b) otherwise, dired is run in another window on the ancestor directory
             of the current directory path up through the location of point;
             if point is before the first character, then the / root directory
             is used.
     (3) on or after the last line in the buffer or at the end of the first line,
         this dired invocation is quit.
  ASSIST KEY
     (1) on a ~ character, all backup files in the directory are marked for deletion;
     (2) on a # character, all auto-save files in the directory are marked for
         deletion;
     (3) anywhere else within an entry line, the current entry is marked for deletion;
     (4) on or after the last line in the buffer or at the end of the first line,
         all delete marks on all entries are undone.
Next: Smart Key - View Mode, Previous: Smart Key - Dired Mode, Up: Smart Keyboard Keys [Contents][Index]
When pressed on a Hyperbole button:
  ACTION KEY
     Activates the button.
  ASSIST KEY
     Displays help for the button, typically a summary of its
     attributes.
Next: Smart Key - Delimited Things, Previous: Smart Key - Hyperbole Buttons, Up: Smart Keyboard Keys [Contents][Index]
If pressed within a buffer in View major or minor mode:
  ACTION KEY
     Scrolls the buffer forward a windowful.  If at the last line of the
     buffer, instead quits from view mode.
  ASSIST KEY
     Scrolls the buffer backward a windowful.
Next: Smart Key - The Koutliner, Previous: Smart Key - View Mode, Up: Smart Keyboard Keys [Contents][Index]
In a programming or markup language buffer, when pressed/clicked at
the start or end of a delimited thing (including lists, comments,
strings, arrays/vectors, sets, functions and markup pair tags in a
markup language), and not at the end of a line:
  ACTION KEY
     Marks the thing for editing.
  ASSIST KEY
     Marks and kills the thing for yanking elsewhere.
Note that the press must be on the first character of the delimiter of
the thing.

There are also drag actions that work on delimited things.  If no
region is selected, when the Action Mouse Key is dragged from a thing
delimiter to another location, it copies the thing and yanks it at the
new location.  Similarly, the Assist Mouse Key kills the thing at its
original location and yanks it at the new location.
Next: Smart Key - RDB Mode, Previous: Smart Key - Delimited Things, Up: Smart Keyboard Keys [Contents][Index]
When pressed within a Hyperbole Koutliner buffer (kotl-mode):
  ACTION KEY
     (1) at the end of the buffer, uncollapses and unhides all cells in
         the view;
     (2) within a cell, if its subtree is hidden then shows it,
         otherwise hides it;
     (3) between cells or within the read-only indentation region to the
         left of a cell, begins creation of a klink to some other
         outline cell; press the Action Key twice on another cell to
         select the link referent cell;
     (4) anywhere else, scrolls up a windowful.
  ASSIST KEY
     (1) at the end of the buffer, collapses all cells and hides all
         non-level-one cells;
     (2) on a header line but not at the beginning or end, displays the
         properties of each following cell in the koutline, starting
         with the cell at point;
     (3) between cells or within the read-only indentation region to the
         left of a cell, prompts to move one tree to a new location in
         the outline; press the Action Key twice to select the tree to
         move and where to move it;
     (4) anywhere else, scrolls down a windowful.
Next: Smart Key - Help Buffers, Previous: Smart Key - The Koutliner, Up: Smart Keyboard Keys [Contents][Index]
If pressed within an rdb-mode buffer which manipulates in-memory,
relational databases (part of InfoDock):
  ACTION KEY
    (1) on the name of a relation, the relation’s full table is shown;
    (2) on an attribute name, all attribute columns aside from this one
        are removed from the relation display;
    (3) to the left of a tuple (row), the tuple is removed from the display;
    (4) on an attribute value, all tuples (rows) which do not contain
        the selected attribute value are removed from the current table display;
    (5) on or after the last line in the buffer, the current database is redisplayed;
    (6) anywhere else (except the end of a line), the last command is undone."
  ASSIST KEY
    (1) on the name of a relation, the relation is removed from the display;
    (2) on an attribute name, the attribute column is removed from the relation
        display;
    (3) to the left of a tuple (row), the tuple is removed from the display;
    (4) on an attribute value, all tuples with the same attribute value are
        removed from the display."
Next: Smart Key - Pages Directory Mode, Previous: Smart Key - RDB Mode, Up: Smart Keyboard Keys [Contents][Index]
When pressed at the end of a Help buffer:
  ACTION KEY or ASSIST KEY
    Restores the window configuration prior to the help display.
Next: Smart Key - Identifier Menu Mode, Previous: Smart Key - Help Buffers, Up: Smart Keyboard Keys [Contents][Index]
Pages-directory-mode is used in special buffers that contain title lines extracted from files consisting of titled, page-delimited contents, e.g. Info files.

When pressed on a pages-directory-mode entry line:
  ACTION KEY
     Jumps to the associated line in the pages file that contains the entry.
  ASSIST KEY
     Jumps to the associated line in the pages file that contains the entry.
Next: Smart Key - C Source Code, Previous: Smart Key - Pages Directory Mode, Up: Smart Keyboard Keys [Contents][Index]
This works only for identifiers defined within the same source file in which they are referenced.
It requires either Emacs’ imenu or XEmacs’ func-menu library and it requires that an index of
identifiers has been built for the current buffer.  Other handlers handle identifier references
and definitions across multiple files.

When pressed on an identifier name after an identifier index has been generated:
  ACTION KEY
     Jumps to the source definition within the current buffer of the identifier at point.
  ASSIST KEY
     Prompts with completion for an identifier defined within the buffer and then jumps
     to the its source definition.
Next: Smart Key - C++ Source Code, Previous: Smart Key - Identifier Menu Mode, Up: Smart Keyboard Keys [Contents][Index]
When pressed within a C source code file:
  ACTION KEY
     Jumps to the definition of a selected C construct:
     (1) on a #include statement, the include file is displayed;
         this looks for include files using the directory lists
         ‘smart-c-cpp-include-path’ and
         ‘smart-c-include-path’;
     (2) on a C identifier, the identifier definition is displayed,
         assuming the identifier is found within an "etags" generated
         tags file within the current directory or any of its ancestor
         directories;
     (3) if ‘smart-c-use-lib-man’ is non-nil (see its documentation),
         the C identifier is recognized as a library symbol, and a man
         page is found for the identifier, then the man page is
         displayed.
  ASSIST KEY
     Jumps to the next tag matching an identifier at point.
Next: Smart Key - Assembly Source Code, Previous: Smart Key - C Source Code, Up: Smart Keyboard Keys [Contents][Index]
When the OO-Browser has been loaded and the press is within a C++
buffer:
  ACTION KEY or ASSIST KEY
     Jumps to the definition of the selected C++ construct via
     OO-Browser support.
     (1) on a #include statement, the include file is displayed;
         this looks for include files using the directory lists
         ‘smart-c-cpp-include-path’ and
         ‘smart-c-include-path’;
     (2) within a method definition before the opening brace, its
         declaration is displayed;
     (3) within a method declaration, its definition is displayed;
     (4) on a class name, the class definition is shown;
     (5) on a member reference (past any :: scoping operator), the
         member definition or a listing of possible definitions or a
         matching declaration (if no definitions exist within the
         Environment) is shown;
     (6) on a global variable or function identifier, its definition is
         shown.
When pressed within a C++ source code file (without the OO-Browser):
  ACTION KEY
     Jumps to the definition of the selected C++ construct:
     (1) on a #include statement, the include file is displayed;
         this looks for include files using the directory lists
         ‘smart-c-cpp-include-path’ and
         ‘smart-c-include-path’;
     (2) on a C++ identifier, the identifier definition is displayed,
         assuming the identifier is found within an "etags" generated
         tags file in the current directory or any of its ancestor
         directories;
     (3) if ‘smart-c-use-lib-man’ is non-nil (see its documentation),
         the C++ identifier is recognized as a library symbol, and a man
         page is found for the identifier, then the man page is
         displayed.
  ASSIST KEY
     Jumps to the next tag matching an identifier at point.
Next: Smart Key - Lisp Source Code, Previous: Smart Key - C++ Source Code, Up: Smart Keyboard Keys [Contents][Index]
When pressed within an assembly source code file:
  ACTION KEY
     Jumps to the definition of the selected assembly construct:
     (1) on an include statement, the include file is displayed;
         this looks for include files using the directory list
         ‘smart-asm-include-path’;
     (2) on an identifier, the identifier definition is displayed,
         assuming the identifier is found within an "etags" generated
         tags file within the current directory or any of its ancestor
         directories.
  ASSIST KEY
     Jumps to the next tag matching an identifier at point.
Next: Smart Key - Java Source Code, Previous: Smart Key - Assembly Source Code, Up: Smart Keyboard Keys [Contents][Index]
When pressed on a Lisp symbol within any of these types of buffers
(Lisp code, debugger, compilation, or help):
  ACTION KEY
     Jumps to the definition of any selected Lisp construct.  If on an
     Emacs Lisp require, load, or autoload clause and the (find-library)
     function is defined, jumps to the library source, if possible.
  ASSIST KEY
     Jumps to the next tag matching an identifier at point or if
     the identifier is an Emacs Lisp symbol, then this displays the
     documentation for the symbol.
Next: Smart Key - JavaScript Source Code, Previous: Smart Key - Lisp Source Code, Up: Smart Keyboard Keys [Contents][Index]
When the OO-Browser has been loaded and the press is within a Java
buffer:
  ACTION KEY or ASSIST KEY
     Jumps to the definition of the selected Java construct:
     (1) within a commented @see cross-reference, the referent is
         displayed;
     (2) on a package or import statement, the referent is
         displayed; this looks for referent files using the directory
         list ‘smart-java-package-path’;
     (3) within a method declaration, its definition is displayed;
     (4) on a class name, the class definition is shown;
     (5) on a unique identifier reference, its definition is shown (when
         possible).
When pressed within a Java source code file (without the OO-Browser):
  ACTION KEY
     Jumps to the definition of the selected Java construct:
     (1) within a commented @see cross-reference, the referent is
         displayed;
     (2) on a package or import statement, the referent is
         displayed; this looks for referent files using the directory
         list ‘smart-java-package-path’;
     (3) on a Java identifier, the identifier definition is displayed,
         assuming the identifier is found within an "etags" generated
         tags file within the current directory or any of its ancestor
         directories.
  ASSIST KEY
     Jumps to the next tag matching an identifier at point.
Next: Smart Key - Python Source Code, Previous: Smart Key - Java Source Code, Up: Smart Keyboard Keys [Contents][Index]
When pressed within a JavaScript source code file:
  ACTION KEY
     Jumps to the definition of the selected JavaScript identifier,
     assuming the identifier is found within an "etags" generated
     tags file within the current directory or any of its ancestor
     directories.
  ASSIST KEY
     Jumps to the next tag matching an identifier at point.
Next: Smart Key - Objective-C Source Code, Previous: Smart Key - JavaScript Source Code, Up: Smart Keyboard Keys [Contents][Index]
When the OO-Browser has been loaded and the press is within a Python
buffer:
  ACTION KEY or ASSIST KEY
     Jumps to the definition of the selected Python construct:
     (1) on an ‘import’ line, the referent is displayed;
     (2) within a method declaration, its definition is displayed;
     (3) on a class name, the class definition is shown;
     (4) on a unique identifier reference, its definition is shown (when
         possible).
When pressed within a Python source code file (without the OO-Browser):
  ACTION KEY
     Jumps to the definition of the selected Python identifier,
     assuming the identifier is found within an "etags" generated
     tags file within the current directory or any of its ancestor
     directories.
  ASSIST KEY
     Jumps to the next tag matching an identifier at point.
Next: Smart Key - Fortran Source Code, Previous: Smart Key - Python Source Code, Up: Smart Keyboard Keys [Contents][Index]
When the OO-Browser has been loaded and the press is within a
Objective-C buffer:
  ACTION KEY or ASSIST KEY
     Jumps to the definition of the selected Objective-C construct via
     OO-Browser support.
     (1) on a #import or #include statement, the include file is
         displayed; this looks for include files using the directory
         lists ‘objc-cpp-include-path’ and
         ‘objc-include-path’;
     (2) within a method declaration, its definition is displayed;
     (3) on a class name, the class definition is shown;
     (4) on a member reference (past any :: scoping operator), the
         member definition or a listing of possible definitions is
         shown;
     (5) on a global variable or function identifier, its definition
         is shown.
When pressed within an Objective-C source code file (without the
OO-Browser):
  ACTION KEY
     Jumps to the definition of the selected Objective-C construct:
     (1) on a #import or #include statement, the include file is
         displayed; this looks for include files using the directory
         lists ‘objc-cpp-include-path’ and
         ‘objc-include-path’;
     (2) on an Objective-C identifier, the identifier definition is
         displayed, assuming the identifier is found within an "etags"
         generated tags file in the current directory or any of its
         ancestor directories;
     (3) if ‘smart-c-use-lib-man’ is non-nil (see its documentation),
         the Objective-C identifier is recognized as a library symbol,
         and a man page is found for the identifier, then the man page
         is displayed.
  ASSIST KEY
     Jumps to the next tag matching an identifier at point.
Next: Smart Key - Occurrence Matches, Previous: Smart Key - Objective-C Source Code, Up: Smart Keyboard Keys [Contents][Index]
When pressed within a Fortran source code file:
  ACTION KEY or ASSIST KEY
     If on an identifier, the identifier definition (or a definition in
     which the identifier appears) is displayed, assuming the identifier
     is found within an "etags" generated tags file in the current
     directory or any of its ancestor directories.
Next: Smart Key - Calendar Mode, Previous: Smart Key - Fortran Source Code, Up: Smart Keyboard Keys [Contents][Index]
When pressed within an occur-mode, moccur-mode or amoccur-mode buffer:
  ACTION KEY or ASSIST KEY
     Jumps to the source buffer and line of the current occurrence.
Next: Smart Key - Man Page Apropos, Previous: Smart Key - Occurrence Matches, Up: Smart Keyboard Keys [Contents][Index]
When pressed within a calendar-mode buffer:
  ACTION KEY
     (1) at the end of the buffer, the calendar is scrolled forward 3
         months;
     (2) to the left of any dates on a calendar line, the calendar is
         scrolled backward 3 months;
     (3) on a date, the diary entries for the date, if any, are
         displayed.
  ASSIST KEY
     (1) at the end of the buffer, the calendar is scrolled backward 3
         months;
     (2) to the left of any dates on a calendar line, the calendar is
         scrolled forward 3 months;
     (3) anywhere else, all dates with marking diary entries are marked
         in the calendar window.
Next: Smart Key - Emacs Outline Mode, Previous: Smart Key - Calendar Mode, Up: Smart Keyboard Keys [Contents][Index]
When pressed within a man page apropos buffer or listing:
  ACTION KEY
     (1) on a UNIX man apropos entry, the man page for that entry is
         displayed in another window;
     (2) on or after the last line, the buffer in the other window is
         scrolled up a windowful.
  ASSIST KEY
     (1) on a UNIX man apropos entry, the man page for that entry is
         displayed in another window;
     (2) on or after the last line, the buffer in the other window is
         scrolled down a windowful.
Next: Smart Key - Info Manuals, Previous: Smart Key - Man Page Apropos, Up: Smart Keyboard Keys [Contents][Index]
If pressed within an outline-mode buffer or when no other context is matched
and outline-minor-mode is enabled:
  ACTION KEY
     Collapses, expands, and moves outline entries.
     (1) after an outline heading has been cut via the Action Key,
         pastes the cut heading at point;
     (2) at the end of the buffer, shows all buffer text;
     (3) at the beginning of a heading line, cuts the headings subtree
         from the buffer;
     (4) on a header line but not at the beginning or end of the line,
         if the headings subtree is hidden, shows it, otherwise hides
         it;
     (5) anywhere else, invokes action-key-eol-function, typically
         to scroll up a windowful.
  ASSIST KEY
     (1) after an outline heading has been cut via the Action Key,
         allows multiple pastes throughout the buffer (the last paste
         should be done with the Action Key, not the Assist Key);
     (2) at the end of the buffer, hides all bodies in the buffer;
     (3) at the beginning of a heading line, cuts the current heading
         (sans subtree) from the buffer;
     (4) on a header line but not at the beginning or end, if the
         heading body is hidden, shows it, otherwise hides it;
     (5) anywhere else, invokes assist-key-eol-function, typically
         to scroll down a windowful.
Next: Smart Key - Email Composers, Previous: Smart Key - Emacs Outline Mode, Up: Smart Keyboard Keys [Contents][Index]
If pressed within an Info manual node:
  ACTION KEY
     (1) on the first line of an Info Menu Entry or Cross Reference, the
         referenced node is displayed;
     (2) on the Up, Next, or Previous entries of a Node Header (first
         line), the referenced node is displayed;
     (3) on the File entry of a Node Header (first line), the Top node
         within that file is displayed;
     (4) at the end of the current node, the next node is displayed
         (this descends subtrees if the function (Info-global-next)
         is bound);
     (5) anywhere else (e.g. at the end of a line), the current node
         is scrolled up a windowful.
  ASSIST KEY
     (1) on the first line of an Info Menu Entry or Cross Reference, the
         referenced node is displayed;
     (2) on the Up, Next, or Previous entries of a Node Header (first
         line), the last node in the history list is found;
     (3) on the File entry of a Node Header (first line), the DIR
         root-level node is found;
     (4) at the end of the current node, the previous node is displayed
         (this returns from subtrees if the function (Info-global-prev)
         is bound);
     (5) anywhere else (e.g. at the end of a line), the current node
         is scrolled down a windowful.

Use {s} within an Info manual to search for any concept that interests you.
Next: Smart Key - GNUS Newsreader, Previous: Smart Key - Info Manuals, Up: Smart Keyboard Keys [Contents][Index]
If pressed within a Hyperbole-supported mail reader (defined by
‘hmail:reader’) or a mail summary (defined by ‘hmail:lister’) buffer:
  ACTION KEY
     (1) in a msg buffer within the first line of a message or at the
         end of a message, the next undeleted message is displayed;
     (2) in a msg buffer within the first line of an Info cross
         reference, the referent is displayed;
     (3) anywhere else within a msg buffer, the window is scrolled up
         one windowful;
     (4) in a msg summary buffer on a header entry, the message
         corresponding to the header is displayed in the msg window;
     (5) in a msg summary buffer, on or after the last line, the
         messages marked for deletion are expunged.
  ASSIST KEY
     (1) in a msg buffer within the first line or at the end of a
         message, the previous undeleted message is displayed;
     (2) in a msg buffer within the first line of an Info cross
         reference, the referent is displayed;
     (3) anywhere else within a msg buffer, the window is scrolled down
         one windowful;
     (4) in a msg summary buffer on a header entry, the message
         corresponding to the header is marked for deletion;
     (5) in a msg summary buffer on or after the last line, all messages
         are marked undeleted.
Next: Smart Key - Buffer Menus, Previous: Smart Key - Email Composers, Up: Smart Keyboard Keys [Contents][Index]
If pressed within the Gnus newsgroups listing buffer:
  ACTION KEY
     (1) on a GNUS-GROUP line, that newsgroup is read;
     (2) if ‘gnus-topic-mode’ is active, and on a topic line, the topic is
         expanded or collapsed as needed;
     (3) to the left of any GNUS-GROUP line, within any of the
         whitespace, the current group is unsubscribed or resubscribed;
     (4) at the end of the GNUS-GROUP buffer after all lines, the
         number of waiting messages per group is updated.
  ASSIST KEY
     (1) on a GNUS-GROUP line, that newsgroup is read;
     (2) if ‘gnus-topic-mode’ is active, and on a topic line, the topic is
         expanded or collapsed as needed;
     (3) to the left of any GNUS-GROUP line, within any of the
         whitespace, the user is prompted for a group name to subscribe
         or unsubscribe to;
     (4) at the end of the GNUS-GROUP buffer after all lines, the
         newsreader is quit.
If pressed within a Gnus newsreader subject listing buffer:
  ACTION KEY
     (1) on a GNUS-SUBJECT line, that article is read, marked deleted,
         and scrolled forward;
     (2) at the end of the GNUS-SUBJECT buffer, the next undeleted
         article is read or the next group is entered.
  ASSIST KEY
     (1) on a GNUS-SUBJECT line, that article is read and scrolled
         backward;
     (2) at the end of the GNUS-SUBJECT buffer, the group is exited and
         the user is returned to the group listing buffer.
If pressed within a Gnus newsreader article buffer:
  ACTION KEY
     (1) on the first line or at the end of an article, the next unread
         message is displayed;
     (2) on the first line of an Info cross reference, the referent is
         displayed;
     (3) anywhere else, the window is scrolled up a windowful.
  ASSIST KEY
     (1) on the first line or end of an article, the previous message is
         displayed;
     (2) on the first line of an Info cross reference, the referent is
         displayed;
     (3) anywhere else, the window is scrolled down a windowful.
Next: Smart Key - Tar File Mode, Previous: Smart Key - GNUS Newsreader, Up: Smart Keyboard Keys [Contents][Index]
If pressed within a listing of buffers (Buffer-menu-mode):
  ACTION KEY
     (1) on the first column of an entry, the selected buffer is marked
         for display;
     (2) on the second column of an entry, the selected buffer is marked
         for saving;
     (3) anywhere else within an entry line, all saves and deletes are
         done, and selected buffers are displayed, including the one
         just clicked on (if in the OO-Browser, only the selected buffer
         is displayed);
     (4) on or after the last line in the buffer, all saves and deletes
         are done.
  ASSIST KEY
     (1) on the first or second column of an entry, the selected buffer
         is unmarked for display and for saving or deletion;
     (2) anywhere else within an entry line, the selected buffer is
         marked for deletion;
     (3) on or after the last line in the buffer, all display, save, and
         delete marks on all entries are undone.
If pressed within an interactive buffer menu (ibuffer-mode):
  ACTION KEY
     (1) on the first or second column of an entry, the selected buffer is
         marked for display;
     (2) anywhere else within an entry line, all saves and deletes are done, and
         selected buffers are displayed, including the one just clicked on (if
         within the OO-Browser user interface, only the selected buffer is
         displayed);
     (3) on the first or last line in the buffer, all deletes are done.
  ASSIST KEY
     (1) on the first or second column of an entry, the selected buffer is unmarked
         for display or deletion;
     (2) anywhere else within an entry line, the selected buffer is marked for
         deletion;
     (3) on the first or last line in the buffer, all display, save, and delete
         marks on all entries are undone.
Next: Smart Key - Man Pages, Previous: Smart Key - Buffer Menus, Up: Smart Keyboard Keys [Contents][Index]
If pressed within a tar-mode buffer:
  ACTION KEY
     (1) on an entry line, the selected file/directory is displayed for
         editing in the other window;
     (2) on or after the last line in the buffer, if any deletes are to
         be performed, they are executed after user verification;
         otherwise, this tar file browser is quit.
  ASSIST KEY
     (1) on an entry line, the current entry is marked for deletion;
     (2) on or after the last line in the buffer, all delete marks on
         all entries are undone.
Next: Smart Key - WWW URLs, Previous: Smart Key - Tar File Mode, Up: Smart Keyboard Keys [Contents][Index]
If pressed on a cross reference within a man page entry section labeled
NAME, SEE ALSO, or PACKAGES USED, or within a man page C routine
specification (see ‘smart-man-c-routine-ref’) and the man page buffer
has either an attached file or else a man-path local variable
containing its pathname:
  ACTION KEY or ASSIST KEY
     Displays the man page or source code for the cross reference.
Next: Smart Key - HyRolo Match Buffers, Previous: Smart Key - Man Pages, Up: Smart Keyboard Keys [Contents][Index]
If pressed on a World-Wide Web universal resource locator (URL):
  ACTION KEY
     Displays the referent for the URL at point using the web browser
     given by the variable, browse-url-browser-function.  Adjust
     this setting with the Cust/URL-Display {C-h h c u} menu.
  ASSIST KEY
     Displays help for the ACTION KEY.
Next: Smart Key - Image Thumbnails, Previous: Smart Key - WWW URLs, Up: Smart Keyboard Keys [Contents][Index]
If pressed within an entry in the HyRolo search results buffer:
  ACTION KEY or ASSIST KEY
     The entry is edited in the other window.
Next: Smart Key - Gomoku Game, Previous: Smart Key - HyRolo Match Buffers, Up: Smart Keyboard Keys [Contents][Index]
If pressed within a Dired Image Thumbnail buffer:
  ACTION KEY
     Selects the chosen thumbnail and scales its image for display in another Emacs window.
  ASSIST KEY
     Selects thumbnail and uses the external viewer named by image-dired-external-viewer
     to display it.
Next: Smart Key - The OO-Browser, Previous: Smart Key - Image Thumbnails, Up: Smart Keyboard Keys [Contents][Index]
If pressed within a Gomoku game buffer:
  ACTION KEY
     Makes a move to the selected space.
  ASSIST KEY
     Takes back a prior move made at the selected space.
Next: Smart Key - Default Context, Previous: Smart Key - Gomoku Game, Up: Smart Keyboard Keys [Contents][Index]
If pressed within an OO-Browser implementors, elements or OOBR-FTR tags
buffer after an OO-Browser Environment has been loaded:
  ACTION KEY
     Jumps to the definition of the item at point.
  ASSIST KEY
     Displays help for the Action Key context at point.
When pressed within an OO-Browser listing window:
  ACTION KEY
     (1) in a blank buffer or at the end of a buffer, browser help
         information is displayed in the viewer window;
     (2) on a default class name, the statically defined instances of
         the default class are listed;
     (3) at the beginning of a (non-single char) class name, the class’
         ancestors are listed;
     (4) at the end of an entry line, the listing is scrolled up;
     (5) on the ‘...’, following a class name, point is moved to the
         class descendency expansion;
     (6) before an element entry, the element’s implementors are
         listed;
     (7) anywhere else on an entry line, the source is displayed for
         editing.
  ASSIST KEY
     (1) in a blank buffer, a selection list of buffer files is
         displayed;
     (2) on a default class name, the statically defined instances of
         the default class are listed;
     (3) at the beginning of a (non-single char) entry, the class’
         descendants are listed;
     (4) at the end of an entry line, the listing is scrolled down;
     (5) on the ‘...’, following a class name, point is moved to the
         class expansion;
     (6) anywhere else on a class entry line, the class’ elements are
         listed;
     (7) anywhere else on an element line, the element’s implementors
         are listed;
     (8) on a blank line following all entries, the current listing
         buffer is exited.
When pressed within the OO-Browser Command Help Menu Buffer:
  ACTION KEY
     Executes an OO-Browser command whose key binding is at point.
  ASSIST KEY
     Displays help for an OO-Browser command whose key binding is at
     point.
When pressed on an identifier within an OO-Browser source file:
  ACTION KEY
     Tries to display the identifier definition.
  ASSIST KEY
     Does nothing.
Previous: Smart Key - The OO-Browser, Up: Smart Keyboard Keys [Contents][Index]
Finally, if pressed within an unrecognized context:
  ACTION KEY
     Runs the function stored in action-key-default-function.
     By default, it just displays an error message.  Set it to
     hyperbole if you want it to display the Hyperbole
     minibuffer menu or hyperbole-popup-menu to popup the
     Hyperbole menubar menu.
  ASSIST KEY
     Runs the function stored in assist-key-default-function.
     By default, it just displays an error message.  Set it to
     hkey-summarize if you want it to display a summary of
     Smart Key behavior.
Next: Questions and Answers, Previous: Smart Key Reference, Up: Top [Contents][Index]
If you find any errors in Hyperbole’s operation or documentation, feel free to report them to <bug-hyperbole@gnu.org>. Be sure to use the {C-h h m r} Msg/Report-Hypb-Bug minibuffer menu item whenever you send a message to this address since that command will insert important system version information for you.
If you use Hyperbole mail or news support (see Buttons in Mail), a press of your Action Key on the Hyperbole mail list address will insert a description of your Hyperbole configuration information into your outgoing message, so that you do not have to type it. Otherwise, be sure to include the version numbers of your editor, Hyperbole and your window system. Your Hyperbole version number can be found in the top-level Hyperbole menu.
Below are some tips on how best to structure requests and discussion messages. If you share information about your use of Hyperbole with others, it will promote broader use and development of Hyperbole.
For example, write: “Subject: Typo in top-level Hyperbole minibuffer menu.”

rather than: “Subject: Hyperbole bug”
If you have suggestions on how to improve Hyperbole, send them to <hyperbole-users@gnu.com> ({C-h h m c} minibuffer menu item Msg/Compose-Hypb-Mail). Here are some issues you might address:
Next: Future Work, Previous: Suggestion or Bug Reporting, Up: Top [Contents][Index]
This other-worldly reaction is of course an individual matter. Some people have canceled meditation trips to the Far East after discovering that pressing the Action Key in random contexts serves a similar purpose much more cheaply. We have not seen anyone’s mind turn to jelly but with the cognition Hyperbole saves you, you might just grow a second one. Eventually, you will be at peace and will understand that there is no adequate description of Hyperbole. Just let it flow through you.
Ok, joking aside, now that we have your attention, here are some serious questions and answers.
No, they offer very different capabilities when you compare them a bit more deeply. In fact, it makes sense to use them together and they are highly compatible. The only overlap we see is that Org mode has a more limited kind of hyperlinks and offers some BBDB integration as Hyperbole does.
Initial Smart Key support for Org mode is already in Hyperbole and more will come. For a list of some differences, see: https://www.emacswiki.org/emacs/Hyperbole.
Org-mode offers traditional Emacs outlining, todo list management, agenda and diary management, so it is very complementary to Hyperbole. It did not exist when Hyperbole was first developed. Today it is just a matter of having time and resources to devote to finding ways to integrate the two. We would like to see this happen. If you would like to see it, offer time or money to help make it happen.
Since the Smart Mouse Keys are set up for use under many different
Emacs configurations, there is no easy way to provide user level
customization. Any mouse key binding changes require editing the
(hmouse-setup) and (hmouse-get-bindings) functions in the
hmouse-sh.el file.
To make the Smart Keys do new things in particular contexts, define new types of implicit buttons, see Implicit Buttons.
The hkey-alist and hmouse-alist variables in
hui-mouse.el and hui-window.el must be altered if you want
to change what the Smart Keys do in standard contexts. You should
then update the Smart Key summary documentation in the file,
man/hkey-help.txt, and then regenerate the readable forms of
this manual which includes that file.
Or what if someone sends a mail message with a button whose link referent I can’t access?
You receive an error that an action type is not defined or a link referent is not accessible/readable if you try to use the button. This is hardly different than trying to get through a locked door without a key; you try the doorknob, find that it is locked, and then realize that you need to take a different approach or else give up.
Like all communication, people need to coordinate, which usually requires an iterative process. If you get a mail message with a button for which you don’t have the action type, you mail the sender and request it.
Rather than typing the name for each, it is quicker to jump to the global button file and edit the buttons there as you would any explicit buttons. By default, the ButFile/PersonalFile menu item takes you to the file where global buttons are saved at the end of the file.
When you think of a hyper-space that you depend on every day, you don’t want to have a single point of failure that can make you incapable of doing work. With Hyperbole, if some directories become unavailable for a particular time (e.g. the filesystems on which they reside are dismounted) you can still work elsewhere with minimal effect. We believe this to be a compelling factor to leave the design with distributed button attribute storage.
This design also permits the potential addition of buttons to read-only media.
Any category of button can make use of an action type. Some action types are useful as behavior definitions for a variety of button categories, so all action types are defined separately to give them independence from those types which apply them.
For implicit button types that require a lot of code, it is useful to add a module that includes the implicit button type definition, its action type definition and supporting code. Then simply load that module into your Emacs session.
Next: References, Previous: Questions and Answers, Up: Top [Contents][Index]
This appendix is included for a number of reasons:
If you would like to see some of this work done, consider funding its development. Without any serious interest from users, progress on these fronts will be slow. Here are some new features we have in mind, however.
There is as yet no means of transferring explicit buttons among buffers. We realize this is an important need. Users should be able to manipulate text with embedded buttons in ordinary ways. With this feature, Hyperbole would store the button attributes as text properties within the buffers so that if a button is copied, its attributes follow. When a buffer is saved, the attributes also will be saved.
This will complement the Koutliner editing mode by using simple one character keys that normally insert characters to instead modify the view of a Koutline and to move around in it, for ease of study. Switching between view and edit modes will also be simple.
Hyperbole is designed to let you rapidly navigate and manipulate large, distributed information spaces. Being able to directly manipulate entities in these spaces will accelerate understanding and production of new information. Already Hyperbole lets you drag buffers, windows, files, and directories and place them where you like. But there is much more that can be done to allow for higher-level browsing and information organization.
Trails are an extension to the basic history mechanism presently offered by Hyperbole. Trails will allow a user to capture, edit and store a specific sequence and set of views of information for later replay by other users. Conditional branching may also be supported.
The current design choice of storing buttons external to the source file was made under the assumption that people should be able to look at files that contain Hyperbole buttons with any standard editor or tool and not be bothered by the ugly button data (since they won’t be able to utilize the buttons anyway, they don’t need to see or have access to them).
In many contexts, embedding the button data within the source files may be a better choice, so a provision which would allow selection of either configuration may be added. Here are some of the PROs and CONs of both design choices:
           POSITIVE                        NEGATIVE

Button data in source file
           Documents can stand alone.      All edit operators have
           Normal file operations apply.   to account for file
                                           structure and hide
           Simplifies creation and         internal components.
           facility expansion for
           structured and multimedia
           files.

Button data external to source file
           Files can be displayed and      Currently, attributes for
           printed exactly as they look.   a whole directory are
           No special display formatting   locked when any button
           is necessary.                   entry is locked.

           Button-based searches and
           database-type lookup operations
           need only search one file
           per directory.
This will allow one to create buttons more flexibly. For example, button attributes could be given in any order. Entry of long code sequences, quick note taking and cross-referencing would also be made easier.
From the early stages of Hyperbole design, collaborative work environments have been considered. A simple facility has demonstrated broadcast of button activations to a number of workstations on a local area network, so that one user can lead others around an information space, as during an online design review. (This facility was never adapted to the current Hyperbole release, however). Nowadays you could just use a screen sharing program.
Next: Key Index, Previous: Future Work, Up: Top [Contents][Index]
Akscyn, R. M., D. L. McCracken and E. A. Yoder. KMS: A Distributed Hypermedia System for Managing Knowledge in Organizations. Communications of the ACM, Vol. 31, No. 7, July 1988, pp. 820-835.
Brown, P. J. Turning Ideas into Products: The Guide System. Proceedings of Hypertext ’87, November 13-15, 1987, Chapel Hill, NC. ACM: NY, NY, pp. 33-40.
Conklin, Jeff. Hypertext: An Introduction and Survey. IEEE Computer, Vol. 20, No. 9, September 1987, pp. 17-41.
Engelbart, D., and W. English. A research center for augmenting human intellect. Proceedings of the Fall Joint Computer Conference, 33, 1, AFIPS Press: Montvale, NJ, 1968, pp. 395-410.
Engelbart, D. C. Authorship Provisions in Augment. Proceedings of the 1984 COMPCON Conference (COMPCON ’84 Digest), February 27-March 1, 1984, San Francisco, CA. IEEE Computer Society Press, Spring, 1984. 465-472. (OAD,2250,)
Engelbart, D. C. Collaboration Support Provisions in Augment. Proceedings of the AFIPS Office Automation Conference (OAC ’84 Digest), February, 1984, Los Angeles, CA, 1984. 51-58. (OAD,2221,)
Foss, C. L. Effective Browsing in Hypertext Systems. Proceedings of the Conference on User-Oriented Content-Based Text and Image Handling (RIAO 88), March 21-24, MIT, Cambridge MA. Centre de Hautes Etudes Internationales d’Informatique Documentaire, 1988, pp. 82-98.
Garrett, N., K. E. Smith and N. Meyrowitz. Intermedia: Issues, Strategies, and Tactics in the Design of a Hypermedia Document System. Computer-Supported Cooperative Work (CSCW ’86) Proceedings, December 3-5, Austin, TX, 1986, pp. 163-174.
Halasz, F. G., T. P. Moran and R. H. Trigg. NoteCards in a Nutshell. Proceedings of the CHI and GI ’87 Conference on Human Factors in Computing Systems, Toronto, J. M. Carroll and P. P. Tanner, (editors), ACM: NY, NY, April 1987, pp. 45-52.
Harvey, G. Understanding HyperCard. Alameda, CA: SYBEX, Inc., 1988.
Kaplan, S. J., M. D. Kapor, E. J. Belove, R. A. Landsman, and T. R. Drake. AGENDA: A personal Information Manager. Communications of the ACM, No. 33, July 1990, pp. 105-116.
Nelson, T. H. Computer Lib/Dream Machines. MicroSoft Press, Redmond, WA, 1987.
Nelson, T. H. Literary Machines, Edition 87.1. Available from the Distributors, 702 South Michigan, South Bend, IN 46618, 1987.
Norman, D. A. and S. W. Draper, editors. User Centered System Design. Lawrence Erlbaum Associates: Hillsdale, New Jersey, 1986.
Shneiderman, B. The future of interactive systems and the emergence of direct manipulation. Behavior and Information Technology, Vol. 1, 1982, pp. 237-256.
Stallman, R. GNU Emacs Manual. Free Software Foundation, Cambridge: MA, March 1987.
Trigg, R., L. Suchman, and F. Halasz. Supporting collaboration in NoteCards. Proceedings of the CSCW ’86 Conference, Austin, TX, December 1986, pp. 147-153.
Trigg, R. H., T. P. Moran and F. G. Halasz. Adaptability and Tailorability in NoteCards. Proceedings of INTERACT ’87, Stuttgart, West Germany, September 1987.
Weiner, B. PIEmail: A Personalized Information Environment Mail Tool. Department of Computer Science Masters Project, Brown University: Providence, RI, May 10, 1992.
Yankelovich, N., B. J. Haan, N. Meyrowitz and S. M. Drucker. Intermedia: The Concept and the Construction of a Seamless Information Environment. IEEE Computer, Vol. 21, No. 1, January 1988, pp. 81-96.
Yoder, E. A., R. M. Akscyn and D. L. McCracken. Collaboration in KMS, A Shared Hypermedia System. Proceedings of the 1989 ACM Conference on Human Factors in Computer Systems (CHI ’89), April 30-May 4, 1989, Austin, TX, ACM: NY,NY, 1989, pp. 37-42.
Next: Function, Previous: References, Up: Top [Contents][Index]
| Jump to: | %
(
)
+
,
-
.
0
=
?
@
[
]
~
A B C D F H I J K L M N O P Q R S T U W Z |
|---|
| Jump to: | %
(
)
+
,
-
.
0
=
?
@
[
]
~
A B C D F H I J K L M N O P Q R S T U W Z |
|---|
Next: Concept Index, Previous: Key Index, Up: Top [Contents][Index]
| Jump to: | A B C D E F G H I K L M O R S W Z |
|---|
| Jump to: | A B C D E F G H I K L M O R S W Z |
|---|
| Jump to: | <
|
A B C D E F G H I J K L M N O P Q R S T U V W X Y Z |
|---|
| Jump to: | <
|
A B C D E F G H I J K L M N O P Q R S T U V W X Y Z |
|---|