Abstract

Introduzione, riassunto chiaro della tesi a tutti i livelli


Introduction

Introduzione, riassunto chiaro della tesi a tutti i livelli


Literature review

Qui mi metto a descrivere a grandi linee il dominio in cui ho operato, gli attori della comunità scientifica,editor WYSIWYG(msWord ecc), formati (latex,html), formati di pubblicazione(?) (pdf, springer LNCS)

Submission workflow

Descrizione di come funziona il workflow per la pubblicazione e delle due macrofasi : sottomissione ad un comitatoe sottomissione ad un editore

Submission to evaluation

Gli utenti usano un editor, ed ognuno ha il suo formato : LaTeX, DOC(X), ODT, DocBook, TEI e HTML ma successivamente serve convertire l'articolo in PDF, in alcuni casi anche EPUB

Submission to publication

Invio dell'articolo all'editore in entrambi i formati (pdf e sorgente), creando un nuovo PDF.

HTML and publication

​Una descrizione approfondita dello html publishing, grosso escursus sulle novità lanciate da questa modalità dipubblicazione in particolare formato RASH. Pros and cons, brief story, estensione e grandezze.

Problema principale è che non è utilizzato per via degli standard de facto

Editors and formats

Teoria sugli editor, descrizione dei più comuni e, se è possibile, aggiungere informazioni sulle percentuali di utilizzorapportate alla popolazione scientifica.

Distinzione delle varie tipologie di editor e in particolare dei loro formati.

PDF: standard de facto

Descrizione del formato pdf, in particolare tutti i contro : accessibilità limitata, non compatibile con github,lenta renderizzazione, online issues ​.

EPUB format

Attenzione particolare a questo formato, informazioni

WYSIWYG

Particolare focus sugli editor di tipo What You See Is What You Get, fondamenti teorici e teoremi.

HTML-oriented editors

​lista dei competitors: (Dokieli format, Fidus writer format, HTML books, ecc.) e degli editor WYSIYG (dokie.li,fiduswriter, authorea, tinyMCE) descrizione, pros and cons, accennare l'utilizzo di github nella differenza tracentralizzati e decentralizzati.

RASH framework

​​Descrizione di RASH​​ e framework, motivi utilizzo, estensione, soggetti e oggetti, pros and cons. Sotto insiemedi html5

Visualization

Scrivere riguardo alla visualizzazione di documenti rash, jquery e css

ROCS

Descrizione di rocs e del suo utilizzo per convertire i documenti, parlare della tesi di Giacomo.

Accessibility

Punti di forza sull'accessibilità del documento, in particolare le formule. Riprendere dalla tesi di Vincenzo ​.


RAJE: RAsh Javascript Editor

Most of this thesis is centered on the development of a HTML-based editor named RAJE (RAsh Javascript Editor), whichis no more than a WYSIWYG editor (these kinds are largely discussed in ​). Is based on HTML, but for more precision it uses a subset, called RASH ().

Inside this chapter i will explain what RAJE is and all the functionalities grant to users (like splash window, toolbars and others) and than I will describe the strenghts, extolling the reasons for which it was created.

Functionalities

Among the main functions that RAJE provides we can find out some obvious and universal needed in a editor such as toolbar and software menu; Other, instead, are specific to the format which the editor is based on (e.g. swap beetwen preview and editor modes). I will also talk about header editability, that deserves to have a dedicated section because the managment is different from the one of the entire body of the article. In the end I will talk of the secret shortcuts that I have implemented to speed up the writing.

Splash window

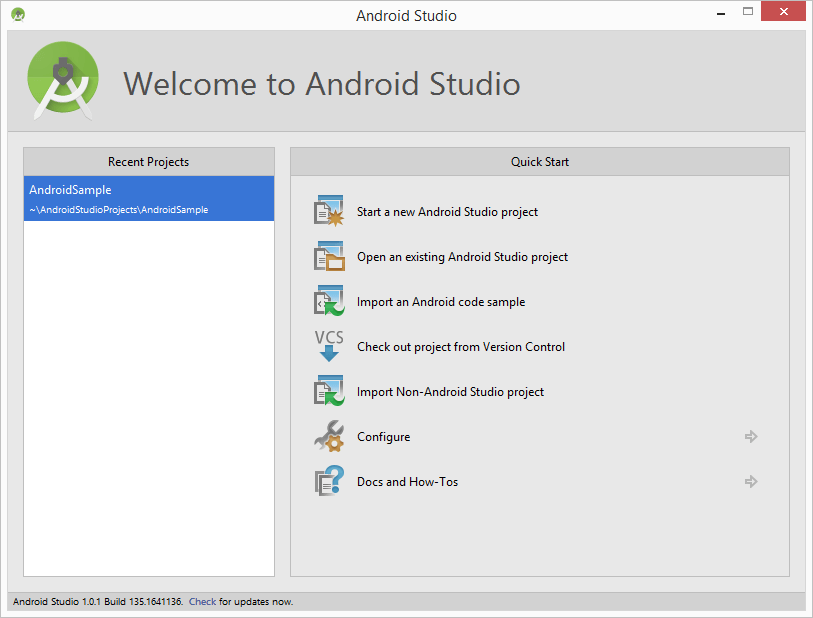
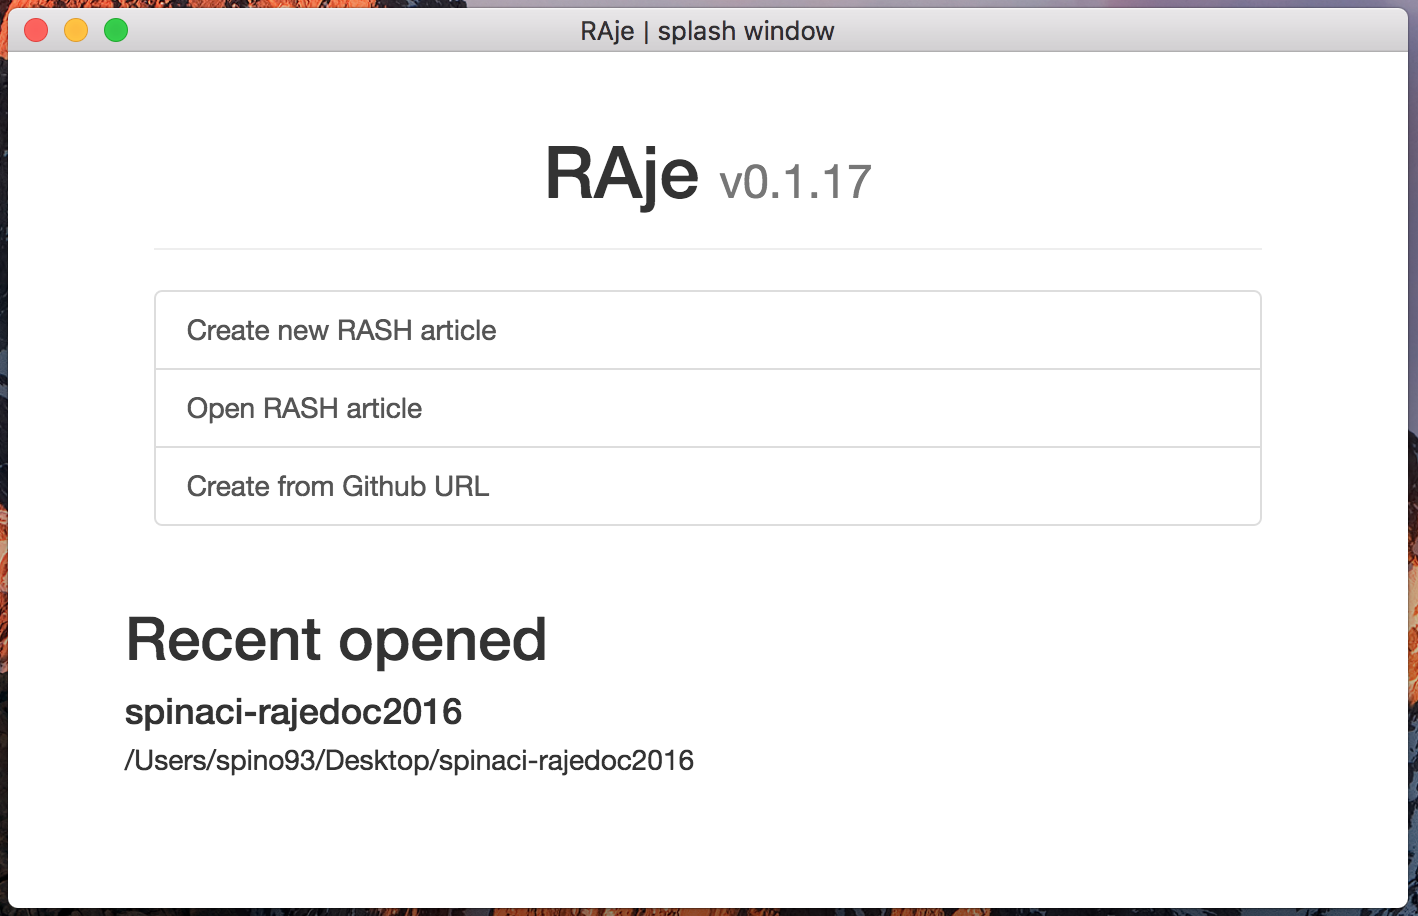
An high number of editors, not only the text ones (e.g. Android studio and his welcome window shown in ​), integrate as first screen a window commonly named splash window or welcome window. During the editor development I found out how is necessary a splash window, as first screen of a software that require to modify multiple projects. RAJE, in fact, allows you to edit and create articles, where an article is actually a folder containing all assets normally required by every RASH document. Of course is permissible to think that every users wants to create more than one article, in fact the idea in which I created RAJE allows to manage multiple files, simply knowing the absolute path of its folder.

http:,,www.techotopia.com,images,9,97,Android_studio_welcome_screen_one_proj2.png

​Welcome window of Android Studio.

The RAJE splash window in
​ has been developed following a similar scheme of ​. Is naturally presents a list of recent articles, disposed in order from the more recent to the less one. For every element of this list, important informations to correctly visualize the article are saved. It is also possible delete elements from the list, especially if we are talking about obsolete articles, or not present in the machine anymore. Recent projects are not updatable, is I opened the article X and then I change its position in another folder, I will not be able anymore to use its "recent article" to open it, and will be obligatory to find manually the new folder position.

There are 3 buttons in the splash. The first one needs to create a new article choosing the destination folder and the name, with the created article will be called (can not be edited next). The opening of an already created article (e.g. one sent by a colleague) is related to the pressure of the second button Open RASH article. In this case is necessary to have physically the folder on the machine.

Finally the third button is something more particular, starting from a URL like this this one: https://github.com/{author}/{repository}​ containing a RASH repository, is possible download into the personal machine and edit directly with RAJE. Descrive this modality will be my task in the ​.

splash.png

​RAJE splash window.

Toolbar and elements

As anticipated before, RAJE is a WYSIWYG HTML-based editor, for this reason exaclty as the others RAJE has a toolbar that wrap a large amount of actions allowed on the article, if not all of them, at least the mosr importants. As of this important component in the initial phase of the development, I adopted a minimalistic style, recovering what are the graphic guidelines of Bootstrap. Then will be my task to transform this toolbar more similar to the most famous and commercial editors.

In this section, my purpose is to give a description of the toolbar with screenshots.

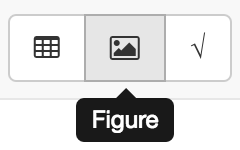
This toolbar is made up with a set of buttons grouped and divided by category, following the RASH specs is possible to notice the difference beetwen the categories of element or action that should be applied to the document, when the user press the corrispondent button. Is also possible invoke a tooltip that shows up the common name to recognize the button ( ).

tooltip.png

​Tooltip shown on button hover.

Refersto the ​ starting from left to right we find the first two buttons: respectively undo and redo. The behaviour hide behind these special button is strictly necessary for what concern drafting of the document. Without its presence, drawing the article would be more complex and difficult, furthermore the revision time would soar. Thus the introduction of these functions was a bound choice.

The third and fourth button are another great classic of the editors, i.e. bold and italic, that can transform the selected text.

From the fourth button onwards, we found instead some special behaviours about RASH, ever inside the inline category (behaviours applied only to plain text) that are: code, link, cross reference, quote, subscript and superscript . Among the various, noteworthy is the cross reference one (represented with ad anchor) that shows a modal window with which to choose exaclty on what element refers, and is also allowed to create a new reference or footnote. These buttons need to have a portion of text selected.

toolbar.png

​Editor's toolbar.

The second group includes the blocks​, that are, as you can find in the ufficial RASH documentation: codeblock, blockquote, ordered list and unordered list.

The element codeblock is very important to insert some code snippets, and is allowed wrote down some code lines (also in HTML format) without interpretation and are shown as a web page. In other words everything is wrapped inside the opening and closing of the code tag is only graphical code, but is text at all effects.

About the quotes, the blockquote element comes in our aid. A quote can be added, and instead the normal quote (that creates a inline citation), it is extended to all line. This kind of citation are very important, also to give more emphasis than the ones inserted in text.

Is acceptable and predictable decide to insert lists in the draft document, about that list buttons come in aid to users. The most used and popular naturally are the ordered and unordered. Every users can have the possibility to add the list more in line with his will.

Then, inside the block called figure we find out table, figure and formula. Always following the directions inside the RASH documentation, we can notice the importance of using these three blocks (considered main for writing research articles).

The tables are inserted with a small configuration button, positioned at their left. The table can be modified thanks to this button and, among the aother permitted operations, we can resize ti and change his heading. Another important functionality, permitted by RASH but not implemented yet in RAJE, is the expantion of cells or the entire column. Will be one of the first new operations permitted in the next releases of the editor.

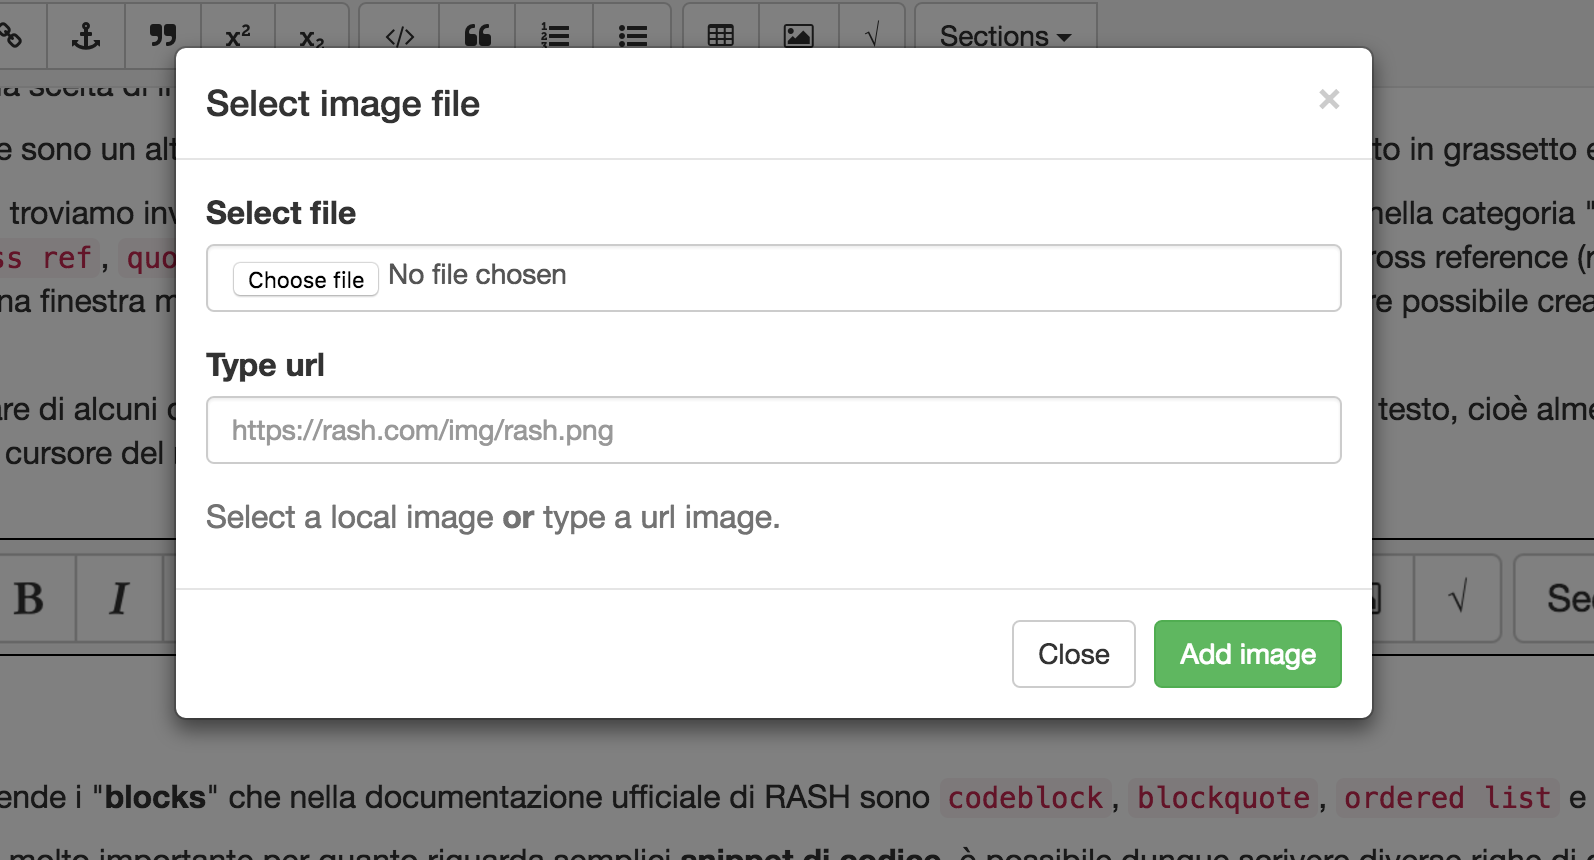
The insertion, with the corrisponding button, of the images is entrusted to the second button of the block: figure. After pressing the button, will be immedialty visible a modal window ( ) that permits to chosse beetwen two different modality: selection a local image file or typing an URL. Both import physically the image inside the project folder.

figure_modal.png

​Modal window to insert images.

One of the most important buttons is surely the one to add a new formula in the selected position. This action takes place with the invocation of a simple asciiMath editor, that at all effects create an environment where set and select the formula. I will discuss this after, in the Section 3.2.1.

I developed the dropdown section to grant the possibility to add new sections such the special abstact and acknowledgement or common sections. The only special section that can be added in this way are the two quoted above. If these are already inserted inside the document, the screen will reposition exaclty at the begin of the section, showing its contents. Insted will be executed the real insertion in the order describer by RASH.

Every time that the caret position change, the dropdown content will be updated with the insertable sections. If the caret is inside af a first level section, will be possible add both a top-level section or a sub sections as shown in the code.

<section><h1>Top level section</h1>[caret]
</section>​ ​

Is very important remember that this is not the only one way for the user to add sections, instead it is for the abstract and acknowledgement (more informations about shortcuts in the )

Software menu

RAJE is a software, and such as, is served with a menu. Its implementation has been chosen to my utter discretion. Is very important to say also that the visualization can considerably change beetwen the different Operating Systems, in particular passing from Unix systems to Windows. Inside this section I will not explain step by step every single button inside the dropdowns, because now the project, in particular this module, is undergoing updates. My task is to explain, with some examples, why and how i devided and group the multiple actors of the menu.

Sincerely I did not started from a development without foundations, instead I followed few guidelines and advices founded on the Internet. In particular I was inspired by the composition of some editing softwares menu. Among the various Visual Studio Code, Atom text editor (both used during the making of) and Open Office as shown in  ​. 

menubar.png

​Open Office menu bar.

The kind of organization i followed was in line with this schema. Omitting the button with the name of the software, that is one of the features only visible on Unix systems, File and Modify has been introducted in RAJE.

File is necessary to work with multiple documents, it gives the opportunity to apen a new window about another article. Modify, instead, encloses a great number of actions allowed inside an editor: undo, redo, cut, paste and copy. Moreover there is a button to save file and others used to modify the header.

Header

The header of a RASH file is made up with more elements, needed to contextualize the entire article. Title and authors list are obviously very important for what concern documents of scientific mold and, in this case, also keywords and ACM subject categories.

Thank RASH you can have articles written by many authors, for this reason RAJE permits the insertion, modification and deletion of authors. Among the other things is reasonable wanting to change the author's order, triggering the corrispondent action from software menu. Now you can move them simply with a Drag & Drop technology. As for what concerns the deletion of authors, you need to choose the relative behaviour from the menu.

As well as the other elements that make up the header, they are easily editable with a double click. I chose to restrict the editing permissions of this crucial part because it has been structured very more complex than the rest of the document, so also a small structural edit would have foreclosed the possibility of saving (and then render) the RASH document correclty. Besides the double click is a banal action, and is the main action to express the willingness to interc with a graphic element or text modification (same as rename action on windows).

Categories and keyword can be editable also after the double click event, the only one difference is that the behaviour is the same as the inline code elements: space button will insert a space inside the element, instead the enter key will insert a space after the element (it indicates the end).

The title is usually accompanied with a subtitle. If during the title editing you want to add the subtitle, you can do it simply pressing the enter key.

So, for what concern the header of a scientific document in RASH format, you can modify it with the most absolutly compatibility. The only exclamation mark is the different editing way other than the body, with a lesser degree of restriction.

Shortcuts

In this subsection, I am here to describe and create the list of all the keyboard shortcuts that i decided to implement. The implementation modalities will be deeply explained in .

Inside the list the key mod is to say ctrl for Windows and Linux, and cmd for OSX.

  1. mod+s is the local save. All changes that will occur to the document will be viewable inside the HTML source document.

  2. mod+shift+s​ is the push to Github. It shows a modal window to insert the comment which it will be labelled.

  3. mod+c​, mod+v​ and mod+x are copy, paste and cut.

  4. mod+z and mod+shift+z​ are the shortcuts for undo and redo actions.

  5. # enter​ permits to create a new section. Based on the number of the characters # you can choose the deepness of the section.

  6. * enter​​ add an unordered list.

  7. 1. enter add an ordered list.

  8. | enter add blockquote element.

  9. ` enter add codeblock element.

Strenghts

RAJE has been created to remedy the problem: having a WYSIWYG editor of research scientific articles structed in RASH format, furthermore to have a centralized placeacessible to everyone where to store documents. During all the presentation of this section, will be my task describe the strenghts of this project.

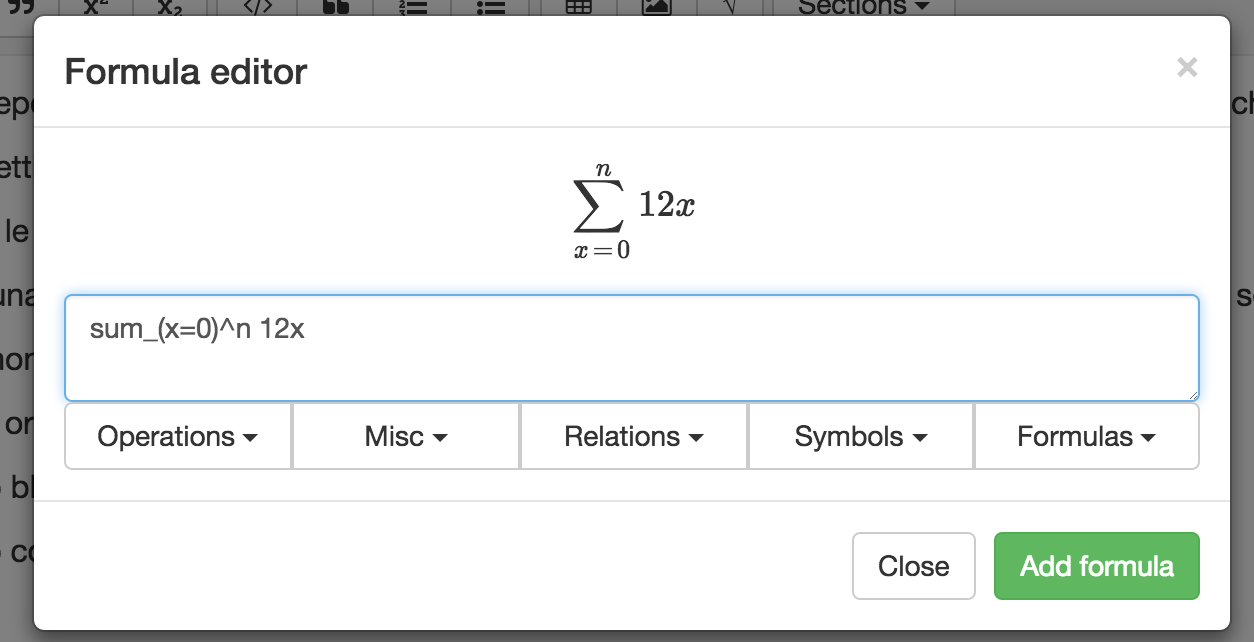
During the development period, with my Co-supervisor we defined another need, related to the document accessibility (issue widely described inside the ), a math formulas editor with asciiMath as input, which generates rendered formulas with MathJax process.

The second pro that I will present is integration with Github, in particular I will talk about how I tought to manage the interconnetion beetwen more authors of same documents.

Mathjax and Mathml

Starting from the release 0.6 di RASH, thanks to work performed by my colleague Vincenzo Rubano (@falcon03), is not possible render asciiMath formulas with MathJax processor.

A significant challeng of this work was to introduce an environment tought to be easy to use, with all tools aviabile, so that also who do not know the key sequence can think of build the mathematical formula. The editor (Figure 7) is a modal window. It has a textbox for ascii input characters, and a screen prepared to render it in real time. In fact another challeng that I charge was the refresh speed of the formule, that happens every time a character or a set are typed.

For those not familiar with the syntax necessary to add particular symbols or functions, they can always use buttons that i tought to add immediatly under the input textbox. The arrangement of the elements was designed crossing the asciiMath syntax and the OpenOffice editor layout.

formulaeditor.png

​RAJE formula editor.

Marriage with Github

As already mentioned more times before, RAJE is strictly wired with a cloud-like system in such a way to easy up the communication and sharing of articles beetwen its stakeholders (which are, in addition to the authors, reviewers in charge of reviewing).

Github is the most popular network for Open Source projects, known and utilized from million of developer all over the world. Its beating heart is Git, a version control system built by Linus Torvald during the development of the operating system called with the name of Linux. Now is a must for the Open Source Developers having a Github profile. Not only for curriculum purposes, but also for appreciations and improvements of its own projects. To every user is allowed to work with people around the world to built project more and more complete and complex, with the only bond, know English. All texts are entirely in English.

Why this powerful system like this is not popular also for sharing textual material? To answer this question we need to know that Git has been built with the purpose of sharing code, and that simplify all things. Code needs to be interpreted by a machine, that's why it needs to define where every instruction starts and ends. This because every machine read, understand and elaborate only one row at time.

If RASH would be raw text, probably other version control sources would be more suitable. But a RASH document is not only plain text, these documents are HTML; Thanks this small difference we can say that RASH and Github they go perfectly in tune each other.

After this introduction we acn describe the real integration beetwen the editor and the network.

In this section, after give some basic informations about what is Github, we can extend the discourse started in ​ describing the last button behaviour. Pushing it you can create a new folder to the choosen path, that will be immediatly filled with code and assets of the article corrispondent to the typed URL. To all effect is the same things to open a document previously created, with the only difference that this time we are talking about the https://github.com/{author}/{repository}​ repository.

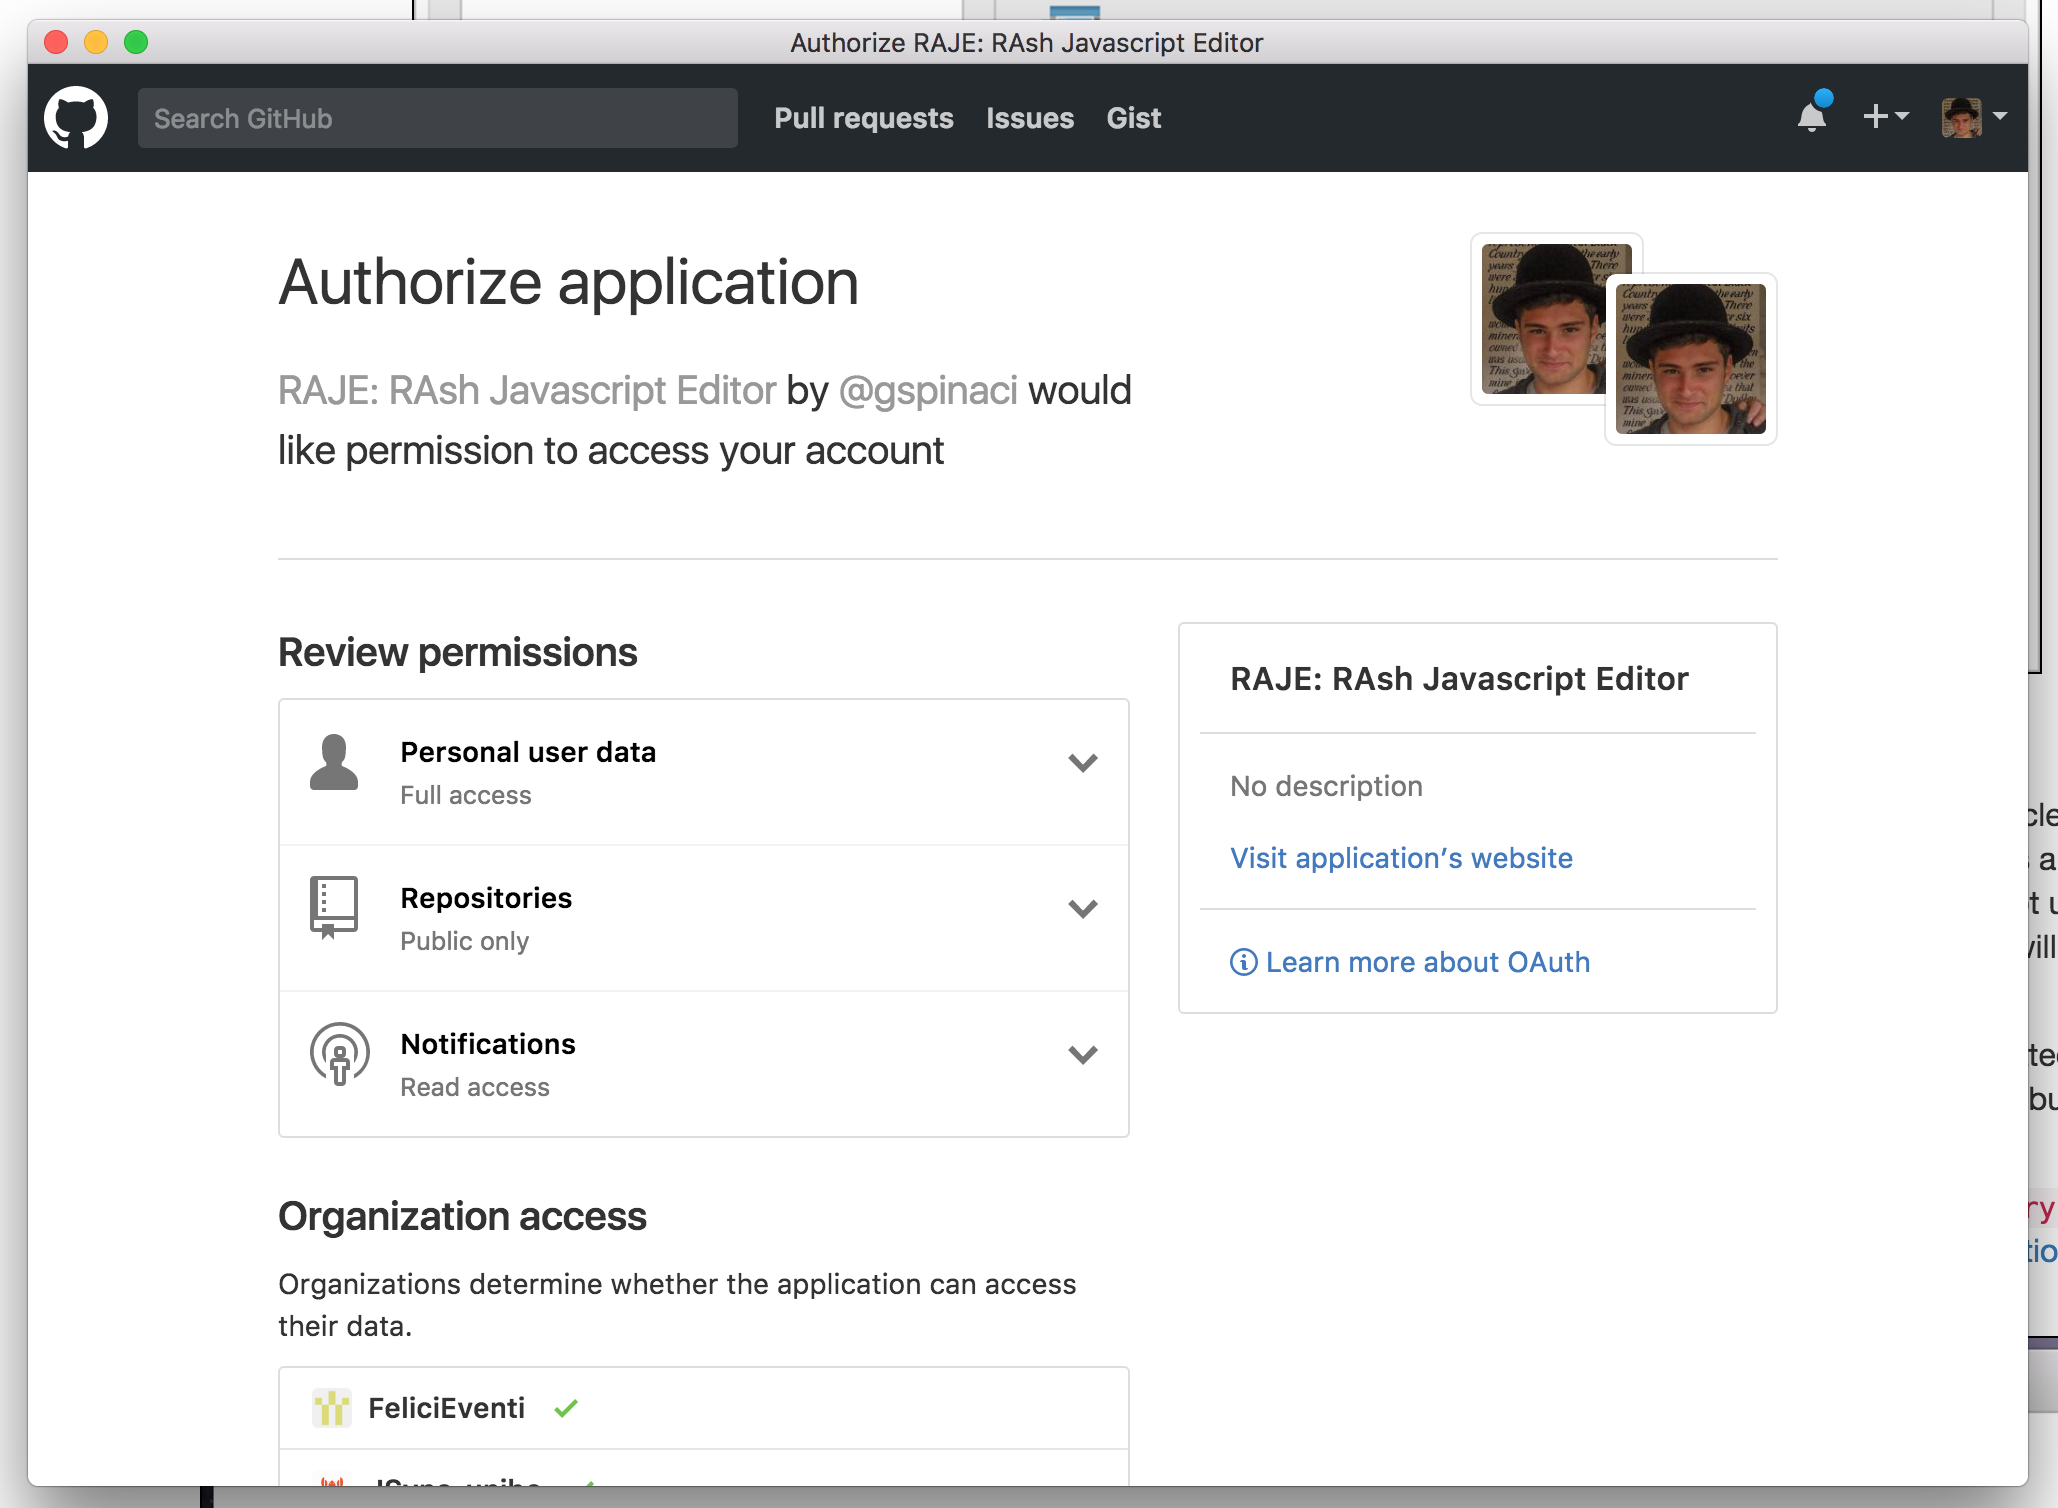
When a user wants to save online the content of a document, to do it, he needs to be logged in with its personal Github profile. These types of requeste are not allowed without authentication, which certifies the user identity.

Omitting the authentication mode, o better the development of the predisposed module for handling authentication, the user has the option to save the document online, on Github servers. The action can be executed with the shortcut mod+shit+s​ or the appropriate button in software menu.​ Will be viewed a simple modal that permits the user to label up the entire sets of changes under an unique comment. When the upload is done will be shown a success message, noninvasively, on the screen. Now the push has been executed with success.

The mangement of sharing documents needs that all repository contributors are always updated to the latest article version, to avoid merge conflicts. In the RAJE current version this functionality has not been introduced yet, but is a crucial fact of distributed system management, will be implemented soon.

These, listed above, are the reasons of the perfect union beetwen Github and RAJE, that precisely is one of the reasons which it was born. 


Raje in deep

Until now I have described just few specific words about RAJE, from all the duration of this chapter I will tell the technologies and the development process i have adopted to create this software.

A little note: I always referred to RAJE called it also "software". The editor is multiplatform, but it has been created as unique project, with the libraries made available from Electron, Also Known As Atom shell.

In this chapter I will describe what Eletron is, and how I used the File System's API to create this software. Next I will introduce the beating heart of RAJE, the script raje.js that I personally built with the aid of JQuery and some other modules, like @TimDown's rangy used to abstract the selection elements and Mousetrap to simplify the manageof shortcuts. Finally, regarding Electron, I will explain how I have made different deploys for the different Operating Systems supported by RAJE: OSX, Windows and Linux.

How electron works

Electron is a Open Source framework created by Github developers. Based on the already famous node.js API, we can say that is a very lively project and it can obtain more and more supporters. Today we can count near 13.000 commits divided beetwen the 500 total contributors.

Electron is pratically a browser wrapper, it utilize Chromium as browser to create multi platform softwares. Thanks to this framework is guaranteed the development with technologies like HTML, CSS and Javascript.

Two are the important process in a Electron-based software: The Main process and the Renderer process.

The Main process is a node.js script, that includes every kind of necessary information and setting to guarantee thesmooth progress of the software, e.g. the instance of the windows and the relatives HTML pages, the use of specialAPI normally unaccessible from the browser or "vanilla Javascript", or else local or remote databases.

Instead the Renderer process is a script imported directly in the document with the classical syntax <script src="rendered.js"></script>​.it allow to utilize NPM packages (the manager of node.js modules) and can communicate in an Async or Syncway with the main process to exchange messages. ​

After this general presentation, I will describe in detail the main API that I have adopted during the project development,and how I handled the communication beetwen processes.

File system API

For a sofware that make every kind of CRUD operation (Create, Retrieve, Update, Delete) on files was impossible notto use the File System API. In my aid, in this case, the FS library of node.js has intervened.

This is one of the most important library, because it is inside the package of libraries inserted inside the officialdistro of node, then it was enough to import it with the next line of code: const fs = require("fs").

Inside this module, we can find out some very useful methods such as readDir, writeFile and readFile,which are asynchronous, but the corrispondent method that ends with Sync (e.g. readDirSync)is its sync counterpart.

When a new article is created, the editor creates the new directory and copy inside every necessary asset with thiscode:

copyAssetFolder: function (assetFolderName, folderPath) {fs.mkdir(`${folderPath}/${assetFolderName}`, (err) => {if (err) console.log(err)fs.readdirSync(`${assetFolderName}`).forEach((file) => {let fullFilePath = `${assetFolderName}/${file}`if (fs.lstatSync(fullFilePath).isFile())fs.createReadStream(fullFilePath).pipe(fs.createWriteStream(`${folderPath}/${assetFolderName}/${file}`))})})
}​ ​ ​ ​

Inside the method signature we can find out two input variables: assetFolderName and folderPath. The first one is the name of the directory that we want to copy the contents i.e. js, css or fonts, while the second is the absolute path of the article's directory, where next the assets will be saved.

The asynchronous mehod fs.mkdir()​ show us that it has a callback(in this case is very simply and it return a not empty variable only if there is an error). Then the directoryis readed and the names of its contents are written inside an array, every element inside the folder is a variableinside the array. Wanting to work only with files, we do not care about folders. Finally a read stream is createdto read the content of the assets and to write a new file with the same content, to the destination folder.​

Inside this code snippet I used the fs package to do some easy operation with the FS API.

Another example that i can show is when the user express to open a new article. The editor wants to be sure thatthe folder has been created before with RAJE.

checkIfRaje: function (dirPath) {let isRaje = falsefs.readdirSync(dirPath).forEach((file) => {if (file == '.raje')isRaje = true})return isRaje
},

One of the main reasons that guide me to create a real software was the need to interface with file system, and thatis not allowed by all browsers , so the development has been hijacked to this way.

Github API

Just like what happened with the File System describer right above, also the APIs to communicate with Github areimplemented using a wrapper: Octonode.

The interfaces that Github provides are updated to the versione v3, and personally I think that these API allows a lot of actions on contents, users and repositories. Of course it provides also OAuth2 login.

To set up a project and arrange to have login, first of all is necessary that the developer application is alreadycreated, as shown in ​, and be in possession of the two necessary codes: client ID and secret ID.

github.png

​RAJE developer application.

As soon the application is created, is now possible to use some code lines to authenticate users with the protocol OAuth2. The Octonode library also serves a different method to authenticate with Github. I adopted the following way: ​you can store all needed functions inside a client variable, that is created passing the token generated by Github when a user make the request to be logged in with its account.

In order to obtain this token, with the developer application created, the user needs to press the login button. Then the request in window will be shown. This window will describe what kind of permissions RAJE needs, it can read all public information about the user (such as email, name, biography and so on) and about public repositories (the ones which are important for RAJE). Another permission is to read the notifications, but now nothing about that is yet implemented.

authorization.png

​Github authorization window.

Once authorizations are given by the user this happens: a message in sent to Github servers, and a result comes back in return. Normally Github needs an URL callback, so the token can be directly sent there, where it will be elaborated. But we do not need that, we only need a mechanism that handle the navigation event. Electron use Chromium as browser, and because that it can understand when a URL is requested with all information normally needed, so we chan handle the callback URL directly from the main process.

First of all I use a regular expression to decode and extract the code from URL (as shown in code block).

var raw_code = /code=([^&]*)/.exec(url) || null
var code = (raw_code && raw_code.length > 1) ? raw_code[1] : null

Then I will elaborate the code to get the user token directly from the Github API with the method requestGithubToken(githubOptions, code)​. This method needs as input the options (which are the IDs explained before) and the code extracted from the callback URL.

function requestGithubToken(githubOptions, code) {apiRequests.post('https://github.com/login/oauth/access_token', {client_id: githubOptions.client_id,client_secret: githubOptions.client_secret,code: code,}).end(function (err, response) {if (response && response.ok) {/** Save github token to settings */storage.set('githubSettings', { 'token': response.body.access_token }, (err) => {if (err) throw errgetUserInfo()})} else {// Error - Show messages.console.log(err)}})
}

The method above uses a node.js module called superagent, an high level wrapper for ajax requests. With this module we can make a POST request, passing all needed informations to get, after, the token. In this snippet the token is saved inside the electron_storage, i.e. a simple environment JSON storage for the current machine.

The login workflow is the following:

  1. The user express the will to be logged in.

  2. RAJE shows athe authorization modal.

  3. The user eccept authorization requirements.

  4. Github send the URL callback containing the code.

  5. RAJE extract the code and request the token.

  6. Github send the token in return.

  7. RAJE stores the token for next requests.

When the token is stored, every successive requests (such as create a repository or push a commit) are instantly served, as we discussed before, with the variable client​, that is created with in input the token stored.

When a new article is opened, only locally the folder, with document and assets, is created. When the user wants to push changes and the repository does not exists, it needs to be created with all needed folders and files.

Every time a push is requested we needs the SHA of the HTML file to update it and, if no repositories are founded RAJE needs to create it. Inside the client variable we can find the method .me()​ which returns an instance of the logged user. The me object has inside all allowed operations to users, and among them, the creation of a new repository. With the method client.me().repo({},callback)​ in our aid, a new repository is created, the first parameter is an object that contains properties like name, description and other less important information.

Once the repository is created we need to push also the assets, which are Javascript scripts, CSS style files and fonts​ (required by FontAwesome). The current versione of RAJE needs to synchronize these files one after another (synchronous paradigm).

Those two are the most important examples of integration with the big API of Github, but they give us the proof of what it can be possible to do.

Communication beetwen processes

Electron needs to ran with two processes: Main and Renderer. Main allow to use node.js syntax and manages the software behaviour, instead the Renderer one can be imported inside the HTML document, as like happens with RAJE.

Rendered process is stored inside the raje.js script, that is concatenated with gulp.js. Said that, there are a lot of behaviours triggered by the Renderer process and executed by the Main, such as the one which is triggered when user wants to close the editor, when changes are not saved yet. To know that changes are unsaved there are some steps to explain. First, when the editor is opened, the entire body of the editable document is saved in a global variable inside the Renderer process. When the event input is triggered (it happens when some kind of input has been added in the editor), the system check if the saved body is different from the current body, and if they are it means that something has changed, and the editor state is set to changed.

At this point the Renderer need to send this information to the Main process, to handle unexpected quit without saving changes. We need to instantiate the ipcRenderer module in the Renderer process, to handle and make requests destinated to the Main process. I set a function to do that, setEditState.

function setEditState() {ipcRenderer.send('setEditState', edit_state)
}

It send the edit_state variable (that is a boolean) directly to the Main process, to be stored there. Right now we need to do the specular thing inside the Main process, but with the mainProcess module:

ipcMain.on('setEditState', (event, state) => {edit_state = state
})

The event parameter inside the callback bring with it a lot of information about the trigger event, instead the state variable is what is passed from the Renderer process, i.e. the boolean that describe the state.

Thank to this now we do not need to ask, from the Main, to the Renderer in Synchronous way (which is not possible) to know if the document has been changed before, but instead we can inform the Main every time a change took place, using the asynchronous paradigm.

In the other way, there are some cases which need to communicate from Main to Process. The entire menu is created ad setted up by the Main, and the behaviour behind the editor mode and preview mode buttons need to change the visualization of the Renderer one.

In this case we use the webContent object in this way to communicate with the Renderer.

{label: 'Editor mode',click() {mainWindow.webContents.send('setEditorMode')}
},
{label: 'Preview mode',click() {mainWindow.webContents.send('setPreviewMode')}
},

And inside the Renderer process we have something like this to set the way how the editor will display the article.

ipcRenderer.on('setPreviewMode', (event) => {$(rash_inline_selector).setNotEditable()
})ipcRenderer.on('setEditorMode', (event) => {$(rash_inline_selector).setEditable()
})

These above are examples of asynchronous communications, but for example when the user wants to add a image inside the article, the communication needs to be Synchronous. That is because first the editor save the file, then the file can be displayed with the img element.

The message is sent with a sync function, passing some informations about the file.

function sendWriteFigure(file) {ipcRenderer.sendSync('writeFigureSync', { 'name': file.name, 'path': file.path })
}

In the Main process is pretty similar as the asynchronous behaviour, the only difference is when it need to send back the result to let know, at the sender process, that it finished its job.

ipcMain.on('writeFigureSync', (event, image) => {storage.getRecentArticles((err, recentArticles) => {fsUtils.writeFigureSync(recentArticles[recentArticles.length - 1], image, (err) => {if (err) throw errevent.returnValue = true})})
})
In this case I send only a boolean in return, it notify to the renderer ​​that it can stop the blocking behavior, and resume from the last util instruction. In this case the last one is the one that creates the img element.

Web-based techs

As mentioned before, RAJE in built on Electron, which uses web technologies as Javascript and CSS to give at client-side behaviours and styles. First, the splash activity (section) is only a html file with its own Javascript and CSS, rendered by the Main process. The editor itself is the HTML file stored inside the article folder. When it is viewed by a browser (Chromium in our case) it has rash.js script that built, into the RASH schema, the document. With the addition of raje.js a RASH document can be turned into a editable document with toolbar and other elements.

For this reason, the core of this editor is not the software itself, but insted is the script imported, but the software gives some important wiring behaviors (FS and Github APIs).

By the way, if the editor is inside the document stored as a script, why we do not use a normal web browser to edit? If someone try to open the file with a normal browser, he can view only a normal RASH file, because the editor behaviour will be shown and added only if the document is opened with RAJE. In other words, this is very useful to send read-only documents or show it with rawgit

Here, in this section, I will explain everything about the "client side" editor, describing the raje.js script, contenteditable element and the issues jumped out using it.

Raje.js: the core script

All the RAJE project flow around the raje.js script. It is built concatenating more scripts with gulp.js.

Gulp is a toolkit that helps to automate tasks during development, and i used it to write raje.js when one of the inner scripts change. I created a task called watch that listens for saved changes, to build up the output.

Raje.js is made up of eight different files:

  1. init.js

  2. caret.js

  3. const.js

  4. raje.js

  5. shortcuts.js

  6. toolbar.js

  7. derash.js

  8. rendered.js

Init.js is the initialization script, it initializes the variables (like bodyContent or edit_state), extends JQuery object adding more new functions, handle the creation of figures and call the $(document).ready() function to set up the editor. Two important functions added to the JQuery object are: setEditable and setNotEditable, both act on the document editability. Very important is what happen to the sections: them are detached from the body and after attached to the editor section (i.e. the section with conteeditable attribute sets to true, i will explain its behaviour in the next section).

The second script, that is caret.js, provides some utility methods about the caret and its position. Here we can find functions to check if the caret is inside some elements (e.g. if is inside the editor), or to create a selection that wraps entirely the node where the caret is. All the methods here are based on rangy.

Sometimes i felt the need to use some constants to store numbers and string called multiple times. Those are wrapped inside the const script, in orde to aware of magic numbers anti-pattern.

Then we find raje.js, that is a set of actions to add elements directly onto the body. More of them uses the contenteditable APIs (see undo and redo) or the method document.execCommand('insertHTML')​ that add a HTML string to the caret (as shown in figure right below). All figure elements and crossref are intended as classes, where a new element is a new object​. There are also methods to add sections of any kind, from normals to specials. 

insertCodeBlock: function () {document.execCommand("insertHTML", false,'<pre><code><br/></code></pre>')
}

All shortcuts are stored in shortcuts.js script. All shortcuts are binded inside an init function called when the document is ready. Those are all implemented using the Mousetrap module, and needed to trigger a different behaviour from the normal one. Over that the enter key press event, may triggers different behaviour based on where the caret is (e.g. when user press enter inside a figure, he wants to add a new paragraph next to the figure, so he can write down a new text line).

I wrapped every graphical elements, that will be added, inside toolbar.js. Here there are some variables which contain HTML strings that need to be added after. Among them there is the toolbar and all other modals, each with its own method to show it.

Because the rendered document is different from the stored one, and rash.js deals with transformation beetwen the stored and rendered article, the editor needed some kind of mechanism that do the specular thing, in other words derash.js. This comes in aid when we save the article, because it creates and beautify the HTML string that is the file. When it creates the string, is minified, for this reason I created a function that mantains the multi line property and tabulation.

At least rendered.js contains everything to handle communication with the Main process.

Next, always with gulp.js, I will build raje.js also with all client-side modules (e.g. rangy and Mousetrap).

Contenteditable and issues with different browsers

When the document is ready all sections are detached from the body, and a new section is added instead (using the following code shown after).

<section id="rashEditor" class="cgen editgen container mousetrap" contenteditable="true"></section>​ ​​

This mean that the entire body is inside this new section#rashEditor​, which grants editability thanks to the attribute contenteditable setted as true.​

Contenteditable is an attribute, which can be true or false. If this section has contenteditable set to true, it is editable. This means that text can be added directly inside it, and it comes with some powerful APIs which give us important manageable skills (such as transform selection into bold text or add new line paragraph).

This technology is very powerful, but have a so many exploits and, as the browser war shown us, every one decided to implement every function in his mid. For instance, after pressing the enter key, Internet Explorer will add a <p> element, Chrome will insert a <p> or <div> depending of the situation and finally Firefox will attach a <div>.

This is only one of the issues jumped out during the development. A RASH article needs a specific set of element which comprends strong and em, but all browsers (without counting on IE) handle bold and italic instead. For this reason, inside the derash script, I added a function that convert a bold into strong.

In the first instance, RASH should not be a software, but a simple script that could be imported directly as script, granting users to edit and save directly using a common browser. Then, according to the impossibility of use FileWriter API from all browsers, I choose to use a technology that allowed that. Right now raje.js works on Chromium, because that everything inside the raje core is intended for it.

All issues listed above are based on the one idea that I always need to use contenteditable because it implements also undo and redo behaviours. Becuase if i broke the contenteditable changes buffer (e.g. if I used JQuery to add directly a strong element), I will not be able anymore to know the order of changes to revert or do again. On the Internet I have not find anything that would aid me, neither the APIs to access the undo buffer.

Another important problem (and well documented on Github) is about the need to insert a sibling element. This went out when I was developing for Chrome and Firefox, so I found a common solution for both. In particular if the user wants to add a new section below the current one (a sibling one) when he is in this situation, where the caret is at the end of the paragraph.

<section><h1>heading</h1><p><br/>[caret]</p></section>

Now, we probally want to add a new section after the current one, not inside. To do that we need to move the caret right at the end, because adding custom HTML need to call the method execCommand("insertHTML", false, string)​, and it will add the passed string where the caret is positioned. There is a function to do that and this is it caret.moveAfterNode(node)​.

Here is where the problem comes out, not if you are using Firefox. For Chrome users (and RAJE indeed), this will move the caret at the end of the element, not outside but inside instead.

<section><h1>heading</h1><p><br/></p>[caret]</section> //Chrome<section><h1>heading</h1><p><br/></p></section>[caret] //Firefox

​​With Chrome, after that, attaching the new section, will not add a sibling but a child instead. After few researches online, i foud out a special character: the Zero Space character i.e. "&#8203"​​. ​ Adding this after the current section, will be possible move the caret outside

<section><h1>heading</h1><p><br/></p></section>[caret]&#8203

The only one thing remained here is to sanitize the current section's parent element, and remove all plain text that is not wrapped in elements.

That was the contenteditable and some examples of what can be the compatibility issues.

Modules

Inside this section I will describe the third-part modules and packages that I used to easy up the usage of particular packages. Rangy is the most used one which comprends also two of its submodules, another one is Mousetrap that I used to handle the keyboard shortcuts.

Rangy

@TimDown's rangy is very popular, and it has also a active community (obviusly leaded by his founder Tim Down), on StackOverflow is a question of an enormus quantity of answers about contenteditable and selection management.

Every browser implements a naïve selection interface (Firefox is the only one that allows multiple selection  ), and for a wider spectrum of methods, I personally think that rangy grants a lot of useful operations. In a particular way, I used that to know where the caret is when is needed to know, or the caret position inside its parent. It can also allow to move the caret to start or the end of an element.

firefox3selecttext.gif

Multiline selection with Firefox.

Otherwise I imported also a submodule, that is rangy-selectionsaverestore. It can save the current caret position to be restored after. E.g. when the user wants to add an image inside the article, after clicking the button, a modal is shown. Is here where the editor needs to save the current selection, because next he probably change the focus to a button, a textbox or directly with a single click in anywhere else position. When he chose file and it is saved, RAJE will restore the selection to move the caret where it was before and then add the new image element.

The other subpackage is rangy-textrange, and can allows to move the caret ahead or behind of some characters. This behaviour is used to exit from inline elements. From inside a code element spaces are allowed, instead if you press enter you will exit from it (and the caret will be moved by a character to right).

Mousetrap and shortcuts

All the shortcuts are attached directly to the section#rashEditor​, because it have the mousetrap class, which is the one recognized by Mousetrap. This script is really easy yo use, is only about to connect somehow a character or a sequence of them.

As shown in   everythig is referred to a Mousetrap class, and only the function bind is called. The signature means that it accepts a string (that is the sequence to trigger the event) and a callback called when the event is triggered.

I used the same functions of the Mousetrap object to bind ctrl+b or cmd+b (the plus indicates that the two buttons need to be pressent at the same time) to handle the bold behaviour, handled in another script.

Mousetrap.bind('mod+b', function (event) {rashEditor.insertBold();return false;
});

mousetrap.png

​Mousetrap bind function.

The deploy phase

When RAJE was ready for the first release, and I looked up for some tutorials to deploy the application. 

First of all I changed the entire structure of the application in  ​. The business core is moved inside the new app folder, with his own package.json with all modules needed by the software itself. There is another package.json. It is used to create the distributions for the differents Operating Systems.

In  ​ we can find build and dist folders. Dist is where the distributions will be stored, build instead contains few relevant build assets like icons (in every needed format).

structure.png

​New structure ready to deploy.

Inside the node_modules folder in the root, which is the development one, there are electron-packager and electron-prebuilt packages. Inside the development package.json we can find out the deploy scripts "dist": "electron-packager ./app --all --out=./dist --overwrite"​.

According with this article, wrote on Electron ROCKS, electron-packager is a module that allows developers to package a software in more distributions for the OSs. For Unix systems is very simply. In particular way for MacOSx, which is the one that I used to develop, and Linux (this one needs the author written in the following schema: Name Surname <email>​ else will not be executed). Windows is another thing, it need Wine and Mono libraries (i.e. the open source counterpart of .NET libraries) installed inside the developer machine​.

Now is allowed package executables only typing the line npm run dist​.

 ​

Evaluation

Descrizione del tipo di test di cui andò a parlare (task based), e dell'obiettivo che è cogliere l'usabilità

Informazioni sul test:

task based test, do a qualcuno dei task da fare descritti, usando l'editor li fa. sono svariati task test.

si può prendere nota dei task che sono stati fatti, permette di estrapolare misure qualitative, cioè usabilità, più annotazioni nell'utilizzo dell'interfaccia.

DUT discount usability test (sarà di questo tipo) perchè si dice che nell'80% dei bug vengono colti semplicemente coinvolgendo pochi utenti (3-4). cercare l'immagine da aggiungere Norman NIelsen group. statisticamente rilevante.

task semplici e chiari: indagare su due cose: editor e integrazione con github.

esurve.org servizio gratis che userò che mette a disposione interfaccie per creare task. 


Backgroud 


paginazione dei task

p1 landing page descrizione + requisiti (utente github e progetto)

p2 backgrund knlowledgement 

p3 lista task

p4 sus

p5 gounded analys+ suggerimenti


formato e livello editor.

(ognuno e negli editor, stesura negli articoli scientifici e sistemi di controll di versione) ognuno di queste cose è un'affermazione

Definisco 3 mascro categorie di domande diverse background knowledgement

esperienza nei forrmati utilizzati (ODT, DOC(X) (Office format e Microsoft office format), HTML, LaTeX, XML. 

word, open office/ libreoffice, authorea, dokieli e fidus writer, latex wysiwyg editor, other text editors.

esperienza nello scrivere articoli scientifici per conferenze scientifici, sistemi di controllo di versione svn, git cvs, github.


task relativi uso editor per crare documento

documento di due paginette pdf da scaricare da preparare springer, task: riscrivilo. deve esserci di tutto all'interno.

1 pagina editor con paper, seconda pagina github


si svolge in 3 grandi momenti: 

  1. raccolta background knowledge esperienza

  2. svolgimento di task da parte dei tester

  3. A SUS (system usability scale) (10 affermazioni secche e definite, con cui rispondere storngly agree, agree, neutral ecc) soglia di 68 di Sauro. si inizia a parlare di usabilità del sistema quando il valore medio è superiore a 68. 
    B [usano sempre lo stesso format vedi Skype] ground analysis (4 domande: 2 positive e due negative) poi si fa uno studio particolare partendo dai testi classificandoli in due fasi. e.g. l'interfaccia mi è piaciuta molto ma l'editor delle formule mi è sembrato straodinario, ma non mi piaceva l'inseirmento dell'intgrale). si crea poi una tabella con due colonne con tantissime castegorie, poi vengono clusterizzarle per arrivare meno categorie.

Tests

Descrizione di come sono stati formati i test, 3 blocchi, quali erano i task

Profiling

Ogni tipo di informazione raccolta riguardo agli utenti che hanno effettuato il test (sia quelli che scrivono sia quelliche posso acquisire come informazioni sulle macchine utilizzate) importantissimo sistema operativo!

Results

Discussione dei risultati che sono stato ottenuti, sus (system usability scale) rapportato ad altri risultati

Suggestions

Sotto sezione basata sulle risposte ricevute dall'ultimo blocco del test, in particolare per quanto riguarda le informazioniche possono servire per redigere i test successivi su larga scala

Personal beta testing

In questa sezione scrivo riguardo alle issues che ho trovato e ho modificato durante la stesura della tesi, poichèho scritto il tutto con questo editor.


Conclusion and future developments

Conclusioni, aggiungere lo sviluppo dell'articolo scientifico successivamente

Descrizioni sugli sviluppi futuri: Annotazioni, visualizzazione del TOC, possibilità di gestire peer review e conferenze


References

  1. Using PDF files. (2009) http://www.siamcomm.com/website-design/using-pdf-files-pros-and-cons/

  2. Peroni, S. (2017). RASH: Research Articles in Simplified HTMLhttps://rawgit.com/essepuntato/rash/master/documentation/index.html

  3. GarrishM., Siegman T., Gylling M., McCarron S. (2016). Digital Publishing WAI-ARIA Module 1.0. W3C Working Draft, 17 March2016. World Wide Web Consortium. https://www.w3.org/TR/dpub-aria-1.0/

Tabella che mostra la compatibilità con le API FileWriter per levarie versioni di browser commerciali.