
User’s Guide for TurboVNC 1.1
This document and all associated illustrations are licensed under the Creative Commons Attribution 2.5 License. Any works that contain material derived from this document must cite The VirtualGL Project as the source of the material and list the current URL for the VirtualGL web site.
The TurboVNC Windows packages include PuTTY, which is released under this license.
TurboVNC is licensed under the GNU General Public License, v2.
TurboVNC is a derivative of VNC (Virtual Network Computing) that is tuned to provide peak performance for full-screen video and 3D workloads. TurboVNC is based on the TightVNC 1.3.x and xf4vnc code bases, and on the surface, it behaves similarly to its parents. However, TurboVNC compresses 3D and video workloads better than the “tightest” compression mode of TightVNC 1.3.x while using only typically 15-20% of the CPU time of the latter.
All VNC implementations, including TurboVNC, use the RFB (remote framebuffer) protocol to send “framebuffer updates” from the VNC server to any connected “viewers.” Each framebuffer update can contain multiple “rectangles” (regions that have changed since the last update.) As with TightVNC, TurboVNC analyzes each rectangle, splits it into multiple “subrectangles”, and attempts to encode each subrectangle using the “subencoding type” that will provide the most efficient compression, given the number of unique colors in the subrectangle. The process by which TurboVNC does this is referred to as an “encoding method.” A rectangle is first analyzed to determine if any significant portion of it is solid, and if so, that portion is encoded as a bounding box and a fill color (“Solid subencoding.”) Of the remaining subrectangles, those with only two colors are encoded as a 1-bit-per-pixel bitmap with a 2-color palette (“Mono subencoding”), those with low numbers of unique colors are encoded as a color palette and an indexed bitmap containing 8 index bits per pixel (“Indexed color subencoding”), and subrectangles with high numbers of unique colors are encoded using either JPEG or arrays of RGB pixels (“Raw subencoding”), depending on the encoding method. Zlib can optionally be used to compress the indexed color, mono and raw subrectangles.
Part of TurboVNC’s speedup comes from the use of libjpeg-turbo, the same high-speed SIMD-optimized JPEG codec used by VirtualGL. However, TurboVNC also eliminates the CPU-hungry smoothness detection routines that TightVNC uses to determine whether a subrectangle is a good candidate for JPEG compression, and TurboVNC’s encoding methods tend to favor the use of JPEG more, since it is now generally the fastest subencoding type. Furthermore, TurboVNC eliminates buffer copies, it maximizes network efficiency by splitting framebuffer updates into relatively large subrectangles, and it uses only the Zlib compression levels that can be shown to have a measurable performance benefit. TurboVNC can compress 3D and video workloads somewhat better and many times faster than any mode that TightVNC 1.3.x provided, and (using non-default settings) TurboVNC can also compress 2D workloads nearly as well as TightVNC while using only half of the CPU time.
TurboVNC is the product of extensive research, in which many different permutations of the TightVNC encoder were benchmarked at the low level against a variety of captured RFB sessions that simulated real-world application workloads, both 2D and 3D. For more information on the research leading to TurboVNC’s encoder design, see this report.
In addition to high performance, other notable features of TurboVNC include:
TurboVNC, when used with VirtualGL, provides a highly performant and robust solution for remotely displaying 3D applications over all types of networks.
TurboVNC is capable of sending 50+ Megapixels/second of image data over a 100 Megabit/second local area network with perceptually lossless image quality. TurboVNC can deliver between 10 and 12 Megapixels/second of image data over a 5 Megabit/second broadband connection at reduced (but usable) image quality.
TurboVNC is compatible with other VNC distributions. See Chapter 9 for more information. TurboVNC can be installed onto the same system as other VNC distributions without interference.
| Server (x86) | Server (x86-64) | Client | |
|---|---|---|---|
| Recommended CPU | Pentium 4, 1.7 GHz or faster (or equivalent)
|
Pentium 4/Xeon with EM64T, or… AMD Opteron or Athlon64, 1.8 GHz or faster
|
Pentium III or Pentium 4, 1.0 GHz or faster (or equivalent) |
| Other Software | X server configured to export True Color (24-bit or 32-bit) visuals |
| Client | |
|---|---|
| Recommended CPU | Any Intel-based Mac |
| O/S | OS X 10.4 (“Tiger”) or later |
| Other Software | Mac X11 application (in the “Optional Installs” package on the OS X install discs) |
| Client | |
|---|---|
| Recommended CPU | Pentium III or Pentium 4, 1.0 GHz or faster (or equivalent) |
| O/S | Windows 2000 or later |
| Other | For best performance, client display should have a 24-bit or 32-bit (True Color) color depth. |
On some Linux distributions, most notably Fedora 10 and later, the basic
X11 bitmap fonts are not installed by default. Thus, it is necessary to
install the xorg-x11-fonts-misc package on these
distributions prior to starting a TurboVNC session for the first time.
Otherwise, TurboVNC will fail with the following error:
Fatal server error:
could not open default font 'fixed'
rpm -U turbovnc*.rpm
dpkg -i turbovnc*.deb
TurboVNC-{version}.dmg)
from the
Files
area of the
VirtualGL
SourceForge project page.
TurboVNC-{version}.pkg
inside the disk image. Follow the instructions to install the Mac
client.
TurboVNC-{version}.exe
for 32-bit systems or
TurboVNC64-{version}.exe
for 64-bit systems) from the
Files
area of the
VirtualGL
SourceForge project page.
If you are using a Unix platform for which there is not a pre-built
TurboVNC binary package available, then log in as root, download the
TurboVNC source tarball
(turbovnc-{version}.tar.gz)
from the
Files
area of the
VirtualGL
SourceForge project page, uncompress
it, cd vnc/unix, and read BUILDING.txt
for further instructions on how to build TurboVNC from source.
As root, issue one of the following commands:
rpm -e turbovnc
dpkg -r turbovnc
Use the “Uninstall TurboVNC” application provided in the TurboVNC disk image, or issue the following command from the Terminal:
sudo /opt/TurboVNC/bin/uninstall
Use the “Programs and Features” applet in the Control Panel (or the “Add or Remove Programs” applet if you are running Windows XP), or “Uninstall TurboVNC” in the “TurboVNC” Start Menu group.
ssh {user}@{server}
"c:\program files\turbovnc\putty" {user}@{server}
Replace {user} with your user account name on the
TurboVNC server machine and {server} with the
hostname or IP address of that machine.
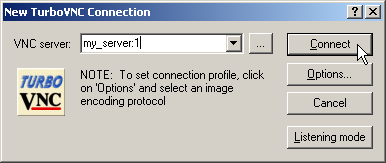
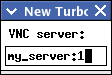
/opt/TurboVNC/bin/vncserver
New 'X' desktop is my_server:1
/opt/TurboVNC/bin/vncviewer
| Windows TurboVNC Viewer | Linux/Unix/Mac TurboVNC Viewer |
|---|---|
 |
 |
| Windows TurboVNC Viewer | Linux/Unix/Mac TurboVNC Viewer | |
|---|---|---|
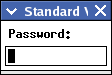
| Standard VNC Authentication Dialog | 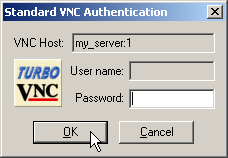 |
 |
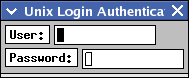
| Unix Login Authentication Dialog | 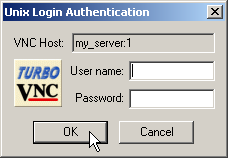 |
 |
Closing the TurboVNC Viewer disconnects from the TurboVNC session, but the TurboVNC session will remain running on the TurboVNC server machine (as will any applications that you may have started in the session), and you can reconnect to the session at any time.
To kill a TurboVNC session:
c:\Program Files\TurboVNC\putty.exe on
Windows clients), log into the server that is running the TurboVNC
session that you wish to kill.
/opt/TurboVNC/bin/vncserver -kill :{n}
Replace {n} with the X display number of the
TurboVNC session you wish to kill.
To list the X display numbers and process ID’s of all TurboVNC sessions that are currently running under your user account on a particular machine, type the following command:
/opt/TurboVNC/bin/vncserver -list
When a TurboVNC session is created, it automatically launches a miniature web server that serves up a Java TurboVNC Viewer applet. This Java TurboVNC Viewer can be used to connect to the TurboVNC session from a machine that does not have a native TurboVNC Viewer installed (or a machine for which no native TurboVNC Viewer is available.) The Java viewer is significantly slower than the native viewer on high-speed networks, but on low-speed networks the Java viewer and native viewers have comparable performance.
To use the Java TurboVNC Viewer, point your web browser to:
http://{turbovnc_server}:{5800+n}
where {turbovnc_server} is the hostname or IP
address of the TurboVNC server machine, and n is
the X display number of the TurboVNC session to which you want to
connect.
Example: If the TurboVNC session is occupying X display
my_server:1, then point your web browser to:
http://my_server:5801
The level of image compression in TurboVNC can be adjusted to balance the (sometimes conflicting) goals of high image quality and high performance. There are four options that control the manner in which TurboVNC compresses images:
In the Windows TurboVNC Viewer, these parameters can be adjusted by accessing the Options dialog box (click on the “Options” button in the “TurboVNC Connection” dialog box or, after connecting to the server, click on the Connection Options button in the toolbar.) In the Unix TurboVNC Viewer, press F8 after connecting to bring up the options menu. In the Java viewer, click on the Options button at the top of the viewer window.
The TurboVNC Viewer provides five “encoding methods”, corresponding to the most useful combinations of the image compression options described above:
| Encoding method | Allow JPEG | JPEG image quality | JPEG chrominance subsampling | Zlib compression level | Notes |
|---|---|---|---|---|---|
| “Tight + Perceptually Lossless JPEG” | Yes | 95 | 1x | N/A | This encoding method should be perceptually lossless (that is, any image compression artifacts it produces should be imperceptible to the human eye under most viewing conditions.) This encoding method requires a great deal of network bandwidth, however, and is generally not recommended except on 50 Megabit/second and faster networks. |
| “Tight + Medium Quality JPEG” | Yes | 80 | 2x | N/A | For subrectangles with a high number of unique colors, this encoding method produces some minor, but generally not very noticeable, image compression artifacts. All else being equal, this encoding method typically uses about twice the network bandwidth of the “Tight + Low Quality JPEG” encoding method and about half the bandwidth of the “Tight + Perceptually Lossless JPEG” encoding method, making it appropriate for medium-speed networks such as 10 Megabit Ethernet. |
| “Tight + Low Quality JPEG” | Yes | 30 | 4x | N/A | For subrectangles with a high number of unique colors, this encoding method produces very noticeable image compression artifacts. However, it performs optimally on low-bandwidth connections. If image quality is more critical than performance, then use one of the other encoding methods or take advantage of the Lossless Refresh feature. |
| “Lossless Tight” | No | N/A | N/A | 0 | This encoding method uses indexed color subencoding for subrectangles with a low number of unique colors but otherwise does not perform any image compression at all. It is thus suitable only for gigabit and faster networks. This encoding method uses significantly less CPU time than any of the JPEG-based encoding methods. |
| “Lossless Tight + Zlib” | No | N/A | N/A | 1 | This encoding method uses indexed color subencoding for subrectangles with a low number of unique colors and raw subencoding for subrectangles with a high number of unique colors. It compresses all subrectangles using Zlib with compression level 1. For certain types of low-color workloads (CAD applications, in particular), this encoding method may use less network bandwidth than the “Tight + Perceptually Lossless JPEG” encoding method, but it also uses significantly more CPU time than any of the JPEG-based encoding methods. |
In the Windows TurboVNC Viewer, the encoding method can be set using the Options dialog box (click on the “Options” button in the “TurboVNC Connection” dialog box or, after connecting to the server, click on the Connection Options button in the toolbar.) In the Java viewer, the same thing is accomplished by clicking on the “Options” button at the top of the browser window. With the Linux/Unix/Mac TurboVNC Viewer, the “Perceptually Lossless” encoding method is the default, and you can use the following command-line switches to select another encoding method:
-medqual = select the “Tight + Medium Quality
JPEG” encoding method
-lowqual = select the
“Tight + Low Quality JPEG” encoding method
-lossless = select the “Lossless Tight”
encoding method
-losslesswan = select the
“Lossless Tight + Zlib” encoding method
You can also press the F8 key after connecting to pop up a menu from which you can select a different encoding method.
Since both of TurboVNC’s mathematically lossless encoding methods have performance drawbacks, another option for image-quality-critical applications is the “Lossless Refresh” feature. When a lossless refresh is requested by a TurboVNC viewer, the server will send a mathematically lossless image of the current TurboVNC desktop to the requesting viewer. So, for instance, a user can rotate/pan/zoom an object in their 3D application using a very low-quality JPEG setting, then when that user is ready to interpret or analyze the object, they can request a lossless refresh of TurboVNC’s virtual screen.
To perform a lossless refresh in the Windows or Unix TurboVNC Viewers, press CTRL-ALT-SHIFT-L (in the Windows TurboVNC Viewer, you can also click on the Lossless Refresh toolbar icon.) In the Java TurboVNC Viewer, click on the “Lossless Refresh” button at the top of the viewer window.
Passing an argument of
-alr {timeout} to
vncserver will enable the automatic lossless refresh (ALR)
feature for the TurboVNC session. ALR will monitor all of the VNC
viewer connections, and if more than {timeout}
seconds have elapsed since the last framebuffer update was sent to a
given viewer, then the TurboVNC Server will send to that viewer a
mathematically lossless copy of screen regions that have been affected
by lossy compression. You can also pass arguments of
-alrqual and -alrsamp to
vncserver to specify that automatic lossless refreshes
should be sent using JPEG instead (see the Xvnc man page
for details.)
The ALR feature is designed mainly for use by interactive visualization applications. The idea is that, on a low-bandwidth connection, low-quality JPEG can be used while the user is rotating/panning/zooming a 3D scene, but when the user stops manipulating the scene, then a fully lossless copy of the 3D image is sent for them to study in detail.
The default ALR behavior is to monitor and send lossless copies of only
the screen regions that were drawn using X[Shm]PutImage().
When used with VirtualGL, this means that ALRs will mainly be sent for
just the 3D screen regions. This should be fine for most 3D
applications, since the 3D regions are the ones that are
quality-critical. The default ALR behavior also prevents what might
best be termed the “blinking cursor dilemma.” Certain
ill-behaved window managers update a small region of the taskbar
continuously, even though none of the pixels in that region have
changed. Also, certain programs have a blinking cursor that may update
more frequently than the ALR timeout. Since an ALR is triggered based
on a period of inactivity relative to the last framebuffer update, these
continuous updates prevent an ALR from ever being sent. Fortunately,
these ill-behaved window managers and blinking cursors do not typically
use X[Shm]PutImage() to perform their continuous updates,
so the problem can be worked around by limiting the regions that are
“eligible” for ALR to just the subset of regions that were
drawn with the X[Shm]PutImage() functions.
You can override the default ALR behavior, thus making all screen
regions eligible for ALR, by setting the TVNC_ALRALL
environment variable to 1 on the TurboVNC server machine
prior to starting a TurboVNC session.
Normally, the connection between the TurboVNC Server and the TurboVNC Viewer is completely unencrypted, but securing that connection can be easily accomplished by using the port forwarding feature of Secure Shell (SSH.) After you have started a TurboVNC session on the TurboVNC server machine, open a new SSH connection into the TurboVNC server machine using the following command line:
ssh -L {5900+n}:localhost:{5900+n} {user}@{server}
"c:\program files\turbovnc\putty" -L {5900+n}:localhost:{5900+n} {user}@{server}
Replace {user} with your user account name on the
TurboVNC server machine and {server} with the
hostname or IP address of that machine. Replace n
with the X display number of the TurboVNC session to which you want to
connect.
For instance, if you wish to connect to display :1 on
server my_server using user account my_user,
you would type:
ssh -L 5901:localhost:5901 my_user@my_server
"c:\program files\turbovnc\putty" -L 5901:localhost:5901 my_user@my_server
After the SSH connection has been established, you can then launch the
TurboVNC Viewer and point it to
localhost:{n}
(localhost:1 in the above example.)
-via Command-Line OptionIf you are using the Unix/Linux TurboVNC Viewer, then you can simplify
the above by using the -via command-line option to
vncviewer. For instance, running
/opt/TurboVNC/bin/vncviewer -via {user}@{server} localhost:{n}
is the equivalent of running
/usr/bin/ssh -L {5900+n}:localhost:{5900+n} {user}@{server}
/opt/TurboVNC/bin/vncviewer localhost:{n}
The command used to establish the SSH tunnel is configurable by way of
environment variables. See the vncviewer man page for more
details.
Passing an argument of -localhost to vncserver
will force the TurboVNC Server session to accept inbound connections
only from the server machine. This effectively forces SSH tunneling to
be used for remote connections. If the
no-remote-connections directive is set in the TurboVNC
authentication configuration file, then that has the effect of enabling
the -localhost option for all new TurboVNC sessions that
are started on the machine.
Passing an argument of -noreverse to vncserver
will disable the ability to make outbound (reverse) connections from the
TurboVNC Server session. If the no-reverse-connections
directive is set in the TurboVNC authentication configuration file, then
that has the effect of enabling the -noreverse option for
all new TurboVNC sessions that are started on the machine.
For LAN connections and other high-speed networks, tunneling the TurboVNC connection over SSH will reduce performance by as much as 20-40%. For wide-area networks, however, there is no performance penalty for using SSH tunneling with TurboVNC.
For more detailed instructions on the usage of TurboVNC:
man -M /opt/TurboVNC/man {vncserver | Xvnc | vncviewer | vncconnect | vncpasswd}
The TurboVNC Server supports four “authentication methods”, which are used to validate authentication credentials sent from a VNC viewer:
vncpasswd, a unique password is generated “on
the fly” for the TurboVNC session and is printed on the
server’s command line (see the man page for
vncpasswd for more details.) The user enters this
password in the VNC viewer as if it were a VNC password, and the viewer
sends the OTP using the “Standard VNC” authentication
scheme (see below.) However, once the OTP has been used once to
authenticate a viewer, it is forgotten and cannot be reused. OTP
authentication can be used, for instance, to launch or connect to
TurboVNC sessions from an automated web portal or from a job scheduler.
OTP authentication is also useful for allowing temporary access to a
TurboVNC session for collaboration purposes.
The TurboVNC Viewer supports three “authentication schemes”, which are protocols used to validate authentication credentials with a VNC server:
The default behavior of the TurboVNC Server is for all authentication
methods to be enabled and for VNC password authentication and OTP to be
preferred over PAM user/password authentication. However, the system
administrator can disable one or more of the authentication methods or
set the preferred order of the authentication methods by editing the
server’s authentication configuration file. See the
Xvnc man page for more details.
If the server allows multiple authentication methods that support
multiple authentication schemes, then the client’s default
authentication scheme will be determined by the preferred authentication
method on the server. In this case, the user can override the default
by passing command-line arguments to vncviewer. If the
server prefers an authentication method that supports standard VNC
authentication, then the user can force the use of Unix login
authentication by passing an argument of
-user {user_name} to
vncviewer when connecting to the TurboVNC session.
Similarly, if the server prefers an authentication method that supports
Unix login authentication, then the user can force the use of standard
VNC authentication by passing an argument of -nounixlogin
to vncviewer. Both of these command-line options work with
both the Unix and Windows versions of vncviewer. Note that
if using the Java TurboVNC Viewer, the same thing can be accomplished by
setting the USER parameter or setting the
No Unix Login parameter to Yes in
/opt/TurboVNC/vnc/classes/index.vnc.
Because of the way that the Windows TurboVNC Viewer caches settings for each connection, the -user and -nounixlogin options may not work properly unless you also specify the connection name on the command line (example: vncviewer -nounixlogin my_server:1).
If the system administrator has not restricted any of the authentication
methods on a system-wide basis, then the user can choose to disable some
or all of them for a single TurboVNC session by passing command-line
arguments to vncserver. See the vncserver man
page for more details.
For more detailed information about the TurboVNC authentication extensions, refer to the TurboVNC man pages:
man -M /opt/TurboVNC/man {vncserver | Xvnc | vncviewer | vncpasswd}
The TurboVNC Server can use multiple threads to perform image encoding and compression, thus allowing it to take advantage of multi-core or multi-processor systems. The server splits the screen vertically into N tiles, where N is the number of threads, and assigns each tile to a separate thread. The scalability of this algorithm is nearly linear when used with demanding 3D or video applications that fill most of the screen. However, whether or not multithreading improves the overall performance of TurboVNC depends largely on the performance of the client and the network. If either the client or the network are the primary performance bottlenecks, then multithreading the server will not help. It will almost certainly have no effect on networks slower than 100 Megabit Ethernet or when using the Java TurboVNC Viewer.
To enable server-side multithreading, set the TVNC_MT
environment variable to 1 on the server prior to starting
vncserver. The default behavior is to use as many threads
as there are cores on the server machine, but you can set the
TVNC_NTHREADS environment variable to override this.
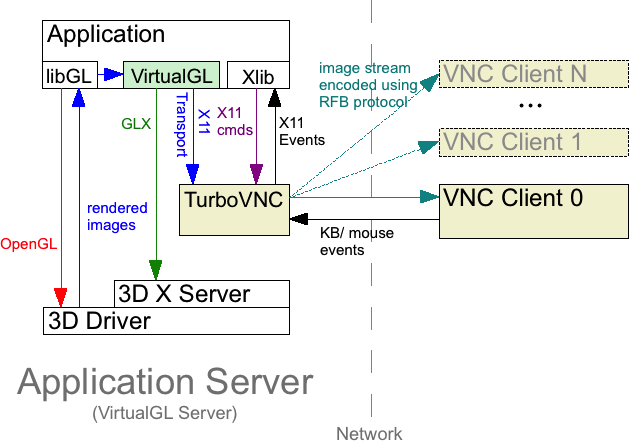
Referring to the VirtualGL User’s Guide, VirtualGL’s X11 Transport draws 3D images onto an X display using standard X11 drawing commands. Since this results in the images being sent uncompressed to the X server, the X11 Transport is designed to be used with an “X Proxy.” An X proxy acts as a virtual X server, receiving X11 commands from the application (and from VirtualGL), rendering the X11 commands into images, compressing the resulting images, and sending the compressed images over the network to a client or clients.
Since VirtualGL is sending rendered 3D images to the X proxy at a very fast rate, the proxy must be able to compress the images very quickly in order to keep up. Unfortunately, however, most X proxies can’t. They simply aren’t designed to compress, with any degree of performance, the large and complex images generated by 3D applications.
Enter TurboVNC. Although TurboVNC can be used with all types of applications, it was initially designed as a fast X proxy for VirtualGL. TurboVNC provides an alternate means of delivering rendered 3D images from VirtualGL to a client machine without using VirtualGL’s embedded VGL Transport.
The most common (and optimal) way to use TurboVNC is to set it up on the same server that is running VirtualGL. This allows VirtualGL to send its rendered 3D images to TurboVNC through shared memory rather than sending them over a network.
The following procedure describes how to launch a 3D application using this configuration.
/opt/VirtualGL/bin/vglrun [vglrun options] {application_executable_or_script} {arguments}
The TurboVNC startup script sets the VGL_COMPRESS
environment variable to 0, which will automatically enable
the X11 Transport within VirtualGL.

If TurboVNC and VirtualGL are running on different servers, then it is desirable to use the VGL Transport to send images from the VirtualGL server to the TurboVNC server. It is also desirable to disable image compression in the VGL Transport. Otherwise, the images would have to be compressed by the VirtualGL server, decompressed by the VirtualGL Client, then recompressed by the TurboVNC Server, which is a waste of CPU resources. However, sending images uncompressed over a network requires a fast network (generally, Gigabit Ethernet or faster), so there needs to be a fast link between the VirtualGL server and the TurboVNC server for this procedure to perform well.
/opt/VirtualGL/bin/vglconnect {user}@{server}
Replace {user} with your user account name on the
VirtualGL server and {server} with the hostname or
IP address of that server. Refer to the VirtualGL User’s Guide
for additional vglconnect options.
VGL_COMPRESS environment
variable to rgb
Passing an argument of -c rgb to vglrun achieves the same effect.
/opt/VirtualGL/bin/vglrun [vglrun options] {application_executable_or_script} {arguments}
In order to realize the full performance benefits of TurboVNC, it is necessary to use a TurboVNC server and a TurboVNC viewer in concert. However, TurboVNC is fully compatible with TigerVNC, TightVNC, RealVNC, and other VNC flavors. You can use the TurboVNC Viewer to connect to a non-TurboVNC server (or vice versa), although this will generally result in some decrease in performance.
The following sections list additional things to bear in mind when mixing TurboVNC with other VNC flavors.
| JPEG quality level | 0 | 1 | 2 | 3 | 4 | 5 | 6 | 7 | 8 | 9 |
|---|---|---|---|---|---|---|---|---|---|---|
| Actual JPEG quality | 5 | 10 | 15 | 25 | 37 | 50 | 60 | 70 | 75 | 80 |
| Actual YUV subsampling | 2X | 2X | 2X | 2X | 2X | 2X | 2X | 2X | 2X | 2X |
| JPEG quality level | 0 | 1 | 2 | 3 | 4 | 5 | 6 | 7 | 8 | 9 |
|---|---|---|---|---|---|---|---|---|---|---|
| Actual JPEG quality | 15 | 29 | 41 | 42 | 62 | 77 | 79 | 86 | 92 | 100 |
| Actual YUV subsampling | 4X | 4X | 4X | 2X | 2X | 2X | 1X | 1X | 1X | 1X |
| Average compression ratio * | 100 | 80 | 70 | 60 | 50 | 40 | 30 | 25 | 20 | 10 |
* Experimentally determined by compressing every 10th frame in the SPECviewperf 9 benchmark suite
The TurboVNC Viewer supports the Hextile and Raw encoding types, which
are compatible with RealVNC. Neither of these encoding types can be
selected from the TurboVNC Viewer GUI, but Hextile will be selected
automatically when connecting to a RealVNC server. Raw will be
automatically selected when connecting to a VNC server running on the
same machine as the viewer. Both Raw and Hextile can also be manually
selected from the vncviewer command line. The TurboVNC
Server additionally supports the CoRRE, RRE, Zlib, and ZRLE encoding
types, for compatibility with RealVNC viewers.
The Raw encoding type can perform well on gigabit links, if you can spare the bandwidth. Hextile, however, uses very small tiles, which causes it to incur a large amount of computational overhead. It compresses too poorly to perform well on slow links but uses too much CPU time to perform well on fast links. Thus, neither Raw nor Hextile should be used unless absolutely necessary. One interesting note, however, is that many of the TurboVNC viewer enhancements (including optimized blitting, hiding network latency, and double buffering) are available even when using these legacy encoding types.
| Environment Variable | TVNC_ALRALL = 0 | 1 |
| Summary | Disable/Enable automatic lossless refresh for regions that were drawn using methods other than X[Shm]PutImage() |
| Platforms | Unix |
| Default Value | Disabled |
| Environment Variable | TVNC_MT = 0 | 1 |
| Summary | Disable/Enable multithreaded image encoding |
| Platforms | Unix |
| Default Value | Disabled |
| Environment Variable | VGL_NTHREADS = {n} |
| Summary | Use {n} threads to perform image encoding |
| Platforms | Unix |
| Default Value | {n} = the number of CPU cores in the system |
| Environment Variable | TVNC_PROFILE = 0 | 1 |
| Summary | Disable/enable profiling output |
| Platforms | Unix |
| Default Value | Disabled |
| Environment Variable | TVNC_PROFILE = 0 | 1 |
| Summary | Disable/enable profiling output |
| Platforms | Unix |
| Default Value | Disabled |